Chicken cutlets ready for any night of the week

parmesanchicken1

Growing up, my family ate a lot of chicken. Mom would make Jamaican jerk chicken, lemon chicken and everything in between. My brother and I went through a phase where we complained any time it was put in front of us. “Again?” we’d ask. But mom likes chicken, and still does. Like most moms, she wanted to put something good in front of us and tried to mix it up once in a while.

I was searching for good make-ahead dinners when I saw this recipe in the March edition of Bon Appétit. I had once made Parmesan chicken and wasn’t terribly impressed by the recipe I used. This one, however, looked easy enough to put together and sounded like it would have a nice crust.

parmesanchicken2
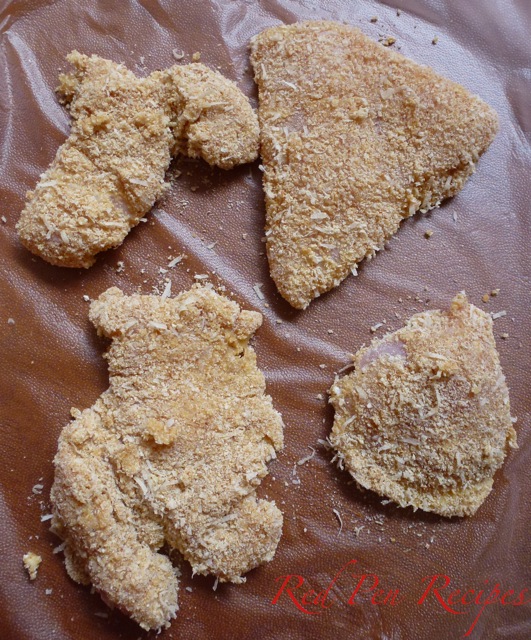
The panko and Parmigiano-Reggiano combination lends itself to a well-made crust that is packed with flavor. If you don’t have panko, regular breadcrumbs will do, though the finished cutlets won’t have as much of a crunch to them.

These freeze surprisingly well. I portioned them and kept some in the freezer for about two months. I was worried the breadcrumb mixture would turn soggy once they were defrosted, but they didn’t. They are ideal for weeknight meals. If you take them out of the freezer and let them defrost in the fridge, they will be ready to go by the time you return home. It was nice to come home during a busy work week and have something ready to toss in a pan.

This post is dedicated to moms such as mine, who work to put dinner on the table night after night, with or without thanks. Happy Mother’s Day.

parmesanchicken3Ingredients
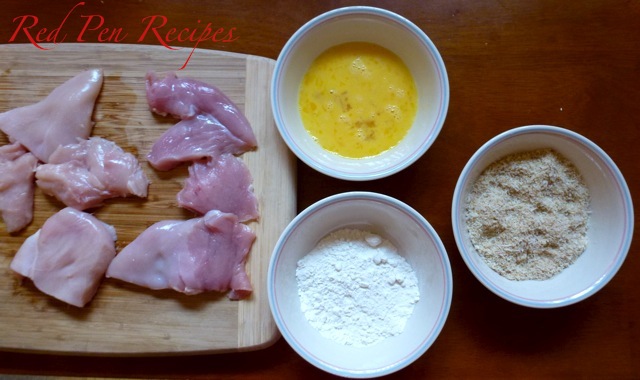
3/4 cup all-purpose flour
2 large eggs
1 1/2 cups panko (Japanese breadcrumbs)
1/4 cup grated Parmigiano Reggiano
1 tablespoon mustard powder
Kosher salt, freshly ground pepper
4 small skinless, boneless chicken cutlets (about 1 1/2 pounds total), pounded to 1/4-inch thickness
8 tablespoons olive oil, divided
1 lemon, halved

Place flour in a shallow bowl. Beat eggs in a second shallow bowl. Combine panko, Parmesan, and mustard powder in a third shallow bowl and season mixture with salt and pepper.

Season chicken with salt and pepper, then dredge in flour, shaking off any excess. Transfer to bowl with beaten egg and turn to coat. Lift from bowl, allowing excess to drip back into bowl. Coat with panko mixture, pressing to adhere.

Chicken can be breaded 3 months in advance. Place between pieces of freezer paper or waxed paper and freeze in resealable freezer bags. Thaw before continuing.

Heat 6 tablespoons oil in a large heavy skillet or a cast-iron skillet over medium-high heat. Working in two batches, cook cutlets, adding remaining 2 tablespoons oil to pan between batches, until golden brown and cooked through, about 4 minutes per side. Transfer cutlets to a paper towel-lined plate and season with salt. Serve with lemon.

Potato salad fit for summer

potatosalad

The warmer weather in Tahoe has me thinking about being outside — and the food that comes with it.

Summer is a time for barbecues and picnics, and potato salad is one of the first dishes that comes to mind when I think of eating outside.

Champagne vinegar and dijon mustard are the dominate flavors in this version of the dish. The first time I used champagne vinegar in potato salad was after watching an episode of the Barefoot Contessa in which Ina Garten made this French Potato Salad. I hadn’t considered the combination before, but it has since become my go-to ingredient.

The recipe below is based on Garten’s recipe. I didn’t have all of the ingredients her recipe called for, so I improvised. If you’re looking for an alternative to your mom’s potato salad recipe, this is a great option.

Ingredients
1 1/2 pounds baby gold Yukon potatoes
3 tablespoons champagne vinegar
3 tablespoons chicken broth
2 tablespoons mayonnaise
1/2 teaspoon dijon mustard
10 leaves of spinach or basil, ripped into small pieces
A small bunch of chives, cut into small pieces
Dash of salt
Dash each of garlic powder, onion powder

Boil the potatoes in a pot of water for 20-30 minutes, or until tender when pierced with a fork. Drain pot. Let potatoes cool for about 10 minutes. Cut into quarters and place in a medium bowl. Add vinegar and chicken broth. Toss gently and let sit until the potatoes have soaked up the liquid.

Once the liquid has been absorbed, add the mayonnaise, dijon mustard, chives and spinach or basil. Mix and add salt and spices to taste. Refrigerate until ready to serve.

Dreaming of summertime

strawberryshortcake1

When I went home for a visit a couple weeks ago, I was delighted to see the farm stands were already offering strawberries. I bought a box of them — six baskets for $6 — and ate a bowl of them daily for about a week once I returned to Tahoe. Still, I had about three baskets that needed to be baked into something to keep them from going bad. Good strawberries can’t be left to waste. I settled on strawberry shortcake, something I don’t make often, but enjoy quite a bit when it turns out just right.

I have never been crazy about those packaged shortcakes sold near the strawberries at the grocery store — the spongey ones that have somewhat of a dip at the top for the strawberries to sit in. I hadn’t made my own biscuits in a long time, so I turned to the Joy of Cooking to see what it suggested. It had a couple options, but I settled on cream biscuits this time around. They were, by far, the best ones I had ever made for strawberry shortcake. I am not big on rolling out dough; I prefer to shape it with my hands when I can. I divided the dough into eight pieces and formed them into rounds on a baking sheet. You may also roll out the dough and divide it into more pieces if you’d like. The biscuits were easy and the flavor and texture were just how I hoped they would be. Topped with the macerated strawberries (I added some of Penzeys Vanilla Sugar to the mixture for a bit of extra flavor) and whipped cream, this was the dessert I was craving. I was thrilled. Summer will be here soon enough.

Ingredientsstrawberryshortcake3
4 cups strawberries
1/4 cup sugar
1 1/2 cups heavy whipping cream
2 cups all-purpose flour
2 1/2 teaspoons baking powder (use 2 if at high altitude)
1/2 to 2/3 teaspoon salt (use one teaspoon if at high altitude)
1 1/4 cups heavy whipping cream

Rinse and quarter the strawberries. Using a potato masher or other tool, partially crush the strawberries. Put them in a bowl with the sugar. Set in fridge.

strawberryshortcake4Preheat the oven to 450 degrees F. Whisk together flour, baking powder and salt. Add 1 1/2 cups heavy whipping cream. Mix with a rubber spatula, wooden spoon or fork until most of the dry ingredients are moistened. Knead until smooth. Divide the dough into eight parts. Shape into 3-inch rounds that are about 3/4-inch thick. Place on a baking sheet with a sheet of parchment paper. Bake for 12 minutes or until slightly browned. Remove from oven and let cool for 15-20 minutes.

Whip the 1 1/4 cups heavy whipping cream until soft peaks form.

To assemble, cut the biscuits in half so there’s a top and bottom. Spoon generous spoonfuls of the strawberry mixture onto the bottom half of the biscuit. Top with a large dollop of whipped cream. Top with the other half biscuit.

Whipping up dessert in a hurry

banoffeepie4

Every time one of my staff members celebrates a birthday, I bring in a baked good just for them, something they don’t have to share with anyone else. When one of my staff members celebrated her birthday Friday and I knew I didn’t have a ton of time to make and decorate a cake, I instead chose to make a Banoffee Pie.

I first made a Banoffee Pie years ago after seeing Curtis Stone make one on “Take Home Chef.” It looked easy and I was pleased that I found it just as simple to make at home. The pie gets its name because it uses bananas and toffee. Making the toffee sauce is the only part that really takes much effort — and it doesn’t take much if you follow the instructions. The pie is framed by a simple graham cracker crust, filled with a base layer of toffee sauce, then topped with whipped cream with bananas folded into it. The rest of the toffee sauce is drizzled on top. It’s easy as, well, pie.

The nice thing about this recipe is that you get a lot more flavor than you might expect. When I first made it, I was worried about getting a mouthful of whipped cream, but the sliced bananas that are folded into it keep that from happening, and the toffee sauce on the top and bottom add a certain richness to it.

For the record, let me say that this is not a banana cream pie. There are bananas and cream, but they are not blended together as they are in the traditional desert.

Another plus is that you can do this in parts if you’re strapped for time. I made the crust and toffee sauce the night before, then made the whipped cream-and-banana filling the day of so it would be as fresh as possible.

This is a great option if you’re short on time and want to serve a light, flavorful dessert. It was a big hit with the birthday girl.

Ingredientsbanoffeepie1
9 ounces graham crackers, crushed

1 stick butter, melted
1/2 cup (packed) dark brown sugar
1 14-ounce  can sweetened condensed milk

1 stick butter
1 1/4 cups heavy cream
5 small ripe bananas (about 1 1/2 pounds)

Line the bottom of a 9-inch springform pan with parchment paper.

Chop the graham crackers in a food processor until they are finely ground.

Pour the melted butter over the crumbs and process to blend well. The crumbs should stick together when pressed.

Press the crumb mixture over the bottom and 1 1/2 inches up the sides of the springform pan. Refrigerate.

To make the toffee sauce, place a heavy medium saucepan over medium heat. Combine the sugar and 3 tablespoons of water in a medium heavy saucepan. banoffeepie3

Stir over medium heat until the sugar dissolves. Increase the heat and boil without stirring until the color is deep amber, occasionally swirling the pan and brushing down the sides with a pastry brush dipped into water, about 5 minutes.

Stir in the condensed milk and butter. Continue stirring for 5 minutes or until the sauce thickens slightly.

Remove the toffee sauce from the heat and spread 1 cup of the sauce over the prepared crust and refrigerate for about 1 hour or until the toffee is semi-firm. This can be refrigerated overnight if you prefer to prepare the rest on the day it will be served.

Keep the remaining toffee sauce at room temperature.

Using an electric mixer, beat the cream in a large bowl until thick and very soft billowy peaks form.

Very thinly slice three of the bananas into discs.

Fold the sliced bananas into the softly whipped cream and spoon into the prepared pie crust.

Slice the remaining bananas and arrange them decoratively over the pie.

Re-warm the remaining toffee sauce gently over low heat.

Drizzle some of the sauce decoratively over the pie. If the sauce has thickened too much to drizzle, stir a few tablespoons of milk into the sauce to create a thinner consistency.

Cut the pie into wedges and transfer to plates.

Drizzle each pie wedge with more sauce and serve.

Just add chocolate for a more decadent muffin

doublechocolatemuffins1

I was craving chocolate last week. When I started thinking about what I should bake, those giant chocolate muffins from Costco came to mind. Except I didn’t want a muffin the size of my hand. I wanted little noshes I could keep on hand for a little while. Because “The Joy of Cooking” has my go-to muffin recipe, I thought I’d see what I could find in the way of chocolate muffins.

Baked goods with melted chocolate can be difficult to make at high altitude. In my experience in the year I’ve been here, I’ve found such treats are one of the most susceptible to collapsing during the baking process. I’ve had the outside cook and crisp before the inside fully cooks. I’ve also had the centers cave in. It has been a learning process. doublechocolatemuffins2

I couldn’t have asked for these to turn out any better than they did. The batter had a slightly stiff quality to it, which ultimately seemed to help them turn out well. I’ve also learned to spray the paper muffin cups with cooking spray so the muffins won’t stick to them. These are a decadent muffin that can either be a rich breakfast or a dessert for later in the day. Next time I’m craving chocolate muffins, this will be my go-to. No more searching for a better recipe.

Ingredients
2 ounces unsweetened chocolate
1 3/4 cups all-purpose flour
1 teaspoon baking soda (use 1/2 teaspoon if at high altitude)
1/4 teaspoon salt
1 cup buttermilk
1 teaspoon vanilla
1/2 cup (1 stick) butter, softened
1 cup packed light brown sugar
1 egg
1 cup chocolate chips

Melt chocolate and let cool.

Whisk flour, baking soda and salt together in a separate bowl. Set aside.

Combine buttermilk and vanilla in a small bowl. Set aside.

Beat butter in a large bowl until creamy. Gradually add and beat in brown sugar until lightened in color and texture, 4 to 5 minutes. Add egg and beat until mixed. Beat in the chocolate just until blended. Add the flour mixture in three parts, alternating with the buttermilk mixture in two parts, beating on low speed or stirring with a rubber spatula until smooth and scraping the sides of the bowl as necessary.

Stir in chocolate chips. Divide the batter among the muffin cups. Bake until a toothpick inserted in 1 or 2 of the muffins comes out clean, 25 to 30 minutes. Let cool for 2 to 3 minutes in the pan before removing to cool completely on a rack.