Curious about quinoa

Quinoaporridge040614

This is what I had for breakfast this morning. I made quinoa once a long time ago for a cold salad. It was good, but I hadn’t seen any recipes since that made me want to revisit the grain, until this recipe arrived in my inbox a few weeks ago. I had forgotten about it until I went grocery shopping yesterday and saw quinoa on the shelf.

Now that I’m working normal daytime hours for the first time in a long time, I’m realizing that I really do need to eat breakfast. Skipping it and waiting for lunchtime leaves me lagging, especially since by that time I’ve already been awake for six or seven hours. So, I’ve been looking for things I can make quickly in the morning, just to get a good start to the day.

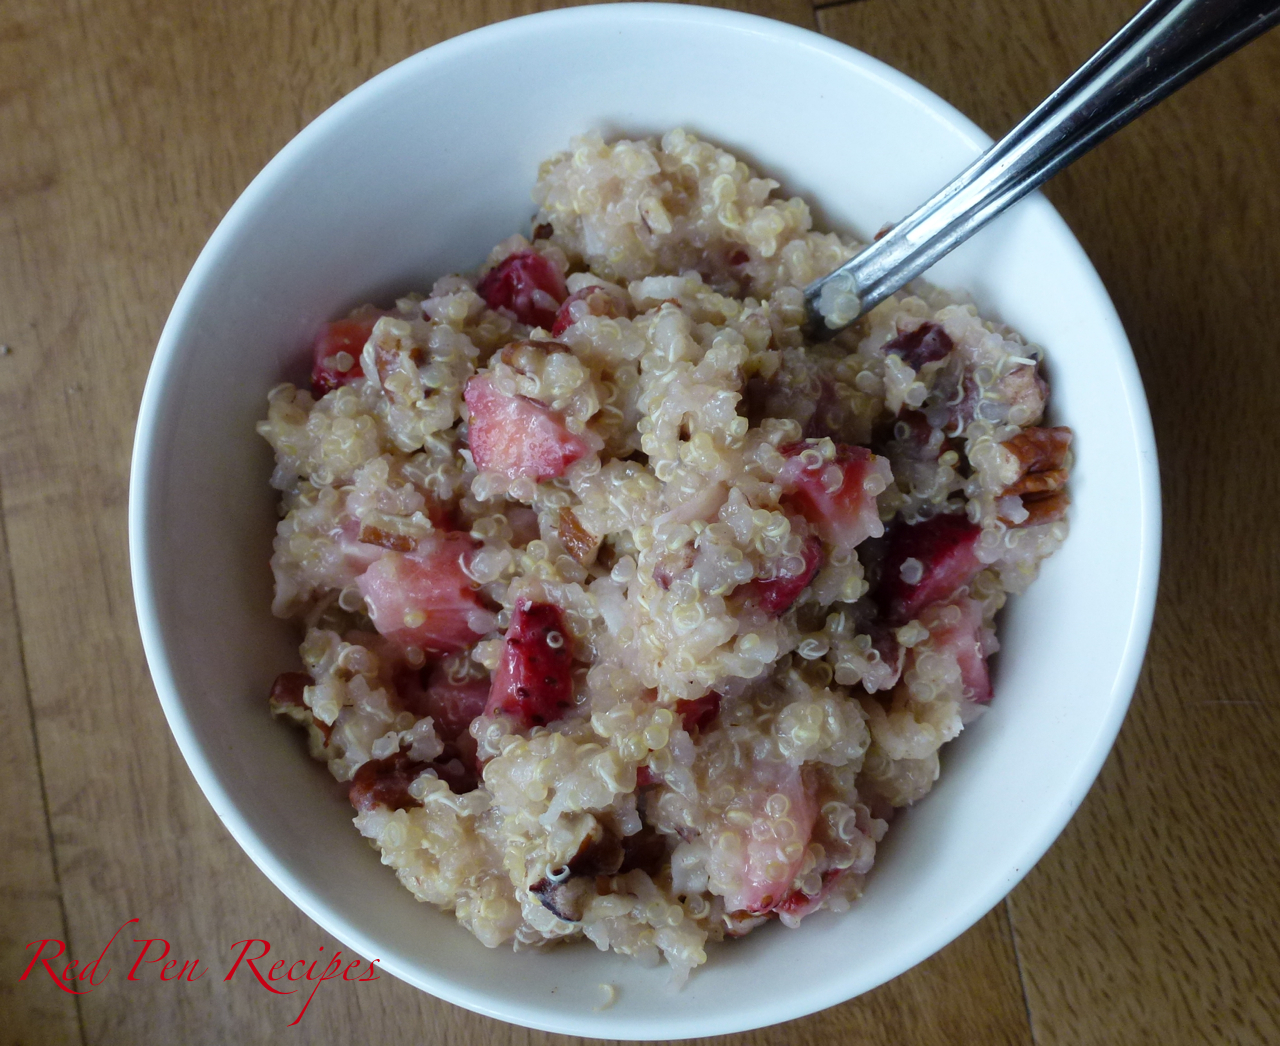
When I saw that this recipe was called porridge, I instantly pictured the soupy, unappetizing substance served in “Oliver Twist.” I don’t know why that’s the first thing that came to mind, but it was. This quinoa porridge turned out to be quite good, and was a satisfying start to the day. I added to the original recipe because I like more texture in my food.

Know that the amount of quinoa made below is more than you’ll need for one serving of this porridge. But, if you want to make it for more than one, or have quinoa to keep in the fridge for other dishes, make the full amount. If you do want to make just one serving, use 1/3 cup quinoa and 2/3 cup water.

Ingredients
2 cups water
1 cup quinoa
2/3 cup almond milk
5 strawberries, hulled and chopped
1 tablespoon shredded raw coconut
2 tablespoons sliced almonds or whole pecans, toasted and chopped
1 1/2 teaspoons light agave nectar
Pinch of salt

Place quinoa in a pot and rinse and drain twice. Add 2 cups water and bring to a boil. Cover and let simmer for 10-15 minutes, or until outer germ layer separates and grain appears translucent.

In another pot, combine 1/2 cup quinoa and 2/3 cup almond milk. Bring to a boil over high heat. Cover pot, lower heat and simmer for 5 minutes. Remove lid and continue cooking for another 5 minutes, or until porridge is thick and creamy. Stir in strawberries, coconut, nuts, agave and salt. Serve warm.

Smashing expectations with simple scones

scones1

I have never met a scone I liked. Every scone I’ve ever had has been dry, plain and crumbly. They were all like eating a stale biscuit. So, for the majority of my life, I’ve avoided them. Last week I decided I make them at home to see whether I would like them better. I did.scones2

The recipe I used was the Simple Cream Scones recipe from The Cook’s Illustrated Cookbook. I figure it’s always best to start with something simple. I added a vanilla bean to the recipe and the flavor of the scones was great. They didn’t crumble all over the place when I bit into them like ones I’d purchased from coffee shops did. They were soft and a bit moist inside instead of dry through and through. They were enjoyable, instead of being overly sweet. They were perfect for breakfast.

As with most recipes, I made a mistake on the first try. I left the oven rack in the upper third of the oven and didn’t rotate the scones halfway through the cooking process as instructed. I left them in a little longer than I should have, but they were still good. In fact, the next weekend I made them and added about a half cup of chopped strawberries to the mix and I liked them even more than the vanilla bean scones.

I’m glad I decided to make them at home because now I know that not all scones are dry and crumbly. Not all scones are bad biscuits. Not all scones are worth writing off.

scones4Ingredients
2 cups all-purpose flour
3 tablespoons sugar
1 tablespoon baking powder (use 3/4 tablespoon if at high altitude)
1/2 teaspoon salt
5 tablespoons unsalted butter, cut into 1/4-inch pieces and chilled
1 vanilla bean
1 cup heavy cream

Adjust oven rock to middle position and heat oven to 450 degrees F. Line baking sheet with parchment paper.

In the bowl of a stand mixer with the whisk attachment on, stir flour, sugar, baking powder and salt until combined. Add butter and stir until mixture resembles coarse meal with some slightly larger pieces of butter.

Cut both ends off the vanilla bean and cut the bean in half lengthwise. Using the back of a knife, scrape the seeds from inside and add them to the mixture. Stir until just combined. Stir in cream until dough begins to form.

Turn dough and any floury bits onto a floured counter and knead until a slightly sticky ball forms. Pat dough into a 9-inch round and use a knife or pizza cutter to cut into eight wedges.

Place wedges on prepared baking sheet and bake until tops of scones are lightly golden brown, 12 to 15 minutes (10 to 12 minutes if at high altitude), rotating baking sheet halfway through baking. Transfer baking sheet to wire rack and let cool for at least 10 minutes. Serve warm or at room temperature.

Getting the hang of homemade ice cream

ApricotAlmondIceCream060913

When I received an ice cream maker last month, I had the grand idea that I would make homemade ice cream on a regular basis. I thought it would be a cinch.

But it hasn’t been. Finding a good ice cream recipe has been more difficult than I anticipated. While the simpler apricot-almond recipe I first tried turned out pretty well, it wasn’t the creamy, scoopable kind of ice cream I had in mind. Since then, I have been on the hunt for something with that store-bought texture.

As it turns out, that kind of ice cream is made by first making a custard, then processing it with the ice cream maker. I tried the chocolate ice cream recipe from the manual, but it ended up being much thicker than what I was looking for. It ended up being more like frozen custard. After looking at several other recipes, I decided to see what Joy had. It had a few pages worth of recipes, but I settled on strawberry frozen yogurt to see how it would turn out. So far, it is my favorite recipe of the ones I’ve tried. It had a rich strawberry flavor, vibrant color and good texture right after making it, which I attribute to the gelatin used in the recipe. However, the next day it was stiff, so I had to let it sit for about 20 minutes before scooping. It’s still not quite the consistency I’m looking for, but the flavor is good.

So, I’m still looking for a good ice cream recipe. If you have one you’ve had success with, please share it!

Ingredients
2 cups plain low-fat yogurt
1 pint strawberries, hulled and sliced
1/3 cup sugar, to taste
1 teaspoon vanilla
pinch of salt
1 envelope (2 1/4 teaspoons) unflavored gelatin
1 cup soy milk or whole milk
1/4 cup plus 2 tablespoons sugar

Spoon yogurt into a fine-mesh sieve set over a large measuring cup or bowl. Refrigerate until 1/2 cup liquid has drained off, about 2 hours, then scrape the yogurt into a medium bowl. Discard the liquid.

Place strawberries in a food processor and pulse a few times, or until the fruit is crushed. Do not puree. A potato masher can also be used for this step. Add sugar, vanilla and salt. Cover and let stand at room temperature for one hour.

Sprinkle gelatin over 1/4 cup milk. let stand for 10 minutes to soften.

Combine 3/4 cup milk and 1/4 cup plus 2 tablespoons sugar in a medium saucepan. Bring to a simmer, stirring occasionally to dissolve hte sugar. Remove from the heat and let cool for five minutes, then add the gelatin mixture, stirring until it dissolves completely. Let cool to room temperature.

Gently whisk the milk and strawberry mixtures into the drained yogurt. Refrigerate until cold. Pour into an ice cream maker and freeze as directed. Mine was done after about 30 minutes.

Scrumptious cupcakes for a special occasion

browniecupcake

I’ve said it before and I’ll say it again: brownies are my favorite dessert. When I’m craving chocolate, I usually whip up a batch of brownies. When I’m feeling creative, I start with a base brownie recipe and improvise with the flavor. But brownies never seemed quite right for a special occasion — until I discovered Curtis Stone’s Brownie Cupcakes.

From the chocolate-loaded brownie cupcake to the decadent, creamy cream cheese frosting, these are perfection. The cupcake has a bit of give to it when you bite in and the frosting is wonderfully smooth. It’s the most delightfully messy cupcake I have ever made and eaten. It really doesn’t get much better than this.

My birthday is tomorrow. Each year, when I think about what to make, these cross my mind. I have only made these twice, but each time they left me wanting more — which is why I make them strictly for special occasions. Whether the festivities are for a birthday or other type of event, these cupcakes definitely merit being part of the celebration.

Ingredients
6 ounces good-quality dark chocolate (60 percent to 70 percent cacao), chopped

6 tablespoons unsalted butter

1 tablespoon light corn syrup

Pinch of salt

3/4 cup sugar

2 large eggs

1/2 cup all purpose flour

1 teaspoon baking powder

2/3 cup coarsely chopped walnuts

Frosting
4 ounces cream cheese, room temperature

1/3 cup light corn syrup

4 ounces good-quality dark chocolate (60 percent cacao), chopped

8 small, fresh strawberries

To make the cupcakes: Position the rack in the center of the oven and preheat the oven to 350 degrees F.

Line 8 standard cupcake molds with cupcake liners.

Stir the chocolate and butter in a small heavy saucepan over low heat until the chocolate and butter melt and the mixture is smooth. Stir in the syrup and salt. Remove from the heat and set aside.

Using an electric mixer, beat the sugar and eggs in a large bowl for 2 minutes or until the mixture is thick and light. Stir in the chocolate mixture. Add the flour and baking powder and stir just until blended, then stir in the walnuts.

Divide the batter equally among the prepared cupcake molds filling the paper liners completely. (Filling the liners completely is key — otherwise the cupcakes will collapse and will be less fudgy.)

Bake for about 25 minutes, or until the cupcakes puff and crack on top and a skewer inserted into the center of the cupcakes comes out with fudgy crumbs attached.

Remove the cupcakes from the oven and cool completely on a cooling rack.

To frost the cupcakes: Using an electric mixer, beat the cream cheese in a large bowl until light and smooth. Beat in the syrup. Place the chocolate in another bowl and place the bowl over a small pot of boiling water. Stir constantly until the chocolate melts. Add the melted chocolate to the cream cheese mixture and beat until blended and fluffy, stopping the machine and scraping the bottom of the bowl to ensure that the mixture is well-blended. Spread the frosting generously over the cooled cupcakes. Garnish each one with a fresh strawberry and serve.

Single-serving tarts pack a punch of flavor

Fruittarts1

I like to bake with fresh fruit when I have some on hand. After making the strawberry shortcake and pineapple upside-down cake, I froze the leftover fruit to use later. When I recently came across this recipe, I knew I had found a good use for the leftovers.

The original recipe only used pineapple, but I didn’t have enough so I substituted strawberries for the rest. I was glad I did. These would have been too sweet with only pineapple. The strawberries helped to mellow the tartness, which brought nice balance to the overall flavor of the finished tarts.

The syrupy mixture that resulted from simmering the fruit and sugars was delicious. It had a lot of layers of flavor, and the mini tarts had a great balance of crust and flavor-packed filling.

The crust isn’t the stiff tart crust I expected. Instead of the usual version that can sometimes take a bit of might with a knife to cut through, this crostata dough is sweet and has a bit of give to it. It perfectly complements the filling.

Instead of taking one large tart to work, I opted to make mini tarts. They were adorable. My staff really seemed to get a kick out of having mini tarts to themselves.

I highly recommend this recipe. The single-serving format I chose eliminates the need for serving utensils. They can be eaten like cupcakes and easily taken to a Memorial Day barbecue.

Ingredients
2 cups all-purpose flour
1/4 cup sugar
3/4 teaspoon coarse salt
8 ounces (2 sticks) cold unsalted butter, cut into 1/2-inch pieces
1/4 cup ice water

Combine flour, sugar, and salt in a large bowl. Add butter and combine until mixture resembles coarse meal. Add ice water and mix until mixture just begins to hold together.

Shape dough into one disk. Wrap in plastic, and refrigerate for at least an hour or up to three days (or freeze for up to 1 month; thaw in refrigerator before using).

Ingredients
1/2 pineapple, peeled, quartered and cored
1 1/2 cups strawberries, hulled and quartered
1/4 cup packed light-brown sugar
1/4 cup granulated sugar
1 vanilla bean, split and scraped, pod reserved
2 tablespoons fresh lemon juice
1/2 cup dark rum

Divide crostata dough into 12 parts. Pat each part into a muffin cup in a muffin tin. Trim excess dough. Combine excess dough into a single mass and flatten into a rectangle between two sheets of plastic wrap. Freeze tin and excess dough until firm, about 30 minutes.

Cut each pineapple quarter crosswise into 1/3-inch-thick slices. Combine sugars, vanilla seeds and pod, and lemon juice in a large saute pan. Add pineapple and strawberries and cook over medium heat, stirring until sugars dissolve and mixture becomes saucy, about 3 minutes. Add rum and simmer until pineapple has softened and almost all of the liquid has evaporated, about 20 minutes. Remove from heat, and let cool in pan. Discard vanilla pod.

Remove muffin tin from refrigerator. Divide pineapple-and-strawberry mixture evenly into each cup. Take remaining rectangle of dough and cut into thin strips place four strips crosswise over each cup.

Preheat oven to 400 degrees. Bake for 15 minutes, or until tarts are golden brown around the edge. Let cool in pan for 30 minutes before removing. Unmold and serve immediately.