Abandoning the rules for apple pie

Applepie112314-2

I’ve always been a by-the-book, play-by-the rules kind of girl. I think with my head instead of my heart and always approach things from the most logical angle I can find. That’s why I always cook according to recipes, too. Except for pie.

Things are different for me when it comes to pie. I’ve made dozens and feel confident that I know what good dough feels like between my fingers, and can trust my senses to guide me to the perfect combination of spices for the filling. This is a rare departure from my normal approach to things. It makes me feel confident in my abilities, enough so that I let go a little and try new things on a whim, instead of following every single instruction in the book from beginning to end. Pie is one of the more forgiving things you can make because you don’t have to rely on leaveners and eggs for consistency. Without those things involved, there’s more of a chance to play without fretting that it will fail entirely.

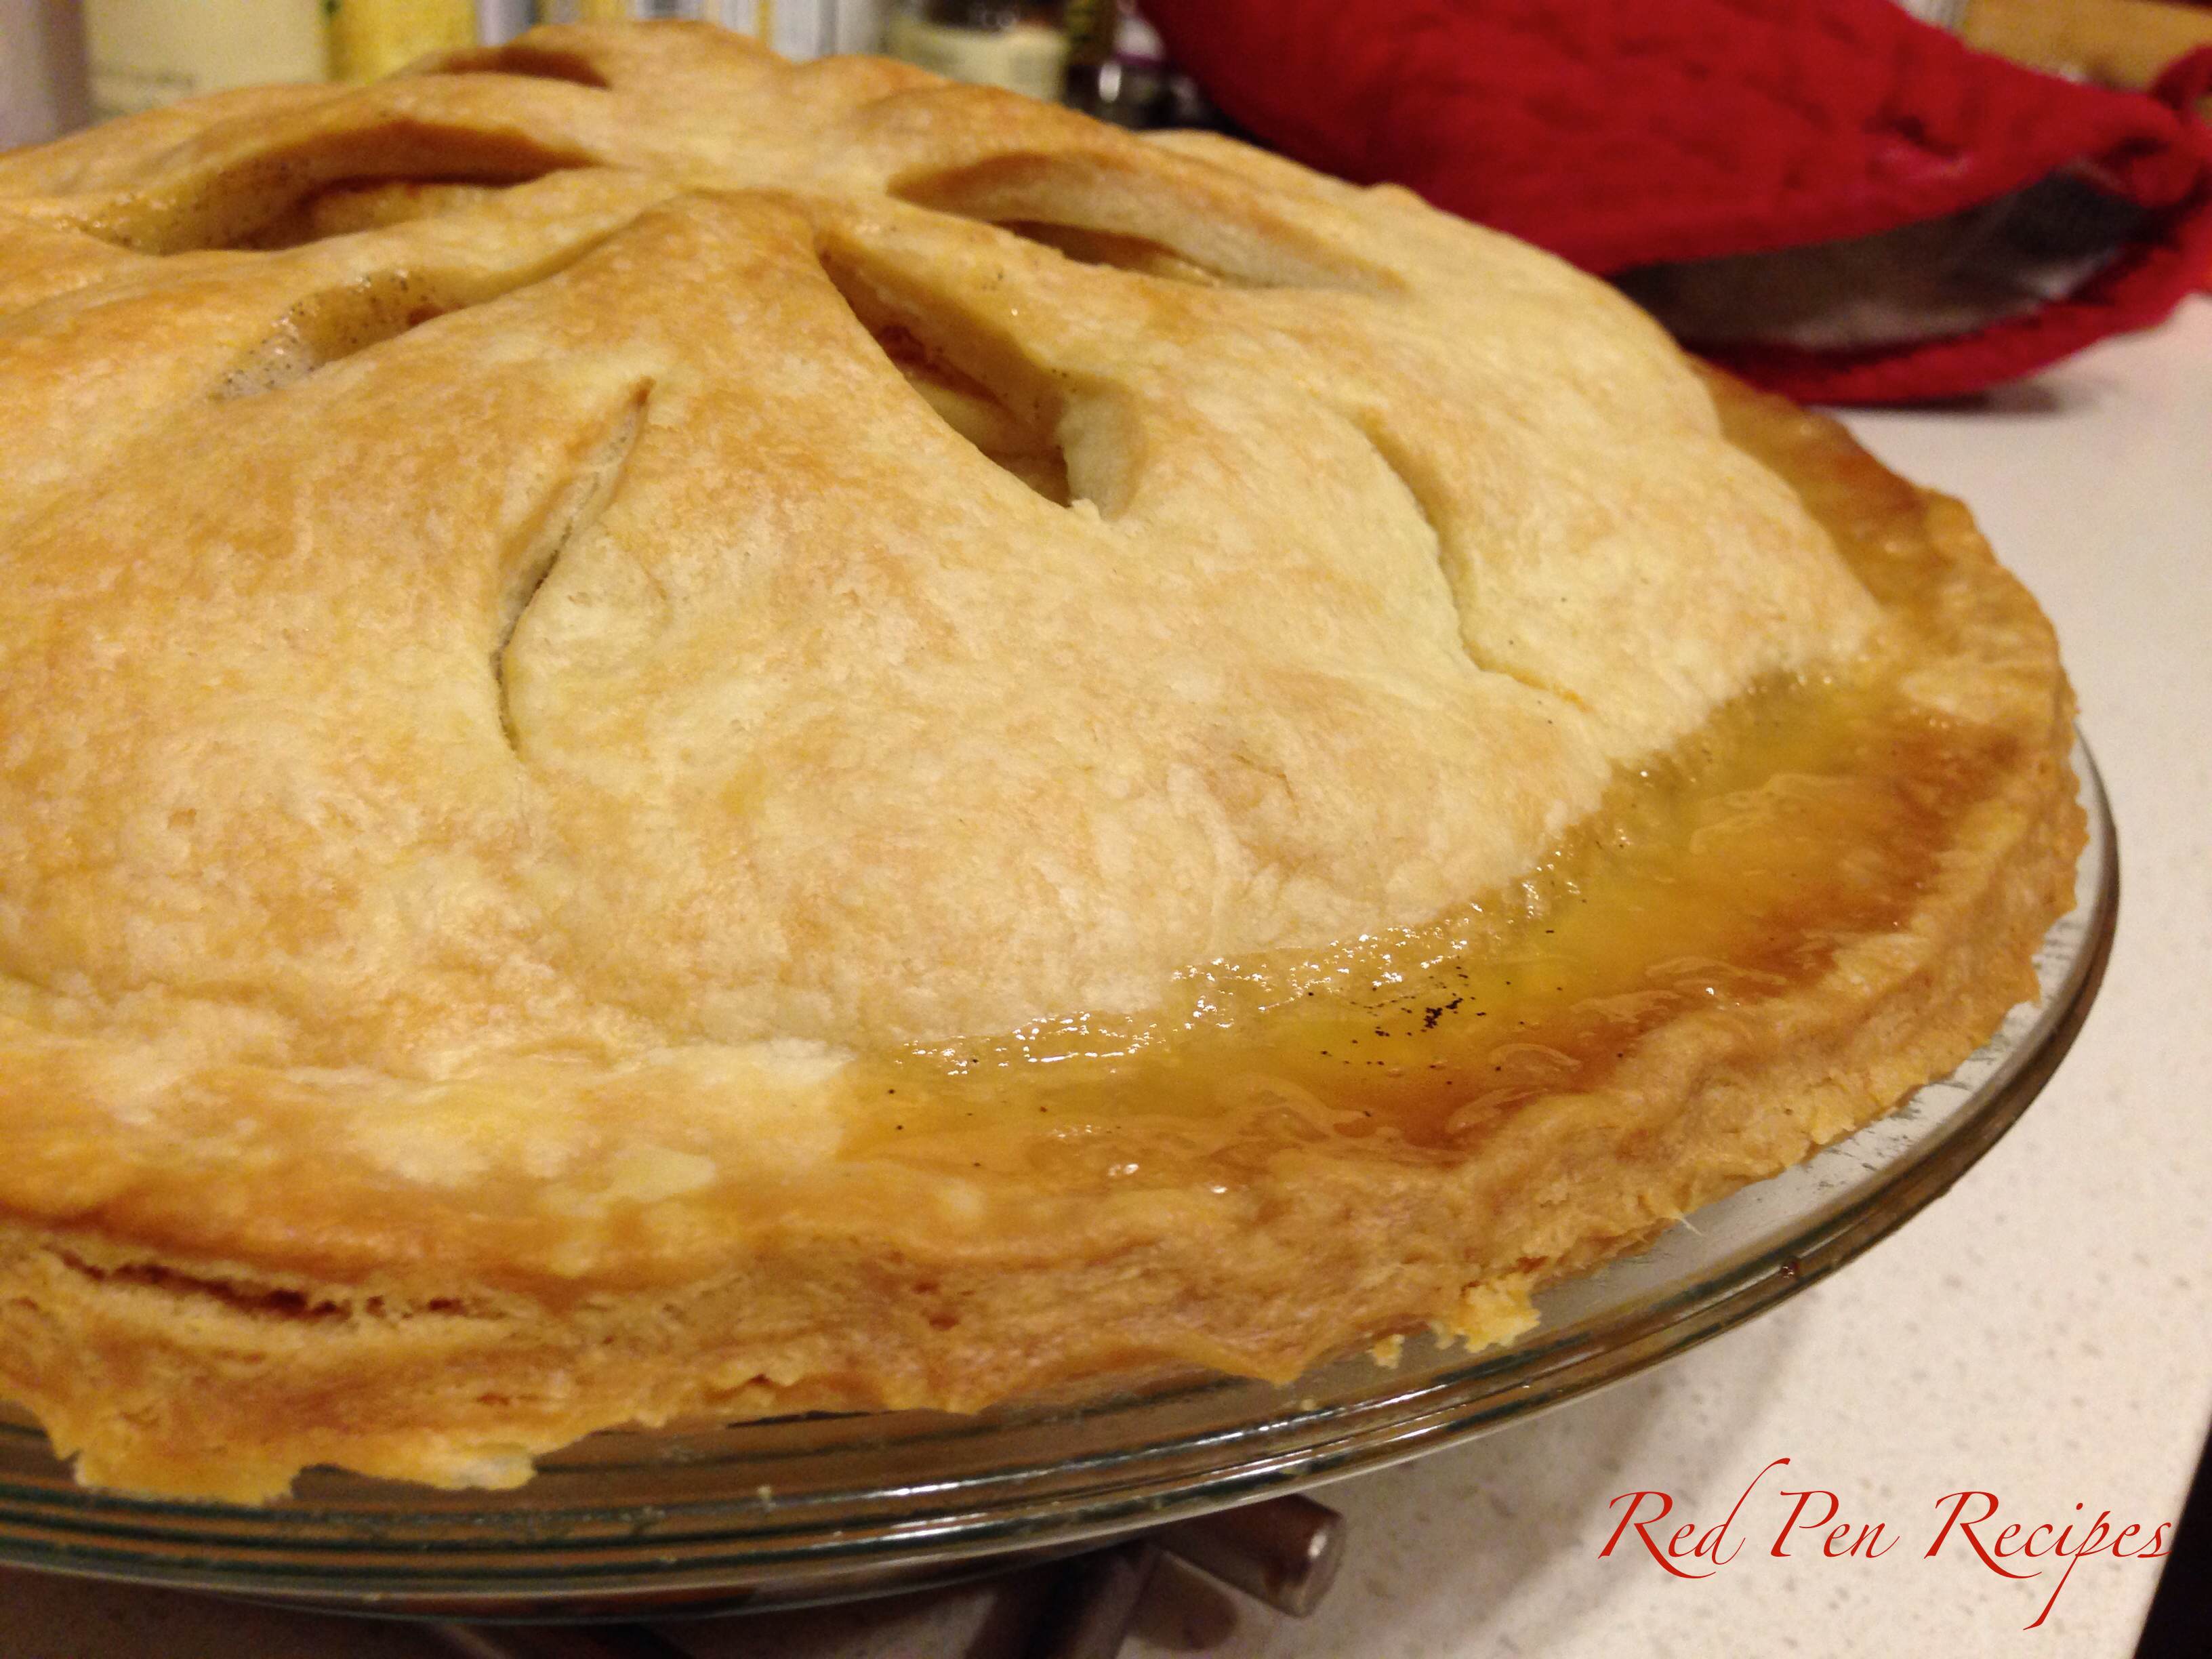
I went to a friend’s place for a pre-Thanksgiving dinner last night. I volunteered to bring my pumpkin scalloped potatoes and an apple pie, both of which I’ve made a few times before. I based my apple pie on the one from The Joy of Cooking, but improvised on the filling by adding a vanilla bean, honey, and a bit of brown sugar. It turned out really well.

If you ever watched Lee Pace as the charming piemaker in “Pushing Daisies,” you might remember when he said “pie is home. People always come home.” For me, apple pie is something I’ll likely make throughout my life, and I can take comfort in knowing it will turn out, and there’s room to try new things.

Applepie112314So here’s my latest version of apple pie for you to share with your families and friends during Thanksgiving. I hope every bite reminds you of home.

Crust
2 cups flour
1 1/4 teaspoons salt
2 sticks of butter
6 tablespoons cold water

Combine flour and salt in a large bowl. Cut butter into mixture and mix with hands until mixture resembles pea-size pieces. Sprinkle water over mixture and mix in using your hands. When water is combined, divide dough in half. Put each half between two pieces of parchment paper and roll out to about a 12-inch circle. Put dough—still between papers—in refrigerator for about 30 minutes. Once 30 minutes have passed, line the bottom of an ungreased pie dish with one layer of dough, using your fingers to press it to the sides. Refrigerate. Preheat oven to 425 degrees F. While oven is preheating, make filling.

Applepie112314-3Filling
6 Granny Smith apples, peeled, cored, and sliced
2 tablespoons all-purpose flour
1 tablespoon arrowroot or corn starch
2 tablespoons honey
1 vanilla bean, split lengthwise and insides scraped
1/2 cup + 2 tablespoons sugar
2 tablespoons brown sugar
1/2 teaspoon cinnamon
Dash of ground ginger

Combine all ingredients in a large bowl and let sit for 15 minutes. Pour mixture into bottom pie crust, letting apples heap in the bottom crust. Cut 2 tablespoons of butter over the top of the filling. Take the top pie crust out and cut holes so the filling can vent during baking. Place crust on top of filled pie and use a knife to cut any crust hanging over the pan. Press crusts together with fingertips to seal. Place pie on a cookie sheet and bake at 425 degrees for 30 minutes, then reduce heat to 375 degrees and bake for another 30 minutes, or until filling is soft when a knife is inserted.

Let cool for at least an hour before serving.

A stunning way to use summer berries

blueberrypie

Summer is a great time to find new ways to use the abundance of berries available in stores. One of my favorite things I’ve made with blueberries is this pie. The combination of citrus, cinnamon, and fresh fruit made the flavor spot-on, and the lattice crust made for a stunning finished product.

If you haven’t attempted to make a lattice crust before, don’t fret. Roll the dough into a circle large enough to cover the top of the pie, then cut it into strips using a knife. Overlap them on the filled bottom crust before popping it into the oven. I recommend checking on the crust about halfway through baking to make sure it’s not burning. If it’s getting brown sooner than you want it to, you can brush it with eggwash.

It’s a beautiful dessert to share.

Crust
2 1/2 cups all-purpose flour
1 1/4 teaspoon salt
3/4 cup butter or shortening + 3 tablespoons cold unsalted butter
6 tablespoons ice water
1 teaspoon to 1 tablespoon ice water

Preheat the oven to 425 F.

Combine the flour and salt in medium bowl. Cut half of the butter into the mixture, working it in with the tips of your fingers until it has the consistency of cornmeal. Cut the rest of the butter into the dough and work in until the dough turns into pea-sized balls. Sprinkle the dough with 6 tablespoons of ice water.

Using a fork, blend the water into the dough. If needed to hold the ingredients together, add the remaining water.

Line a 9-inch pan with half the dough. Position a rack in the lower third of the oven. Combine in a bowl and let sit for 15 minutes:

Ingredients
5 cups blueberries, picked over
3/4 cup sugar
4 tablespoons cornstarch
1 tablespoon fresh lemon juice
1 teaspoon grated orange zest
1/4 teaspoon salt
1/4 teaspoon cinnamon

Pour the mixture into the bottom crust and dot with 2 tablespoons unsalted butter, cut into small pieces. Shape the remaining dough into a top crust or cut into strips and form a lattice crust. Place on top of pie.

Bake for one hour. Cool completely on a rack.

Bombshell blondies that can’t be beat

blondies072014
One recipe I keep going back to is the Joy of Cooking’s recipe for Butterscotch Brownies, aka Blondies. Some people think a brownie isn’t a brownie unless it involves chocolate, but this recipe gives you the consistency and richness you’d expect, but with a different flavor. This is one I make well, and one that has been well-received by anyone who has tried them. It’s a keeper.

The key to this recipe is to get the first step right. Browning butter is an easy thing to mess up the first few times you do it. The trick here is to make sure you don’t turn the heat up too high. I did that when I first tried browning butter, and it went from beautiful to burnt in a matter of seconds. I’ve had consistent success browning butter when I keep the heat at medium-low, about a four on my oven knob. When the fat starts to separate, the butter will start to smell differently. When it starts to smell like butterscotch, take it off the heat immediately and throw in the sugar to keep the butter from burning. It doesn’t take long for the butter to smell slightly burnt, and that flavor will carry into the finished blondies if you don’t catch it before it gets there.

These decadent bars are a delicious treat and a great excuse to work on your butter-browning skills, which can be used in pasta dishes like this one and other types of meals. Use your nose, and you’ll get it down. I hope you enjoy them as much as I do.

Ingredients
1/2 cup unsalted butter
3/4 cup packed light brown sugar
1/4 cup sugar
1 large egg
1 large egg yolk
1 tablespoon light corn syrup
1 1/2 teaspoons vanilla
1 cup all-purpose flour
1/4 teaspoon baking powder
1/8 teaspoon baking soda
1/8 teaspoon salt
2/3 cup shredded sweetened coconut

Preheat oven to 350 degrees F. Grease an 8-inch square baking pan lined with foil.

In a large heavy saucepan, melt butter over medium heat, then boil, stirring constantly until light golden brown, about 4 minutes. Remove from heat and stir in sugars until well-blended. Let cool to barely warm. Stir in egg, egg yolk, corn syrup, and vanilla. Add dry ingredients and coconut. Stir until combined. Scrape mixture into greased baking pan. Bake until the top is golden brown and a toothpick inserted in the center comes out clean, 25-30 minutes. Cool completely in the pan on a rack.

Calzones and a lesson for an ambitious beginner

Calzones1
Calzones are basically small pizzas folded in half and sealed around the edges. But sometimes, it’s a nice change.

Last week was busy, and I wanted to make a lunch I could eat at my desk if I needed to — something that didn’t require utensils or much cleanup. So, I went with calzones.

This is the second time I’ve ever made calzones. The first was years ago when my brother graduated from high school. I had just tried making them for the first time and got overly ambitious. I told my mom I’d make them for everyone at his graduation party. I made bowl after bowl of dough and kept the oven on for hours — even during the party — as I pulled them out of the oven. For me, that was one of those learning moments, particularly around cooking and entertaining. If you overcomplicate things, you won’t get to enjoy the gathering. Lesson learned.

That time I filled them with ham and cheese, but I liked the ones I made using this recipe more. While they may not look like they’ve been filled enough, the fillings I chose had stronger flavors, so it tasted like enough. Beware that using fresh vegetables such as spinach or peppers can make the bottom of the calzone watery if you haven’t sautéed them first.

Calzones2This recipe — the dough is from the Joy of Cooking — makes two large calzones. I like to keep my calzones basic, so I went with pepperoni, cheese, and pesto. You can put whatever you’d like in them.

Ingredients
2/3 cup warm water
1 1/8 teaspoons active dry yeast
1 3/4 cups all-purpose flour
1 tablespoon olive oil
1/2 tablespoon salt
2 tablespoons pesto
20 slices of pepperoni
1 cup shredded mozzarella cheese

Combine water and yeast in a large bowl and let sit until dissolved, about 5 minutes. Meanwhile, lightly coat another large bowl with olive oil.

Using a stand mixer with a dough hook, or using your hands, mix in flour, olive oil, and salt. Transfer the dough to the oil-coated bowl, cover with a cloth or plastic wrap, and let rise in a warm place until doubled in bulk, up to two hours. If you want to speed up the process, preheat the oven to 200 degrees and turn it off when you put the bowl of dough inside. I did it this way, and it took about an hour.

When dough is ready, remove from oven and preheat oven to 475 degrees.

Line a baking sheet with parchment paper. Divide dough in half. Shape each half the way you would for a pizza. Leaving about an inch all the way around the circumference of the dough, top with sauce, cheese, and pepperoni — or the toppings of your choice. Once topped, fold in half and pinch the edges to close. Place on baking sheet and bake for 20 minutes, or until lightly browned.

Fluffy pancakes to kick off the weekend

Blueberrypancakes052514

During the week, I rarely have the time to make the kind of breakfast I want. So, on the weekends, I usually take advantage of the time I have to whip up whatever strikes my fancy. Sometimes it’s a frittata, sometimes it’s an omelet, but it’s often pancakes. I really enjoy pancakes with fruit, and my go-to is nearly always blueberries. This recipe from The Joy of Cooking produces the perfect fluffy pancakes that other recipes I’ve tried just can’t produce. I like to top mine with marionberry syrup.

Next weekend I’ll be heading to Curtis Stone’s restaurant, Maude, in Beverly Hills for my birthday dinner. Though it will be a couple days before my birthday, I am so excited and have been looking forward to this for months. I’ll report back when I return!

Ingredients
1 1/2 cups all-purpose flour
3 tablespoons sugar
1 3/4 tablespoons baking powder
1 teaspoon salt
1 1/2 cups milk
3 tablespoons butter, melted
2 eggs
1/2 teaspoon vanilla extract
1/2 cup blueberries
1/3 cup coconut

Combing flour, sugar, baking powder, and salt in a large bowl. Set aside. Combine milk, butter, eggs, and vanilla in another bowl. Quickly mix the liquid ingredients into the dry ingredients. Mix in blueberries and coconut.

Melt a pat of butter in a frying pan over medium heat. Put two tablespoons of batter in the pan for each pancake. Cook until the bubbles at the top of the pancakes have popped, then flip over and cook for a few more minutes, until both sides are golden brown. Serve hot, topped with syrup.