Whipping up dessert in a hurry

banoffeepie4

Every time one of my staff members celebrates a birthday, I bring in a baked good just for them, something they don’t have to share with anyone else. When one of my staff members celebrated her birthday Friday and I knew I didn’t have a ton of time to make and decorate a cake, I instead chose to make a Banoffee Pie.

I first made a Banoffee Pie years ago after seeing Curtis Stone make one on “Take Home Chef.” It looked easy and I was pleased that I found it just as simple to make at home. The pie gets its name because it uses bananas and toffee. Making the toffee sauce is the only part that really takes much effort — and it doesn’t take much if you follow the instructions. The pie is framed by a simple graham cracker crust, filled with a base layer of toffee sauce, then topped with whipped cream with bananas folded into it. The rest of the toffee sauce is drizzled on top. It’s easy as, well, pie.

The nice thing about this recipe is that you get a lot more flavor than you might expect. When I first made it, I was worried about getting a mouthful of whipped cream, but the sliced bananas that are folded into it keep that from happening, and the toffee sauce on the top and bottom add a certain richness to it.

For the record, let me say that this is not a banana cream pie. There are bananas and cream, but they are not blended together as they are in the traditional desert.

Another plus is that you can do this in parts if you’re strapped for time. I made the crust and toffee sauce the night before, then made the whipped cream-and-banana filling the day of so it would be as fresh as possible.

This is a great option if you’re short on time and want to serve a light, flavorful dessert. It was a big hit with the birthday girl.

Ingredientsbanoffeepie1
9 ounces graham crackers, crushed

1 stick butter, melted
1/2 cup (packed) dark brown sugar
1 14-ounce  can sweetened condensed milk

1 stick butter
1 1/4 cups heavy cream
5 small ripe bananas (about 1 1/2 pounds)

Line the bottom of a 9-inch springform pan with parchment paper.

Chop the graham crackers in a food processor until they are finely ground.

Pour the melted butter over the crumbs and process to blend well. The crumbs should stick together when pressed.

Press the crumb mixture over the bottom and 1 1/2 inches up the sides of the springform pan. Refrigerate.

To make the toffee sauce, place a heavy medium saucepan over medium heat. Combine the sugar and 3 tablespoons of water in a medium heavy saucepan. banoffeepie3

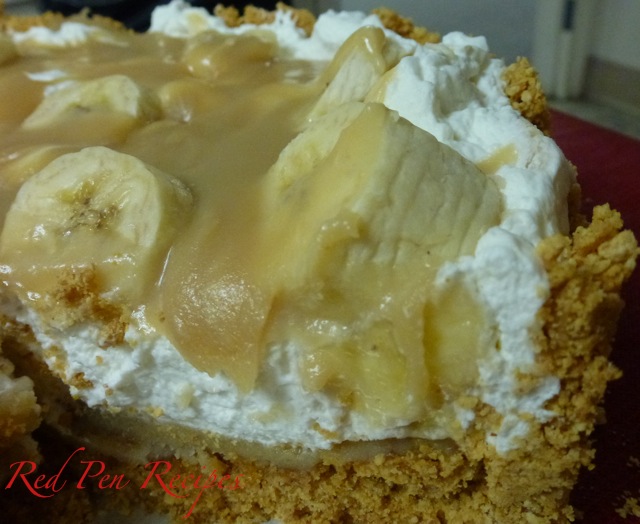
Stir over medium heat until the sugar dissolves. Increase the heat and boil without stirring until the color is deep amber, occasionally swirling the pan and brushing down the sides with a pastry brush dipped into water, about 5 minutes.

Stir in the condensed milk and butter. Continue stirring for 5 minutes or until the sauce thickens slightly.

Remove the toffee sauce from the heat and spread 1 cup of the sauce over the prepared crust and refrigerate for about 1 hour or until the toffee is semi-firm. This can be refrigerated overnight if you prefer to prepare the rest on the day it will be served.

Keep the remaining toffee sauce at room temperature.

Using an electric mixer, beat the cream in a large bowl until thick and very soft billowy peaks form.

Very thinly slice three of the bananas into discs.

Fold the sliced bananas into the softly whipped cream and spoon into the prepared pie crust.

Slice the remaining bananas and arrange them decoratively over the pie.

Re-warm the remaining toffee sauce gently over low heat.

Drizzle some of the sauce decoratively over the pie. If the sauce has thickened too much to drizzle, stir a few tablespoons of milk into the sauce to create a thinner consistency.

Cut the pie into wedges and transfer to plates.

Drizzle each pie wedge with more sauce and serve.

Sweet-and-salty pistachio brittle hits the spot

pistachiobrittle1

If you’re looking for something sweet to add to your Super Bowl spread, consider this. Salted Pistachio Brittle was the first recipe I tried from the January edition of Bon Appétit. At the time, I had a bag of unsalted, shelled pistachios that I was looking to incorporate into a recipe.

When I think of making candy, I think of the mishaps I’ve had while attempting different recipes — most of which involved some sort of sugar syrup. I’ve learned from the mistakes, but also mentally prepare for frustration whenever I plan to tackle a new candy recipe.

I had never made brittle before, so I didn’t know what I was getting myself into, but that mental preparation wasn’t needed for this straightforward recipe. Watch the temperature of the mixture closely and you’ll be OK. If you don’t like pistachios, this recipe would also work well with peanuts or cashews. The best part is that it cools quickly, so it can be made for a same-day treat.

Ingredients
Nonstick vegetable oil spray
1 cup sugar
1/2 cup light corn syrup
1 cup unsalted, shelled raw natural pistachios, very coarsely chopped
1 tablespoon unsalted butter
1 teaspoon kosher salt
3/4 teaspoon baking soda
Coarse gray sea salt (such as fleur de sel or sel gris)

Line a rimmed baking sheet with parchment paper; spray with nonstick spray and set aside. Whisk sugar, corn syrup, and 3 tablespoons water in a medium saucepan. Stir over medium heat until sugar dissolves. Fit saucepan with candy thermometer, bring mixture to a boil, and cook until thermometer registers 290 degrees, about 3-4 minutes.

Using a heatproof spatula, stir in pistachios, butter, and kosher salt (syrup will seize initially, but will melt as it heats back up). Continue to cook syrup, stirring often, until thermometer registers 300 degrees and pistachios are golden brown, 3-4 minutes. Caramel should be pale brown (it will darken slightly as it cools). Sprinkle baking soda over and stir quickly to blend caramel thoroughly (mixture will bubble vigorously).

Immediately pour caramel onto prepared baking sheet and, using a heat-proof spatula, quickly spread out as thin as possible. Sprinkle sea salt over and let caramel cool completely. Break brittle into pieces.

Note: Brittle can be made 1 week ahead. Store airtight between sheets of parchment paper (to prevent sticking) at room temperature.

Cookies to satisfy any craving

pbcookie

When I was a kid, peanut butter cookies were my favorite treat. My mom used to make them by rolling the dough into balls and flattening them by making criss-cross fork imprints on the top. I used to love eating them warm shortly after they came out of the oven.

Around the same time, my grandmother in Wisconsin sent me a couple books from the “World Famous Muriel” series. In each book the heroine, Muriel, would solve mysteries as long as the person seeking her help provided her with peanut butter cookies. My grandmother must have seen that we had that in common.

Even now, I still enjoy peanut butter cookies; but I now use a recipe that incorporates chocolate. When I’m craving something sweet, I often turn to Curtis Stone’s Peanut Butter Cookies With Chocolate Chunks. The best part is how quickly they can be made. I had seen him make these cookies on an episode of “Take Home Chef,” and was delighted when the recipe was included in his most recent cookbook, “Relaxed Cooking With Curtis Stone.”

The original recipe calls for 5 ounces of semisweet chocolate. The first time I made them, all I had was a 4-ounce semisweet chocolate bar, and that turned out to be plenty. I once used chocolate chips, but I prefer chunks of chocolate for this recipe. When it comes to breaking up the chocolate, I’ve found the best way to do it is to smack the wrapped 4-ounce bar of chocolate on the edge of the counter until it feels broken up enough. The different size chunks add a homemade charm to the cookies. If using a stand mixer, just throw the whole bar into the bowl and let the stand mixer break it up into chunks.

The recipe says to remove the cookies from the oven when they’ve puffed up and begin to brown on top. At first, it might seem like you’re taking them out prematurely, but really, follow the recipe. The cookies continue to cook because of the residual heat. If you follow the recipe, you’ll have large, soft cookies to satisfy your sweet tooth.

Ingredients
1 cup unbleached all-purpose flour
1/2 teaspoon baking soda
1/2 teaspoon salt
1 cup natural chunky peanut butter
1/2 cup (packed) light brown sugar
1/2 cup granulated / caster sugar
1/2 cup (1 stick) unsalted butter, at room temperature
1 ½ tablespoons honey
1 large egg
1 teaspoon vanilla extract
4 ounces semisweet chocolate, coarsely chopped

Preheat the oven to 350 F.

Mix the flour, baking soda, and salt in a medium bowl.

Using an electric mixer, beat the peanut butter, brown sugar, granulated sugar, butter, honey, egg, and vanilla in a large bowl until well blended.

Stir the dry ingredients into the peanut butter mixture in 2 additions. Stir in the chopped chocolate.

Scoop about 3 tablespoonfuls of dough for each cookie onto the prepared baking sheets, spacing them 2 1/2 inches apart.

Bake for about 12 minutes, or until the cookies puff and begin to brown on top but are still very soft to the touch.

Cool the cookies on the baking sheets for 5 minutes.

Using a metal spatula, transfer the cookies to a rack and eat warm or cool completely.

Plum-and-cinnamon crumble

Image

Curtis Stone is my favorite celebrity chef. He’s easy on the eyes and he makes cooking accessible for the average person. I started watching him on “Take Home Chef” a few years ago and have been paying attention ever since. I have both of his cookbooks, but I favor his second one, “Relaxed Cooking With Curtis Stone,” because the recipes are simpler and have always turned out well for me. If it wasn’t for this book, I never would have attempted to make a pork roast with brandied apple compote.

One of the recipes I frequently turn to is his plum and cinnamon crumble. It’s similar to a crisp, but the topping uses regular sugar instead of brown sugar, so the flavor is lighter.

When choosing plums for this recipe, choose ripe plums that are tender to the touch. Plums that aren’t quite ripe make the finished product too tart and too firm. I made the mistake of choosing firmer black plums the first time I made this, and the end result was not what I’d hoped for. The second time I made it, the plums were slightly firmer than I wanted, so I macerated them with vanilla sugar for about a half hour. That process got them to where I wanted them to be, and the end result was perfect.

Filling:
2 pounds plums, halved, pitted and cut into six wedges
1/3 cup sugar
2 cinnamon sticks

Topping:
3/4 cup all-purpose flour
1/2 cup sugar
1/2 cup rolled oats (not instant)
8 tablespoons (1 stick) cold unsalted butter, cut into pieces
3/4 cup sliced almonds, coarsely chopped

Preheat the over to 350ºF. To make the filling, toss the plums, sugar and cinnamon sticks in an 8-inch-square bake dish. Arrange the mixture evenly in the dish, tucking the cinnamon sticks beneath the plums.

To make the topping, mix the flour, sugar and oats in a medium bowl to blend. Using your fingers, work the butter into the flour mixture until moist clumps form. Mix in the almonds. Sprinkle the crumb topping evenly over the plum mixture.

Bake for 45 minutes or until the juices are bubbling, the fruit is tender and the topping is golden brown. Allow the crumble to stand at room temperature for 5 minutes before serving.

Spoon the crumble into bowls, discarding the cinnamon sticks, and serve with vanilla ice cream.