Scrumptious cupcakes for a special occasion

browniecupcake

I’ve said it before and I’ll say it again: brownies are my favorite dessert. When I’m craving chocolate, I usually whip up a batch of brownies. When I’m feeling creative, I start with a base brownie recipe and improvise with the flavor. But brownies never seemed quite right for a special occasion — until I discovered Curtis Stone’s Brownie Cupcakes.

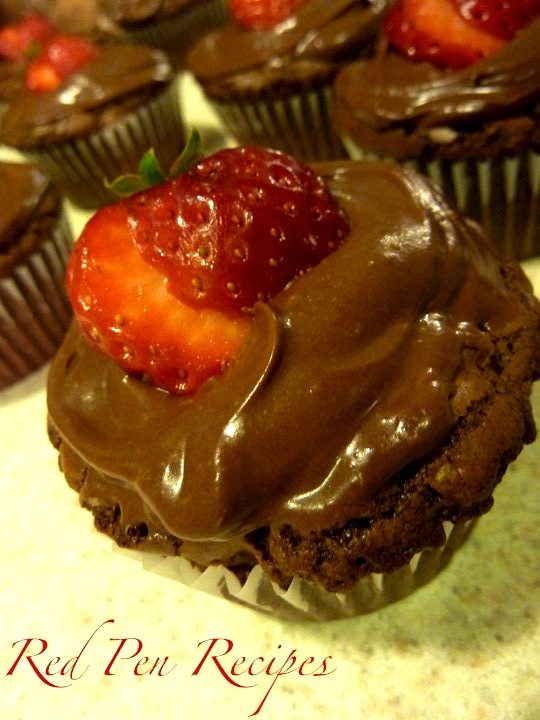
From the chocolate-loaded brownie cupcake to the decadent, creamy cream cheese frosting, these are perfection. The cupcake has a bit of give to it when you bite in and the frosting is wonderfully smooth. It’s the most delightfully messy cupcake I have ever made and eaten. It really doesn’t get much better than this.

My birthday is tomorrow. Each year, when I think about what to make, these cross my mind. I have only made these twice, but each time they left me wanting more — which is why I make them strictly for special occasions. Whether the festivities are for a birthday or other type of event, these cupcakes definitely merit being part of the celebration.

Ingredients
6 ounces good-quality dark chocolate (60 percent to 70 percent cacao), chopped

6 tablespoons unsalted butter

1 tablespoon light corn syrup

Pinch of salt

3/4 cup sugar

2 large eggs

1/2 cup all purpose flour

1 teaspoon baking powder

2/3 cup coarsely chopped walnuts

Frosting
4 ounces cream cheese, room temperature

1/3 cup light corn syrup

4 ounces good-quality dark chocolate (60 percent cacao), chopped

8 small, fresh strawberries

To make the cupcakes: Position the rack in the center of the oven and preheat the oven to 350 degrees F.

Line 8 standard cupcake molds with cupcake liners.

Stir the chocolate and butter in a small heavy saucepan over low heat until the chocolate and butter melt and the mixture is smooth. Stir in the syrup and salt. Remove from the heat and set aside.

Using an electric mixer, beat the sugar and eggs in a large bowl for 2 minutes or until the mixture is thick and light. Stir in the chocolate mixture. Add the flour and baking powder and stir just until blended, then stir in the walnuts.

Divide the batter equally among the prepared cupcake molds filling the paper liners completely. (Filling the liners completely is key — otherwise the cupcakes will collapse and will be less fudgy.)

Bake for about 25 minutes, or until the cupcakes puff and crack on top and a skewer inserted into the center of the cupcakes comes out with fudgy crumbs attached.

Remove the cupcakes from the oven and cool completely on a cooling rack.

To frost the cupcakes: Using an electric mixer, beat the cream cheese in a large bowl until light and smooth. Beat in the syrup. Place the chocolate in another bowl and place the bowl over a small pot of boiling water. Stir constantly until the chocolate melts. Add the melted chocolate to the cream cheese mixture and beat until blended and fluffy, stopping the machine and scraping the bottom of the bowl to ensure that the mixture is well-blended. Spread the frosting generously over the cooled cupcakes. Garnish each one with a fresh strawberry and serve.

Single-serving tarts pack a punch of flavor

Fruittarts1

I like to bake with fresh fruit when I have some on hand. After making the strawberry shortcake and pineapple upside-down cake, I froze the leftover fruit to use later. When I recently came across this recipe, I knew I had found a good use for the leftovers.

The original recipe only used pineapple, but I didn’t have enough so I substituted strawberries for the rest. I was glad I did. These would have been too sweet with only pineapple. The strawberries helped to mellow the tartness, which brought nice balance to the overall flavor of the finished tarts.

The syrupy mixture that resulted from simmering the fruit and sugars was delicious. It had a lot of layers of flavor, and the mini tarts had a great balance of crust and flavor-packed filling.

The crust isn’t the stiff tart crust I expected. Instead of the usual version that can sometimes take a bit of might with a knife to cut through, this crostata dough is sweet and has a bit of give to it. It perfectly complements the filling.

Instead of taking one large tart to work, I opted to make mini tarts. They were adorable. My staff really seemed to get a kick out of having mini tarts to themselves.

I highly recommend this recipe. The single-serving format I chose eliminates the need for serving utensils. They can be eaten like cupcakes and easily taken to a Memorial Day barbecue.

Ingredients
2 cups all-purpose flour
1/4 cup sugar
3/4 teaspoon coarse salt
8 ounces (2 sticks) cold unsalted butter, cut into 1/2-inch pieces
1/4 cup ice water

Combine flour, sugar, and salt in a large bowl. Add butter and combine until mixture resembles coarse meal. Add ice water and mix until mixture just begins to hold together.

Shape dough into one disk. Wrap in plastic, and refrigerate for at least an hour or up to three days (or freeze for up to 1 month; thaw in refrigerator before using).

Ingredients
1/2 pineapple, peeled, quartered and cored
1 1/2 cups strawberries, hulled and quartered
1/4 cup packed light-brown sugar
1/4 cup granulated sugar
1 vanilla bean, split and scraped, pod reserved
2 tablespoons fresh lemon juice
1/2 cup dark rum

Divide crostata dough into 12 parts. Pat each part into a muffin cup in a muffin tin. Trim excess dough. Combine excess dough into a single mass and flatten into a rectangle between two sheets of plastic wrap. Freeze tin and excess dough until firm, about 30 minutes.

Cut each pineapple quarter crosswise into 1/3-inch-thick slices. Combine sugars, vanilla seeds and pod, and lemon juice in a large saute pan. Add pineapple and strawberries and cook over medium heat, stirring until sugars dissolve and mixture becomes saucy, about 3 minutes. Add rum and simmer until pineapple has softened and almost all of the liquid has evaporated, about 20 minutes. Remove from heat, and let cool in pan. Discard vanilla pod.

Remove muffin tin from refrigerator. Divide pineapple-and-strawberry mixture evenly into each cup. Take remaining rectangle of dough and cut into thin strips place four strips crosswise over each cup.

Preheat oven to 400 degrees. Bake for 15 minutes, or until tarts are golden brown around the edge. Let cool in pan for 30 minutes before removing. Unmold and serve immediately.

Winding down with mint chocolate mousse

chocolatemintmousse

Last week I traveled for work. No matter how long I’m gone, it’s always nice to come home to my own space.

Because I didn’t return home until late Saturday afternoon, I knew I’d only have one full day of the weekend to myself. So I planned to do some cooking. To get a head start, I decided to make dessert.

Work has been particularly time-consuming lately, so much so that I haven’t had time to try anything from the new cookbook I bought in April, Curtis Stone’s “What’s for Dinner?” That was the first place I looked for inspiration. I settled on his Bittersweet-chocolate Mint Mousse.

Stone’s version of the mousse is thick and creamy, and the mint extract helps to bring out the richness of the chocolate. Other versions of mousse that I’ve made ended up overly foamy or the chocolate flavor wasn’t rich enough. The texture and flavor in this recipe are just about how I prefer them to be.

The only cooking involved is melting the chocolate. Making something with eggs that aren’t cooked always makes me a bit uneasy, so I researched whether it was OK and found this page in the Farmers’ Almanac, which stated that the risk of salmonella is low. If you’re worried about consuming the raw eggs, it also suggests substitutes for them.

Ingredients
7 ounces bittersweet chocolate (70% cacao), coarsely chopped
2 tablespoons unsalted butter, thinly sliced
1/2 cup whole milk
3 large eggs, separated
2/3 cup confectioners’ sugar
1 cup heavy cream
1/8 teaspoon mint extract (use 1/4 teaspoon if at high altitude)

Set a large heatproof bowl over a saucepan of barely simmering water. Add the chocolate and butter to the bowl and stir until melted and smooth. Remove the bowl from the saucepan. Whisk in the milk. Let stand for about 15 minutes, stirring occasionally, or until the mixture is cool.

In a medium bowl, using an electric mixer, beat the egg yolks and 1/3 cup of the confectioners’ sugar on medium-high speed, until light and airy. In another medium bowl, using clean beaters, beat the egg whites with the remaining 1/3 cup confectioners’ sugar on medium-high speed until soft peaks form. Using a large flexible spatula, fold the egg yolk mixture into the cooled chocolate mixture. Gently fold in the egg white mixture.

Add the cream and the mint extract to the bowl that held the egg whites. Beat with the mixer (no need to clean the beaters) on high speed until thick, soft peaks form. Fold the whipped cream into the chocolate mixture.

Divide the mousse among six to eight dessert cups or bowls. Cover each one with plastic wrap. Refrigerate for at least two hours to chill and set the mousse.

Dreaming of summertime

strawberryshortcake1

When I went home for a visit a couple weeks ago, I was delighted to see the farm stands were already offering strawberries. I bought a box of them — six baskets for $6 — and ate a bowl of them daily for about a week once I returned to Tahoe. Still, I had about three baskets that needed to be baked into something to keep them from going bad. Good strawberries can’t be left to waste. I settled on strawberry shortcake, something I don’t make often, but enjoy quite a bit when it turns out just right.

I have never been crazy about those packaged shortcakes sold near the strawberries at the grocery store — the spongey ones that have somewhat of a dip at the top for the strawberries to sit in. I hadn’t made my own biscuits in a long time, so I turned to the Joy of Cooking to see what it suggested. It had a couple options, but I settled on cream biscuits this time around. They were, by far, the best ones I had ever made for strawberry shortcake. I am not big on rolling out dough; I prefer to shape it with my hands when I can. I divided the dough into eight pieces and formed them into rounds on a baking sheet. You may also roll out the dough and divide it into more pieces if you’d like. The biscuits were easy and the flavor and texture were just how I hoped they would be. Topped with the macerated strawberries (I added some of Penzeys Vanilla Sugar to the mixture for a bit of extra flavor) and whipped cream, this was the dessert I was craving. I was thrilled. Summer will be here soon enough.

Ingredientsstrawberryshortcake3
4 cups strawberries
1/4 cup sugar
1 1/2 cups heavy whipping cream
2 cups all-purpose flour
2 1/2 teaspoons baking powder (use 2 if at high altitude)
1/2 to 2/3 teaspoon salt (use one teaspoon if at high altitude)
1 1/4 cups heavy whipping cream

Rinse and quarter the strawberries. Using a potato masher or other tool, partially crush the strawberries. Put them in a bowl with the sugar. Set in fridge.

strawberryshortcake4Preheat the oven to 450 degrees F. Whisk together flour, baking powder and salt. Add 1 1/2 cups heavy whipping cream. Mix with a rubber spatula, wooden spoon or fork until most of the dry ingredients are moistened. Knead until smooth. Divide the dough into eight parts. Shape into 3-inch rounds that are about 3/4-inch thick. Place on a baking sheet with a sheet of parchment paper. Bake for 12 minutes or until slightly browned. Remove from oven and let cool for 15-20 minutes.

Whip the 1 1/4 cups heavy whipping cream until soft peaks form.

To assemble, cut the biscuits in half so there’s a top and bottom. Spoon generous spoonfuls of the strawberry mixture onto the bottom half of the biscuit. Top with a large dollop of whipped cream. Top with the other half biscuit.

Whipping up dessert in a hurry

banoffeepie4

Every time one of my staff members celebrates a birthday, I bring in a baked good just for them, something they don’t have to share with anyone else. When one of my staff members celebrated her birthday Friday and I knew I didn’t have a ton of time to make and decorate a cake, I instead chose to make a Banoffee Pie.

I first made a Banoffee Pie years ago after seeing Curtis Stone make one on “Take Home Chef.” It looked easy and I was pleased that I found it just as simple to make at home. The pie gets its name because it uses bananas and toffee. Making the toffee sauce is the only part that really takes much effort — and it doesn’t take much if you follow the instructions. The pie is framed by a simple graham cracker crust, filled with a base layer of toffee sauce, then topped with whipped cream with bananas folded into it. The rest of the toffee sauce is drizzled on top. It’s easy as, well, pie.

The nice thing about this recipe is that you get a lot more flavor than you might expect. When I first made it, I was worried about getting a mouthful of whipped cream, but the sliced bananas that are folded into it keep that from happening, and the toffee sauce on the top and bottom add a certain richness to it.

For the record, let me say that this is not a banana cream pie. There are bananas and cream, but they are not blended together as they are in the traditional desert.

Another plus is that you can do this in parts if you’re strapped for time. I made the crust and toffee sauce the night before, then made the whipped cream-and-banana filling the day of so it would be as fresh as possible.

This is a great option if you’re short on time and want to serve a light, flavorful dessert. It was a big hit with the birthday girl.

Ingredientsbanoffeepie1
9 ounces graham crackers, crushed

1 stick butter, melted
1/2 cup (packed) dark brown sugar
1 14-ounce  can sweetened condensed milk

1 stick butter
1 1/4 cups heavy cream
5 small ripe bananas (about 1 1/2 pounds)

Line the bottom of a 9-inch springform pan with parchment paper.

Chop the graham crackers in a food processor until they are finely ground.

Pour the melted butter over the crumbs and process to blend well. The crumbs should stick together when pressed.

Press the crumb mixture over the bottom and 1 1/2 inches up the sides of the springform pan. Refrigerate.

To make the toffee sauce, place a heavy medium saucepan over medium heat. Combine the sugar and 3 tablespoons of water in a medium heavy saucepan. banoffeepie3

Stir over medium heat until the sugar dissolves. Increase the heat and boil without stirring until the color is deep amber, occasionally swirling the pan and brushing down the sides with a pastry brush dipped into water, about 5 minutes.

Stir in the condensed milk and butter. Continue stirring for 5 minutes or until the sauce thickens slightly.

Remove the toffee sauce from the heat and spread 1 cup of the sauce over the prepared crust and refrigerate for about 1 hour or until the toffee is semi-firm. This can be refrigerated overnight if you prefer to prepare the rest on the day it will be served.

Keep the remaining toffee sauce at room temperature.

Using an electric mixer, beat the cream in a large bowl until thick and very soft billowy peaks form.

Very thinly slice three of the bananas into discs.

Fold the sliced bananas into the softly whipped cream and spoon into the prepared pie crust.

Slice the remaining bananas and arrange them decoratively over the pie.

Re-warm the remaining toffee sauce gently over low heat.

Drizzle some of the sauce decoratively over the pie. If the sauce has thickened too much to drizzle, stir a few tablespoons of milk into the sauce to create a thinner consistency.

Cut the pie into wedges and transfer to plates.

Drizzle each pie wedge with more sauce and serve.