Peanut butter is the icing on the cake

Peanutbutterfrosting041215

One of my coworkers had a birthday last week, which means I did some baking. This coworker requested chocolate cupcakes, so I knew I’d turn to the Joy of Cooking for the cupcake recipe. But the frosting was where I wanted to have some fun.

My mom always made buttercream frosting for cupcakes, but I’ve always found most frosting to be too sweet for my taste. I remembered this coworker being fond of peanut butter, so I looked around for a recipe online for peanut butter frosting and came across this one.

The original recipe called for creamy peanut butter, but I only ever buy crunchy, so I used that. The frosting held up well and complemented the cupcakes nicely. It’s definitely a nice alternative to the more common options.

Ingredients
1 cup confectioners’ sugar
1 cup crunchy peanut butter
5 tablespoons unsalted butter, at room temperature
3/4 teaspoon pure vanilla extract
1/4 teaspoon kosher salt
1/3 cup heavy cream

Place the confectioners’ sugar, peanut butter, butter, vanilla, and salt in the bowl of an electric mixer fitted with a paddle attachment. Mix on medium-low speed until creamy, scraping down the bowl with a rubber spatula as you work. Add the cream and beat on high speed until the mixture is light and smooth.

Swapping potatoes for cauliflower

MashedCauliflower011114

One of the great things about Facebook is when someone raves about a recipe they’ve recently tried and loved. This happened last week with one of my friends who tried mashed cauliflower. I reached out to her and she gave me the link. Since I don’t have much experience with cauliflower or how to use it creatively, this seemed like a great, simple recipe to try.

I thought using cauliflower instead of potatoes wouldn’t be able to compare to mashed potatoes. I was wrong. Not only did boiling the cauliflower take a lot less time to boil than potatoes would, but the entire recipe took less than 15 minutes. Just make sure you get the cauliflower as dry as possible after taking it out of the boiling water. My friend said she put the cauliflower in a tea towel and wrung it out.

This is a great addition to any meal where you’re short on time.

Ingredients
1 medium head cauliflower
1 tablespoon cream cheese, softened
1/4 cup grated Parmesan
1/2 teaspoon minced garlic
1/8 teaspoon straight chicken base or bullion (may substitute 1/2 teaspoon salt)
1 tablespoon sour cream
1/8 teaspoon white pepper
1/2 teaspoon chopped fresh or dry chives, for garnish
3 tablespoons unsalted butter

Set a stockpot of water to boil over high heat.

Clean and cut cauliflower into small pieces. Cook in boiling water for about 6 minutes, or until well done. Drain well; do not let cool and pat cooked cauliflower very dry between several layers of paper towels.

In a bowl with an immersion blender, or in a food processor, puree the hot cauliflower with the cream cheese, Parmesan, garlic, chicken base, sour cream, and pepper until almost smooth.

Garnish with chives, and serve.

Curious about quinoa

Quinoaporridge040614

This is what I had for breakfast this morning. I made quinoa once a long time ago for a cold salad. It was good, but I hadn’t seen any recipes since that made me want to revisit the grain, until this recipe arrived in my inbox a few weeks ago. I had forgotten about it until I went grocery shopping yesterday and saw quinoa on the shelf.

Now that I’m working normal daytime hours for the first time in a long time, I’m realizing that I really do need to eat breakfast. Skipping it and waiting for lunchtime leaves me lagging, especially since by that time I’ve already been awake for six or seven hours. So, I’ve been looking for things I can make quickly in the morning, just to get a good start to the day.

When I saw that this recipe was called porridge, I instantly pictured the soupy, unappetizing substance served in “Oliver Twist.” I don’t know why that’s the first thing that came to mind, but it was. This quinoa porridge turned out to be quite good, and was a satisfying start to the day. I added to the original recipe because I like more texture in my food.

Know that the amount of quinoa made below is more than you’ll need for one serving of this porridge. But, if you want to make it for more than one, or have quinoa to keep in the fridge for other dishes, make the full amount. If you do want to make just one serving, use 1/3 cup quinoa and 2/3 cup water.

Ingredients
2 cups water
1 cup quinoa
2/3 cup almond milk
5 strawberries, hulled and chopped
1 tablespoon shredded raw coconut
2 tablespoons sliced almonds or whole pecans, toasted and chopped
1 1/2 teaspoons light agave nectar
Pinch of salt

Place quinoa in a pot and rinse and drain twice. Add 2 cups water and bring to a boil. Cover and let simmer for 10-15 minutes, or until outer germ layer separates and grain appears translucent.

In another pot, combine 1/2 cup quinoa and 2/3 cup almond milk. Bring to a boil over high heat. Cover pot, lower heat and simmer for 5 minutes. Remove lid and continue cooking for another 5 minutes, or until porridge is thick and creamy. Stir in strawberries, coconut, nuts, agave and salt. Serve warm.

A fresh take on French onion soup

Frenchonionsoup021614

French onion soup is never something I’ve craved. I think I may have tasted it once at a restaurant years ago, but hadn’t given it much thought since. I’ve been eating a lot of soups and stews this year, and I wanted to expand my repertoire. I wanted to go outside my comfort zone.

I browsed the Food Network site, as I so often do when looking for inspiration, and chose Alton Brown’s French Onion Soup recipe at the recommendation of a friend. I had never heard of French onion soup with Cognac and apple cider. I was intrigued.

Cutting onions always makes me tear up, so I wanted to slice them in the fastest way I could. I took out my mandoline slicer and did it quickly — and without tears. The mandoline made it a much easier process than it would have been otherwise. If you have one, I recommend using it for this soup.

After slicing the onions, cooking the soup became a slower process, but it was completely worth it in the end. It made about six servings, so I had lunch all set for the work week.

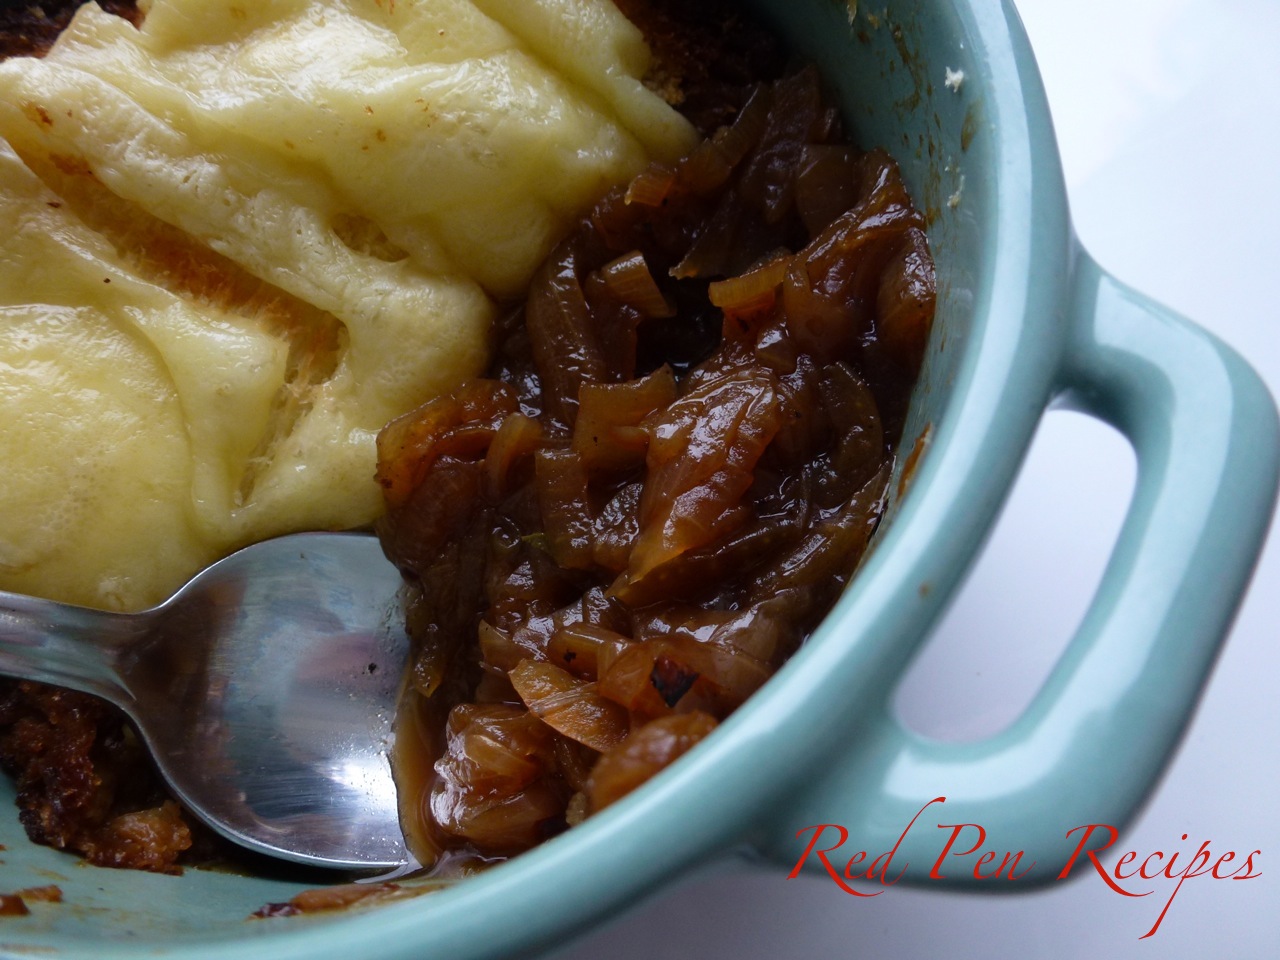
Many of the reviewers said the soup was a bit too sweet. The first time I made it, I agreed with them. But the second time around, I used two red onions instead of two sweet onions, and I used a less concentrated cider. It helped tremendously. Smoked fontina also addedI wouldn’t change anything else because, at the end of the day, I’d learned a new recipe and had something to warm me up as the snow fell outside.

Ingredients
3 sweet onions (like Vidalias) and 2 red onions (about 4 pounds total)
3 tablespoons butter
1 teaspoon salt
2 cups white wine (sauvignon blanc and dry riesling both work well)
10 ounces canned beef consume
10 ounces chicken broth
10 ounces apple cider (Tree Top works well)
Bouquet garni; thyme sprigs, bay leaf and parsley tied together with kitchen string
1 loaf country style bread
Kosher salt
Ground black pepper
Splash of Cognac (optional)
1 cup Fontina or Gruyere cheese, grated

Trim the ends off each onion then halve lengthwise. Remove peel and finely slice into half moon shapes. Set electric skillet to 300 degrees and add butter. Once butter has melted add a layer of onions and sprinkle with a little salt. Repeat layering onions and salt until all onions are in the skillet. Do not try stirring until onions have sweated down for 15 to 20 minutes. After that, stir occasionally until onions are dark mahogany and reduced to approximately 2 cups. This should take 45 minutes to 1 hour. Do not worry about burning.

Add enough wine to cover the onions and turn heat to high, reducing the wine to a syrup consistency. Add consume, chicken broth, apple cider and bouquet garni. Reduce heat and simmer 15 to 20 minutes.

Place oven rack in top 1/3 of oven and heat broiler.

Cut country bread in rounds large enough to fit mouth of oven-safe soup crocks. Place the slices on a baking sheet and place under broiler for 1 minute.

Season soup mixture with salt, pepper and cognac. Remove bouquet garni and ladle soup into crocks leaving one inch to the lip. Place bread round, toasted side down, on top of soup and top with grated cheese. Broil until cheese is bubbly and golden, 1 to 2 minutes.

Peppers that will leave you stuffed

stuffedbellpeppers011914

I love bell peppers. Usually I just cut them up and use them as part of a recipe, but this time I wanted to make them the focus of the meal, so I decided to try stuffing them. I looked around on the Food Network’s site and found this creation from Emeril was one of its top-rated recipes.

Because I was only cooking for myself, I made two stuffed peppers instead of the full six the original recipe makes. I also used red peppers instead of green, and ground turkey instead of ground beef and ground pork because that’s what I had. Plus, I love the sweetness of red peppers. That’s what’s great about this recipe: it’s easy to customize it to your taste.

The peppers are firm enough to hold up through the baking process, but soft enough to cut through. Mine were still slightly crunchy after they came out of the oven, which provided more texture to the dish.

One stuffed pepper is filling, but not in the I-just-ate-way-too-much-macaroni-and-cheese way. There’s a lot of good stuff in these peppers, so you can enjoy them and maybe even look forward to the leftovers.

Ingredients
2 red bell peppers, tops cut away and seeds removed
1 tablespoon vegetable oil
1/3 cup finely chopped yellow onions
1/4 cup finely chopped red peppers
1/3 pound ground turkey
1 teaspoon minced garlic
1 tablespoon finely chopped fresh parsley leaves
1/4 teaspoon salt
Dash ground black pepper
Pinch red pepper flakes
2/3 cup cooked long or medium-grain white rice
3 ounces tomato sauce
Water

Preheat the oven to 350 degrees F.

In a large pot of boiling water, parboil the peppers until just tender, 2 to 3 minutes. Remove with a slotted spoon and dry on paper towels.

In a large saute pan or skillet, heat the oil over medium-high heat. Add the onions and chopped bell peppers and cook, stirring, until soft, about 3 minutes. Add the turkey, garlic, parsley, salt, black pepper, and pepper flakes. Cook until the meat is browned, stirring with a heavy wooden spoon to break up the lumps, about 6 minutes. Add the rice and tomato sauce and stir well. Remove from the heat and adjust the seasoning, to taste.

Pour enough water into a baking dish to just cover the bottom, about 1/8-inch deep. Stuff the bell peppers with the rice mixture and place in the baking dish. Bake until the peppers are very tender and the filling is heated through, 25 to 30 minutes.

Remove from the oven and let rest for 10 minutes before serving.