Banana bread that’s a breeze to make

bananabread100613

Everyone has a favorite banana bread recipe. It’s one of those classic things that most people have on hand, even if baking isn’t something they do on a regular basis.

I love my mom’s banana bread, but it didn’t translate well at high altitude. I also tried the Banana Bread Cockaigne from the Joy of Cooking, which is my second favorite recipe, but that had issues, too. So, I toyed with it until it came out perfectly.

While three bananas work well at much lower altitude, they make the bread overly mushy at altitude. So, I reduced the number of bananas to two and used less baking powder as well. I checked the bread 45 minutes into the baking process and, while it looked done, it wasn’t fully cooked inside. I left it in for another 10 minutes and it turned out just right. It stayed moist and the crust was not overcooked.

If you’re in the mood to put a spin on the bread, you can add seeds from one vanilla bean. I’ve done that before and it can be a nice change if you’re looking for a more dynamic loaf. The original recipe also suggests adding 1/2 cup chopped nuts or 1/4 cup finely chopped dried apricots.

Ingredients
1 1/2 cups all-purpose flour
1 1/2 teaspoons baking powder (use 1 teaspoon at high altitude)
1/2 teaspoon salt (use 1 teaspoon at high altitude)
2/3 cup sugar
6 tablespoons butter, softened
2 large eggs, beaten
2 ripe bananas, mashed

Grease a loaf pan and preheat the oven to 350 degrees F.

Beat sugar and butter in a large bowl at medium speed until creamy. Add eggs and bananas. Add dry ingredients. Mix until just combined.

Scrape the batter into the loaf pan. Bake the bread for 50-55 minutes, or until a toothpick inserted in the center of the loaf comes out clean. Cool slightly, then take out of pan and cool completely on a rack.

Having fun with a less common fall flavor

almondpeartart092913

Fall is here, and that means it’s time for baking comfort foods with apples and pumpkin. Last weekend, I went wine tasting in the Apple Hill area and stopped at a farm stand on my way home. The best deal at the farm stand was a box of about eight pears for $2. I bought two boxes because I knew I’d want to bake with them.

But, before I proceed, I want to let you know that Red Pen Recipes now has a Facebook page. Like it here.

Screen shot 2013-09-25 at 8.14.25 PMI also recently purchased a ticket to see Curtis Stone in Reno. Those of you who read regularly know that I love his style of cooking. According to his response to the question I posed to him on Facebook, we’ll be having cocktails, stir-frys and chocolate. The countdown to Oct. 12 has begun.

So, back to the pears. When I got home, I started looking for recipes and found this Pear and Almond Tart recipe from Bon Appétit. I had all of the ingredients, and it sounded like the perfect way to use a few of those pears.

This recipe has three major components, all of which can be done separately and saved until you’re ready to assemble the whole thing. If you don’t want to spend hours at a time in the kitchen, do one piece at a time.

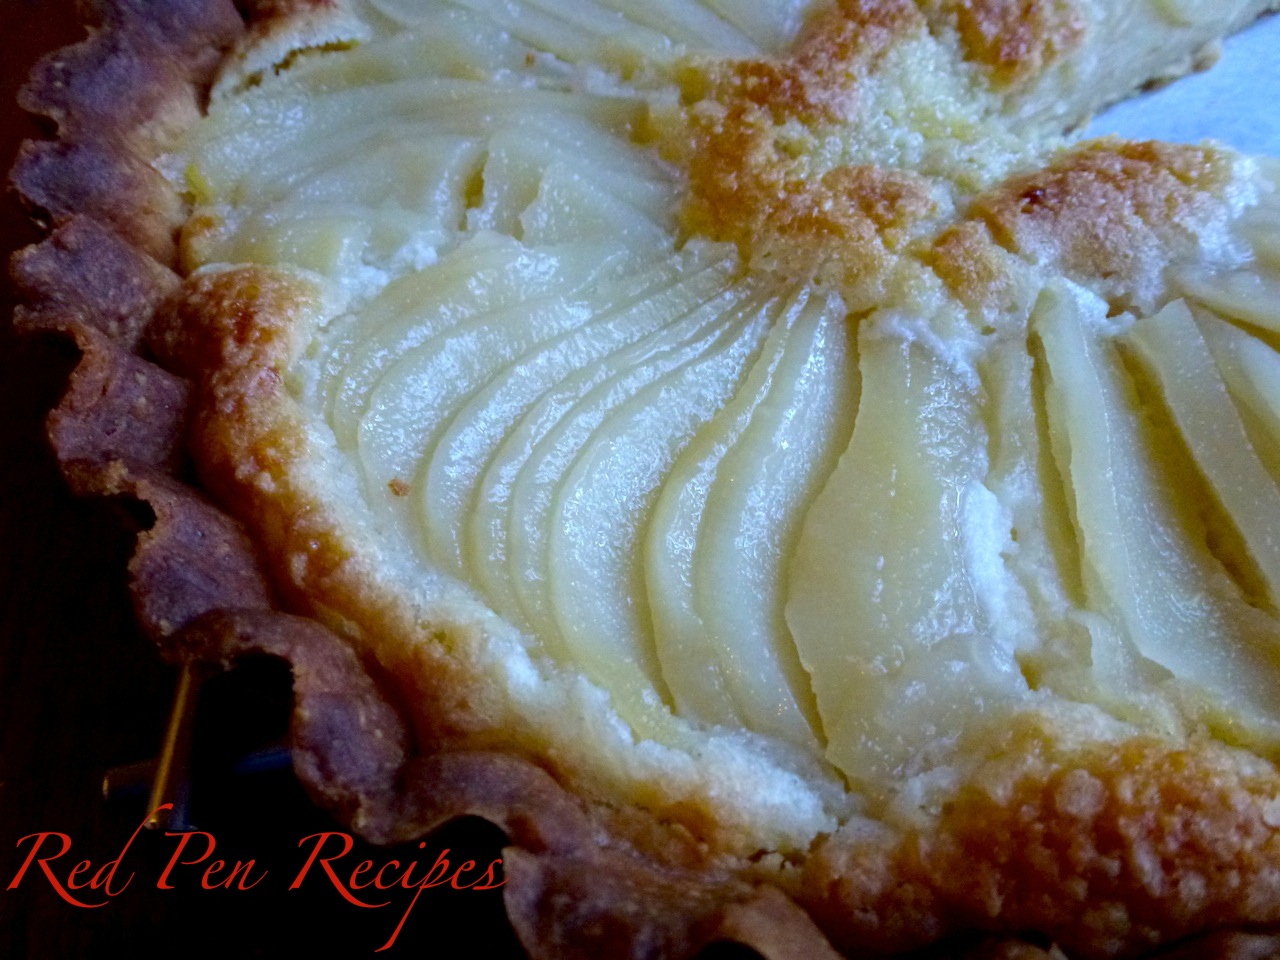
I know my crust looks burned in the photo, but it didn’t taste like it at all. I was pleasantly surprised.

The recipe didn’t say to save the liquid from poaching the pears, but I knew from experience that I could boil it into a syrup. A beautiful simple syrup is a terrible thing to waste so I decided to use it to make ice cream.

For the ice cream, I used this recipe. If you plan on using the syrup for ice cream, you have to do things just a bit differently. I’d recommend adding a fourth pear to the poaching process. Set it aside and, when you’re ready to make the ice cream, core it, then dice it and add it to the ice cream when it’s in the ice cream mixer. After the pears have cooled in the liquid, remove them. Then bring the liquid back to a boil and keep it on the heat until there’s about 3/4 cup of thick syrup. Take it off the heat and set it aside. Use it in place of the 1/2 cup sugar in the recipe by using 1/2 in the milk mixture and adding the remaining 1/4 cup to the egg yolks. I know it seems like a lot, but trust me. It works. The bits of pear in the ice cream provided a nice contrast to the texture, too.

If you’re not into that, bottle the syrup and use it on pancakes or find another way to use it. But I encourage you not to waste it, because it’s too delicious to throw away.

Pears
4 cups water
1 1/4 cups sugar
1 1/2 tablespoons fresh lemon juice
3 medium-size firm but ripe pears (Bosc or Bartlett), peeled (each about 7 ounces)

Bring 4 cups water, sugar, and lemon juice to boil in large saucepan over medium-high heat, stirring until sugar dissolves. Add pears. Reduce heat to medium and simmer until pears are very tender, turning occasionally, about 20 minutes. Cool pears in syrup. Can be made two days ahead. Cover and refrigerate.

Crust
1/2 cup powdered sugar
1/4 cup almonds
1/4 teaspoon salt
9 tablespoons (1 stick plus 1 tablespoon) unsalted butter, room temperature
1 large egg yolk
1 1/4 cups all purpose flour

Blend powdered sugar, almonds, and salt in processor until nuts are finely ground. Add butter and blend until smooth, scraping down sides of bowl occasionally. Mix in egg yolk. Add flour. Using on/off turns, blend until dough comes together in clumps. Gather dough into ball; flatten into disk. Wrap in plastic and chill at least 3 hours. Can be made two days ahead. Keep refrigerated.

Almond filling
2/3 cup blanched slivered almonds
1 tablespoon all-purpose flour
7 tablespoons sugar
6 tablespoons (3/4 stick) unsalted butter, room temperature
1 large egg
Powdered sugar (optional)

Finely grind almonds and flour in processor. Mix in 7 tablespoons sugar, then butter, blending until smooth. Mix in egg. Transfer filling to medium bowl. Cover and chill at least 3 hours. Can be made two days ahead. Keep chilled.

Once you’re ready to assemble all three components, position rack in center of oven and preheat to 375 degrees F. Roll out chilled dough on floured sheet of parchment paper to 12-inch round, lifting and turning dough occasionally to free from paper. Using paper as aid, turn dough into 9-inch-diameter tart pan with removable bottom; peel off paper. Seal any cracks in dough. Trim overhang to 1/2 inch. Fold overhang in, making double-thick sides. Pierce crust all over with fork. Freeze crust 10 minutes.

Line crust with buttered foil, buttered side down, then fill with dried beans or pie weights. Bake crust until sides are set, about 20 minutes. Remove foil and beans. Bake crust until sides are golden and bottom is set, pressing with back of fork if crust bubbles, about 10 minutes longer. Cool crust in pan on rack. Reduce oven temperature to 350 degrees F.

Spread almond filling evenly in crust. Stem pears and cut each in half lengthwise; scoop out cores. Cut each half crosswise into thin slices. Gently press each pear half to fan slices but keep slices tightly overlapped. Slide spatula under pears and arrange atop filling like spokes of wheel with narrow ends in center.

Bake tart until golden and tester inserted into center of filling comes out clean, about 55 minutes. Cool tart in pan on rack. Push pan bottom up, releasing tart from pan. Let stand at room temperature. Cut tart into wedges; sprinkle with powdered sugar, if desired, and serve.

Coffee’s sidekick made easy at home

1biscotti092213

Biscotti might seem intimidating at first, but it’s really just a twice-baked, sweet, quick bread. Once you make it at home, you’ll no longer feel the need to buy it with your morning coffee.

This is the second time I’ve made biscotti in the past few years. The first recipe I used called for about 10 eggs, but this time I used the Orange Almond biscotti recipe from Cook’s Illustrated cookbook, which only called for two eggs. There was no noticeable difference in the texture of the finished biscotti.

Biscotti is a lot like a cookie in the way that, once you have a good base recipe, you can put whatever you want in it. The first time I made biscotti I put pistachios in it. This time around, I opted to add dried cranberries. You can also dip it in tempered chocolate for a special treat. Have fun making your own flavor combinations.

The most important thing to remember when making biscotti is to keep the slices a half-inch thick or less. Any thicker and the biscotti becomes hard to bite into when it’s done.

Enjoy!

Ingredients
2 cups all-purpose flour
1 teaspoon baking powder (use 1/2 teaspoon if at high altitude)
1/4 teaspoon salt (use 1/2 teaspoon if at high altitude
4 tablespoons unsalted butter, softened
1 cup sugar
2 large eggs
3/4 cup sliced almonds
1/3 cup dried cranberries
2 tablespoons grated orange zest
1/2 teaspoon vanilla extract (use 1 teaspoon if at high altitude)
1/2 teaspoon almond extract

Adjust oven rack to middle position and heat oven to 350 degrees F. Line baking sheet with parchment paper. Whisk flour, baking powder and salt together in small bowl.

Using a stand mixer fitted with the paddle attachment, beat butter and sugar together at medium-high speed until light and fluffy. Reduce speed to low and add eggs one at a time, then add almonds, cranberries, orange zest, vanilla and almond extracts until combined, about 30 seconds, scraping down bowl as needed. Stir in flour mixture until just combined.

Halve dough and turn each portion onto prepared baking sheet. Using floured hands, quickly stretch each portion of dough into rough 12-inch-by-2-inch loaf, placing them about 3 inches apart. Pat each loaf to smooth it. Bake until loaves are golden and just beginning to crack on top, about 35 minutes, rotating baking sheet halfway through baking.

Let loaves cool for 10 minutes; reduce oven temperature to 325 degrees. Using a serrated knife, cut each loaf diagonally into 1/2-inch slices. Lay slices cut side up about 1/2 inch apart on baking sheet and return them to the oven. Bake until lightly golden on both sides, about 15 minutes, turning over each piece halfway through baking. Immediately transfer biscotti from baking sheet to wire rack and let cool completely.

Experimenting with eggplant

eggplant1

I never ate eggplant as a kid. Mom never made it, so for most of my life it has been somewhat of a foreign vegetable. After seeing it at the farmers market on a regular basis, I decided to purchase one and figure out what to do with it.

While browsing Pinterest a couple weeks ago, I saw a recipe for mini pizzas that used slices of zucchini for crust. I decided to see if I could do the same thing with eggplant. It seemed like a good starting point and it was. It gave me a bit of experience seeing how eggplant bakes, and I learned that it has a lot of moisture that can be cumbersome if not drained a ahead of time. I made the pizzas two ways — first in the oven and second in a frying pan. I preferred the way it came out of the oven, because it had less moisture in the end. The pizzas are simple enough to throw together on a whim, and they taste good, too. I stuck with basic toppings, but you can easily put whatever you want on them.

After getting that bit of experience under my belt, I felt ready to tackle something a little more ambitious. I had never made Eggplant Parmesan, so I decided to consult my cookbooks to see how it was done. It turns out everybody has their own version. One book called for large slices of eggplant, another called for long sticks of eggplant; one book recommended frying the eggplant in oil, and another said baking it was better because frying it made it too soggy. It sounded like each recipe had its issues, so after checking out the basic methods and ingredients, I decided to come up with my own method.

I chose to approach the eggplant like I would homemade fish sticks. I breaded it in panko, which I like because it gives foods a nice crunch, and chose to bake it in a thin layer of olive oil. It worked surprisingly well. I like a bit of heat to sauce, so the garlic and red pepper flakes took care of that. I didn’t have mozzarella, so I went with fresh Asiago I picked up at the store, and I liked how it complemented the sauce. I’m proud of how this experiment turned out, and will definitely be making this version of Eggplant Parmesan again.

eggplant2Eggplant mini pizzas
Olive oil
Sea salt
Three 1/4- to 1/3-inch slices of eggplant, drained on a paper towel for 30 to 45 minutes
1/3 cup tomato sauce
1 cup grated cheese
About 12 slices of pepperoni

Put enough olive oil in the bottom of a pie pan to lightly coat the bottom of the pan. Sprinkle with sea salt. Put the pan in the oven and preheat it to 350 degrees F.

Once the pan is preheated, add the eggplant slices. Cook for 5 minutes. Take the pan out of the oven and turn over the eggplant slices. Spoon tomato sauce onto each slice. Top with cheese and pepperoni. Put back in oven and cook for another 5 minutes, or until the cheese is melted.

Remove from the oven and serve.

Eggplant Parmesan
2/3 of an eggplant, cut into 1-inch-wide sticks and drained in a colander or pan lined with paper towels for 1 hour or overnight
1/2 cup flour
1/4 teaspoon white pepper
1/2 teaspoon salt
1 egg
1 cup panko (or breadcrumbs)
Olive oil
1 15-ounce can tomato sauce
2 tablespoons dried basil
1 teaspoon dried minced garlic or 1 clove fresh minced garlic
1/2 teaspoon crushed red pepper flakes
Dash salt
3/4 cup Asiago, grated or cut into small cubes
1/2 cup grated Parmesan

Preheat oven to 425 degrees F. Combine flour, white pepper and salt in a resealable freezer bag. Beat the egg in a pie pan and set aside.

Put five sticks of eggplant into the resealable bag with the flour mixture, seal the bag and shake to coat. Remove and repeat with the remaining eggplant, doing about five sticks at a time. Once all the eggplant has been coated with flour, dispose of any remaining flour mixture.

Put the panko in the same resealable bag. Coat each piece of eggplant in the beaten egg and set aside. Put five sticks of eggplant into the bag of panko. Seal the bag and shake to coat the eggplant. Repeat with the remaining eggplant.

Drizzle a generous amount of olive oil over the bottom of a 9-by-13-inch glass pan or cookie sheet. Place the panko-covered eggplant sticks in a single layer in the pan. Bake for 15 minutes, or until bottom of eggplant is slightly browned.

Meanwhile, combine the tomato sauce, basil, garlic, red pepper flakes and salt in a small saucepan or microwavable dish and heat until hot. Set aside.

Once the eggplant has baked for 15 minutes, turn it over and bake for another 10 minutes, or until the other side of the eggplant is slightly browned. Remove eggplant from the pan. Coat the bottom of the pan evenly with half of the sauce. Put the eggplant back in the pan in a single layer. Pour remaining sauce over eggplant. Sprinkle cheeses over eggplant and return to oven for 5 minutes, or until cheese has melted. Remove from oven and let sit for 5-10 minutes before serving.

Smashing expectations with simple scones

scones1

I have never met a scone I liked. Every scone I’ve ever had has been dry, plain and crumbly. They were all like eating a stale biscuit. So, for the majority of my life, I’ve avoided them. Last week I decided I make them at home to see whether I would like them better. I did.scones2

The recipe I used was the Simple Cream Scones recipe from The Cook’s Illustrated Cookbook. I figure it’s always best to start with something simple. I added a vanilla bean to the recipe and the flavor of the scones was great. They didn’t crumble all over the place when I bit into them like ones I’d purchased from coffee shops did. They were soft and a bit moist inside instead of dry through and through. They were enjoyable, instead of being overly sweet. They were perfect for breakfast.

As with most recipes, I made a mistake on the first try. I left the oven rack in the upper third of the oven and didn’t rotate the scones halfway through the cooking process as instructed. I left them in a little longer than I should have, but they were still good. In fact, the next weekend I made them and added about a half cup of chopped strawberries to the mix and I liked them even more than the vanilla bean scones.

I’m glad I decided to make them at home because now I know that not all scones are dry and crumbly. Not all scones are bad biscuits. Not all scones are worth writing off.

scones4Ingredients
2 cups all-purpose flour
3 tablespoons sugar
1 tablespoon baking powder (use 3/4 tablespoon if at high altitude)
1/2 teaspoon salt
5 tablespoons unsalted butter, cut into 1/4-inch pieces and chilled
1 vanilla bean
1 cup heavy cream

Adjust oven rock to middle position and heat oven to 450 degrees F. Line baking sheet with parchment paper.

In the bowl of a stand mixer with the whisk attachment on, stir flour, sugar, baking powder and salt until combined. Add butter and stir until mixture resembles coarse meal with some slightly larger pieces of butter.

Cut both ends off the vanilla bean and cut the bean in half lengthwise. Using the back of a knife, scrape the seeds from inside and add them to the mixture. Stir until just combined. Stir in cream until dough begins to form.

Turn dough and any floury bits onto a floured counter and knead until a slightly sticky ball forms. Pat dough into a 9-inch round and use a knife or pizza cutter to cut into eight wedges.

Place wedges on prepared baking sheet and bake until tops of scones are lightly golden brown, 12 to 15 minutes (10 to 12 minutes if at high altitude), rotating baking sheet halfway through baking. Transfer baking sheet to wire rack and let cool for at least 10 minutes. Serve warm or at room temperature.