Sweet strawberry-filled success

Strawberry oatmeal loaf

When I’m not in the mood to tackle regular bread recipes, I opt for a quick bread. I like quick breads because there’s no rising process and I can usually find a recipe that uses ingredients I have on hand.

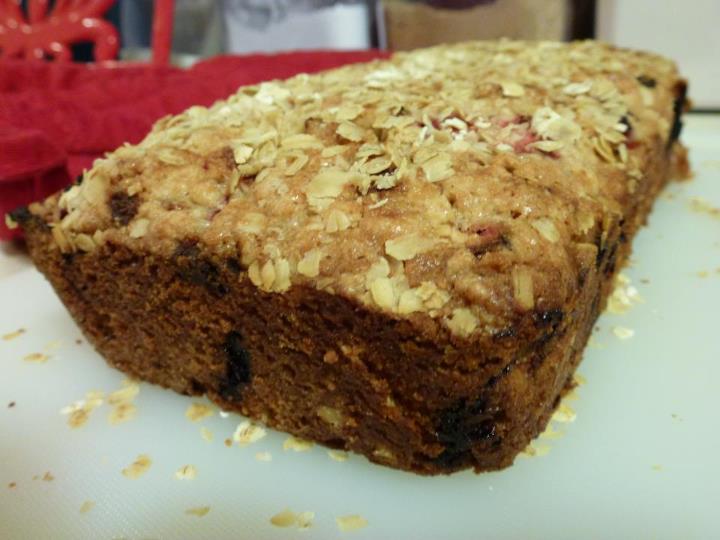
One of my favorite quick bread recipes is this Oatmeal-strawberry bread. The bread is sweet and moist and makes a nice treat or breakfast with a cup of coffee; not to mention it smells delicious while it’s baking. It would also make a great snack for kids.

I often have strawberries around and there are few recipes that use strawberries correctly — most breads and muffins that incorporate them end up with large soggy spots where the berries are. For this recipe, take the time to slice the strawberries so they’re thin. If you leave them in chunks, the bread will get too soggy in spots or the strawberries will sink to the bottom of the loaf. I know this from experience. Also make sure to grease the bottom of the pan well, or the bottom of the loaf will break off when the loaf is being taken out of the pan. Check the bread with a toothpick about 10 minutes before it should be done baking. If you’re at high altitude, use 1/2 teaspoon baking powder instead of a full teaspoon or it won’t come out correctly. It may need to bake longer, too.

Ingredients
1 1/2 cups all-purpose flour
3/4 cup rolled oats
1 cup white sugar
1 1/2 teaspoons ground cinnamon 
1 teaspoon baking powder
1/2 teaspoon salt
3/4 cup vegetable oil
2 eggs
10 ounces fresh strawberries, sliced
2 tablespoons rolled oats

Preheat oven to 350 degrees F. Grease a 7-inch-by-3-inch loaf pan.

Stir together the flour, 3/4 cups rolled oats, sugar, cinnamon, baking powder, and salt in a large mixing bowl.

In another bowl, whisk together the vegetable oil and eggs; stir into flour mixture until just moistened. Fold in strawberries. Pour into the prepared loaf pan, and sprinkle the tops with the remaining 2 tablespoons of rolled oats.

Bake in the preheated oven until a toothpick inserted into the center comes out clean, 50 to 60 minutes. Cool the strawberry bread in the pan for 5 minutes before cooling completely on a wire rack.

Cookies to satisfy any craving

pbcookie

When I was a kid, peanut butter cookies were my favorite treat. My mom used to make them by rolling the dough into balls and flattening them by making criss-cross fork imprints on the top. I used to love eating them warm shortly after they came out of the oven.

Around the same time, my grandmother in Wisconsin sent me a couple books from the “World Famous Muriel” series. In each book the heroine, Muriel, would solve mysteries as long as the person seeking her help provided her with peanut butter cookies. My grandmother must have seen that we had that in common.

Even now, I still enjoy peanut butter cookies; but I now use a recipe that incorporates chocolate. When I’m craving something sweet, I often turn to Curtis Stone’s Peanut Butter Cookies With Chocolate Chunks. The best part is how quickly they can be made. I had seen him make these cookies on an episode of “Take Home Chef,” and was delighted when the recipe was included in his most recent cookbook, “Relaxed Cooking With Curtis Stone.”

The original recipe calls for 5 ounces of semisweet chocolate. The first time I made them, all I had was a 4-ounce semisweet chocolate bar, and that turned out to be plenty. I once used chocolate chips, but I prefer chunks of chocolate for this recipe. When it comes to breaking up the chocolate, I’ve found the best way to do it is to smack the wrapped 4-ounce bar of chocolate on the edge of the counter until it feels broken up enough. The different size chunks add a homemade charm to the cookies. If using a stand mixer, just throw the whole bar into the bowl and let the stand mixer break it up into chunks.

The recipe says to remove the cookies from the oven when they’ve puffed up and begin to brown on top. At first, it might seem like you’re taking them out prematurely, but really, follow the recipe. The cookies continue to cook because of the residual heat. If you follow the recipe, you’ll have large, soft cookies to satisfy your sweet tooth.

Ingredients
1 cup unbleached all-purpose flour
1/2 teaspoon baking soda
1/2 teaspoon salt
1 cup natural chunky peanut butter
1/2 cup (packed) light brown sugar
1/2 cup granulated / caster sugar
1/2 cup (1 stick) unsalted butter, at room temperature
1 ½ tablespoons honey
1 large egg
1 teaspoon vanilla extract
4 ounces semisweet chocolate, coarsely chopped

Preheat the oven to 350 F.

Mix the flour, baking soda, and salt in a medium bowl.

Using an electric mixer, beat the peanut butter, brown sugar, granulated sugar, butter, honey, egg, and vanilla in a large bowl until well blended.

Stir the dry ingredients into the peanut butter mixture in 2 additions. Stir in the chopped chocolate.

Scoop about 3 tablespoonfuls of dough for each cookie onto the prepared baking sheets, spacing them 2 1/2 inches apart.

Bake for about 12 minutes, or until the cookies puff and begin to brown on top but are still very soft to the touch.

Cool the cookies on the baking sheets for 5 minutes.

Using a metal spatula, transfer the cookies to a rack and eat warm or cool completely.

Perfect blueberry muffins

bm3

I know, I know, this is my third recipe that uses blueberries. But they’re still in season, and who couldn’t use a good recipe for blueberry muffins?

The truth is that I used to dislike blueberries — not as much as I hate raspberries, but they definitely weren’t something I’d choose. I’d avoid them, instead using strawberries and blackberries in recipes. Clearly, I’ve since learned to love them and what their flavor can do for baked goods.

This recipe doesn’t take much time or effort. It’s another recipe from “The Joy of Cooking,” but the original offered too many options — butter or oil, milk or cream, sugar or brown sugar. After trying a few different mixtures, this became the winning combination for me.

The whole process takes about a half hour and uses ingredients readily available in most kitchens. Small things won’t make or break this recipe, either. If you don’t have nutmeg, leave it out. If you want to add a dash of cinnamon, go for it. If you only have cream or soy milk, use those instead. If you want to use more blueberries than the recipe calls for, have at it. If you have an aversion to blueberries, replace them with blackberries or cherries.

Every once in a while it’s nice to have something other than cereal, yogurt or eggs for breakfast. Freshly baked muffins can stand in for toast with your morning cup of coffee, and are a nice treat to bring to the office. Your coworkers will appreciate it.

Ingredients
2 cups all-purpose flour
1 tablespoon baking powder (reduce by 1/2 teaspoon if at high altitude)
1/2 teaspoon salt
1/8 teaspoon ground nutmeg
2 large eggs
1 cup milk
1/3 cup sugar
1 stick butter, melted
1 teaspoon vanilla
1 1/2 cups fresh blueberries, rinsed
Brown sugar

Position a rack in the center of the oven. Preheat the oven to 400 F. Grease a 12-muffin pan or line with paper liners.

In a large bowl, whisk together flour, baking powder, salt and nutmeg. In another bowl, whisk together eggs, milk, sugar, butter and vanilla. Add the wet ingredients to the dry ingredients and mix together just until the dry ingredients are moistened. Do not overmix. The batter should not be smooth. Add the blueberries and stir until just incorporated.

Divide the batter among the muffin cups. Sprinkle with brown sugar.

Bake until a toothpick inserted in 1 or 2 of the muffins comes out clean, about 15 minutes. Let cool for 2 to 3 minutes before removing from the pan. If not serving hot, let cool on a rack. Serve as soon as possible, preferably within a few hours of baking.

Layer up for a weeknight meal

Pesto, red peppers and cheese are three of my favorite things to eat, so when I saw them all used in AP Food Editor J.M. Hirsch’s Deep-dish Pesto and Prosciutto Tortilla Pizza, I knew I had to make it.

The recipe requires two different layers to be used three times each. One layer has tomato sauce, prosciutto and onion; the other has pesto, red peppers and olives. The prosciutto and peppers provide a nice contrast to the texture of the cheese.

Biting in to a too-thick slice of onion can ruin the dish, so take the time to slice it as thin as possible. A mandolin is a great tool to use for this recipe, as it will help to slice the onion and red pepper really thin. But be careful not to slice your hand in the process — been there, done that.

It’s also important to make sure you press down on each layer before you build the next; otherwise, the ingredients tend to heap in the process and will slide out during the baking process.

Deli meat can be used in place of prosciutto, but I prefer prosciutto because it adds a nice bit of saltiness amid all the cheese and vegetables. There is a substantial amount of cheese used in this dish so that can be reduced. It’s a rich meal but, depending on how many will be eating, you’ll have leftovers for days.

This pizza would be good to make with kids, too, because most of it requires sprinkling ingredients on a tortilla and ingredients they don’t like can easily be substituted. It can also be constructed ahead of time and refrigerated until you’re ready to pop it in the oven for dinner, which makes it perfect for a weeknight dinner.

Ingredients
7 large (about 10-inch) flour tortillas
1 cup prepared tomato or pasta sauce
6 slices prosciutto
1 small red onion, very thinly sliced
3 cups (two 6-ounce packages) shredded cheddar cheese
3 cups (two 6-ounce packages) shredded mozzarella cheese
7 ounces of pesto
1 large red bell pepper, cored and very thinly sliced
3.8-ounce can sliced black olives

Heat the oven to 350 F. Coat a baking sheet with cooking spray.

Place one flour tortilla in the center of the baking sheet. Spoon a third of the tomato sauce evenly over the tortilla, then top with two slices of prosciutto and a third of the sliced onion.

Sprinkle a bit less than 1/2 cup of each cheese over the pizza. Place a second tortilla on top and gently press the tortilla to compress and flatten it. This helps the pizza stack evenly.

Spoon a third of the pesto over the tortilla, then top with a third each of the sliced pepper and black olives. Top with more cheese, then another tortilla, pressing gently again.

Repeat with remaining ingredients, alternating the fillings for a total of six layers (three of each), gently pressing the stacked tortillas before adding each new layer.

Top with a final tortilla, a bit more tomato sauce or pesto and the remaining cheese.

Bake on the center rack for 35 minutes, checking frequently during the final 5 to 10 minutes to make sure the top doesn’t burn. If the top browns too quickly, tent it with foil.

Remove the pizza from the oven and let it stand for 5 minutes. Use a sharp knife to cut the pizza as you would a pie.

A new spin on classic lemon bars

My mom has had a well-loved copy of the red-and-white checkered Better Homes and Gardens Cook Book on her shelf for as long as I can remember. It sits beside her small, handwritten cookbook full of some of her — and my — favorite recipes. While Joy is usually my go-to book for American classics, its recipe for lemon bars leaves much to be desired — that’s where The Better Homes and Gardens book comes in.

Once in a while I’ll be in the mood to experiment with a classic recipe, and lemon bars is a great one to modify. I’ve found that the recipes I make well are the best to play with.

On a recent trip to Trader Joe’s, I purchased a bottle of blueberry juice. As I was looking at the lemon bars recipe, it occurred to me that some of the lemon juice could easily be substituted. I also had leftover toasted coconut and coconut milk from the coconut-rum ice cream I made last week that needed to be used.

I set to work and broke up the toasted coconut and added it to the crust, and substituted the coconut milk for the milk called for in the filling. The final product was exactly what I’d hoped it would be. The blueberry flavor mellowed the tartness of the lemon, but both flavors were still prominent in the result. The bits of toasted coconut added a nice bit of texture to the crust. Substituting all of the lemon juice with blueberry juice would likely work, too, should anyone be so inclined to make an entirely blueberry version.

This kitchen experiment definitely goes down as a success.

Ingredients
2 cups all-purpose flour
1/2 cup powdered sugar
1/3 cup toasted coconut
2 tablespoons cornstarch
1/4 teaspoon salt
3/4 cup butter
4 eggs, lightly beaten
1 1/2 cups granulated sugar
3 tablespoons all-purpose flour
1/2 cup lemon juice (if using fresh lemons, squeeze about 4)
1/4 cup blueberry juice
1/4 cup coconut milk
1 tablespoon vanilla sugar

Preheat oven to 350 F. Grease a 13-inch-by-9-inch pan.

In a bowl, combine the 2 cups flour, powdered sugar, toasted coconut, cornstarch and salt. Cut in butter until mixture resembles coarse crumbs. Press mixture into the bottom of the prepared pan. Bake 18-20 minutes or until edges are golden.

Meanwhile, in a medium bowl, stir together eggs, granulated sugar, 3 tablespoons flour, lemon and blueberry juices, coconut milk and vanilla sugar.

Pour filling over hot crust. Bake for 15-20 minutes more or until center is set.

Cool completely in pan on a wire rack. Cut into bars. Cover and store in the refrigerator.