Banana oatmeal muffins great for breakfast to go

Bananaoatchocomuffins

This week’s recipe comes from Pinterest. I was looking for a recipe for chocolate chip muffins and found these banana chocolate chip baked oatmeal singles.

There is no flour used in these muffins. Instead, the main components of the mixture are oats, bananas, milk and eggs. The muffins don’t end up light and fluffy; they end up with a bit more of a dense, eggy texture. The flavor is well-rounded and the ingredients make this recipe healthier than other options may be.

These muffins are nice to have on hand during a busy week — you can make them ahead of time and have them grab-and-go ready for weekday breakfasts or snacks. I used mini chocolate chips when I made them because I prefer the smaller bits of chocolate in smaller muffins.

One step that I have found is particularly important to take at high altitude is to spray the paper cupcake holders with cooking spray. For some reason, baked goods tend to get a good grip on the paper otherwise, leaving the person eating them to have to peel away a good layer of the muffin. Who wants to do that with something so delicious?

Ingredients
3 cups old-fashioned oats
1/2 cup packed brown sugar
2 teaspoons baking powder (1 1/2 if you’re at high altitude)
1/2 tsp. salt
2 egg whites
1 egg
1 1/4 cup skim or soy milk
3/4 cup mashed bananas
1 teaspoon vanilla extract
3/4 cup semisweet chocolate chips

Preheat oven to 350 degrees F. Lightly mist 18 cups in a muffin tin with cooking spray.

Combine the oats, brown sugar, baking powder and salt in a large bowl and stir until thoroughly mixed.

In a separate bowl, whisk together the egg whites, egg, mashed banana, milk and vanilla. Add to the dry ingredients and stir until blended together. Mix in chocolate chips.

Spoon the oatmeal mixture evenly between the prepared muffin cups. Bake uncovered for 18 to 22 minutes or until oatmeal is lightly browned and a toothpick inserted into the middle comes out clean.

Celebrating Easter with traditional Greek bread

GreekEasterbread

Most cultures have a special bread associated with religious holidays. St. Patrick’s Day has Irish soda bread, Christmas has stollen and Easter has Tsoureki Paschalino — Greek Easter bread.

I first saw a recipe for this sweet holiday bread in a San Francisco Chronicle food section in 2010. I liked the sound of the bread, but I didn’t want to make anything that produced three to four loaves and included a hard-to-find ingredient such as mahlepi, a fruity Greek spice. I opted to search for a more accessible version and found this.

Traditional versions of the bread call for cardamom and mahlepi, but I don’t like cardamom and mahlepi isn’t something most grocery stores carry. The version I made may be less traditional, but I had all the ingredients on hand and I enjoyed the flavor of the final product. I decided to make two 12-inch loaves instead of a 24-inch loaf so I could store one and serve the other one. Everyone enjoyed this sweet bread, especially warm with a bit of butter on it. It has a nice orange spice flavor and the egg adds a nice splash of color.

Regardless of what you eat today, I hope you have a happy Easter.

Ingredients
3 to 3 1/2 cups all-purpose flour
2 tablespoons sugar
1/2 package instant yeast
1/2 teaspoon salt
Zest of 1 large orange
Pinch of nutmeg
Pinch of cinnamon
1/2 cup milk whole milk, warmed to room temperature
1/2 stick (1/4 cup) unsalted butter, melted
2 large eggs, beaten slightly; set 1 tablespoon aside for glazing
1 tablespoon fresh orange juice
1/2 teaspoon vanilla

In a large mixing bowl, thoroughly combine 3 cups flour, sugar, yeast, salt, zest, nutmeg and cinnamon.

In another large bowl or the bowl of a stand mixer combine milk, butter, all but 1 tablespoon of eggs, orange juice and vanilla. Add flour mixture and combine well using a large spoon or the paddle attachment on the stand mixer.

If mixing by hand, scoop dough out onto a well-floured surface and knead for at least 15 minutes. Adding more flour if needed.

If using a stand mixer, swap to the dough hook. Knead for at least 10 minutes at medium speed, adding more flour as needed to keep the dough from becoming too sticky, although it will be somewhat tacky if kneaded in a mixer. Scoop dough onto a lightly floured surface.

Form dough into a ball by folding edges into the center, turning over and forcing into a ball shape using your palms and fingers to shape.

Clean and dry the largest bowl, then spray lightly with cooking spray. Place dough, seam-side down, in bowl and spray top lightly with oil. Cover bowl with plastic wrap and let rise until doubled in bulk — 1 1/2 to 2 hours.

Once the dough has risen, punch it down and scoop onto a lightly floured surface. Knead by hand for 3-5 minutes.

Shape the dough into a rope 24 inches long, fold in half, and braid. If you wish, place dyed, uncooked eggs in center of the fold before braiding. They’ll end up perfectly hard-cooked but difficult to peel.

Place the loaf on a greased cookie sheet or baking pan, spritz lightly with oil, and cover with plastic. Let rise until doubled in bulk — 1 1/2 to 2 hours. Thirty to 45 minutes before dough has completely risen, heat oven to 350 degrees.

Make an egg wash using the remaining egg and one tablespoon of water. Brush loaf with the wash. Bake for 30 minutes until golden brown. You can tell the bread is done in the center by tapping the top of the loaf. If it sounds hollow, the loaf is finished. Cool on a rack.

Bringing back a childhood dinner item

pierogies1

Growing up, pierogies and kielbasa was something we’d eat on a regular basis. If you’ve never had pierogies before, they’re pasta stuffed with a mashed potato mixture that often includes cheese. What kid doesn’t like cheesy potato pockets?

I had’t had pierogies in quite a while, so when I saw this recipe on Huffington Post, I thought it would be a fun one to try. We always ate pierogies from a box, so I wondered how different making them from scratch would be. I set forth with an idea of how they were supposed to taste, which is always helpful when tackling a new recipe.

Shaping the dough required more work than the recipe indicated. I found that it pierogies2was easiest to work with half of it at a time. After rolling it to one-fourth-inch thickness, I used the top of a cup to cut circles in it. But, from my experience with pasta, I knew leaving it that thick meant it would expand more during the cooking process. So, after cutting it into rounds, I rolled out each round to about half its original thickness. Sure enough, when the pierogies were cooked, the dough got thicker, so my instinct to roll out the rounds was a smart move.

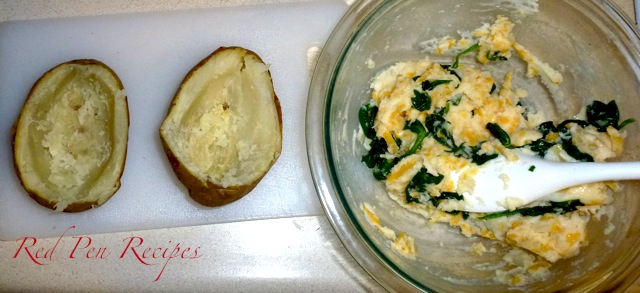
The filling called for in the original recipe was not what I expected. It called for ricotta and much closer to a type of ravioli filling than the potato filling I wanted. So, the second time I made these, I made my own simple mashed potato filling and it was just what I wanted. The type of cheese you choose doesn’t matter as much as the consistency. Choose a harder cheese, such as an aged cheddar, to avoid making the filling oily.

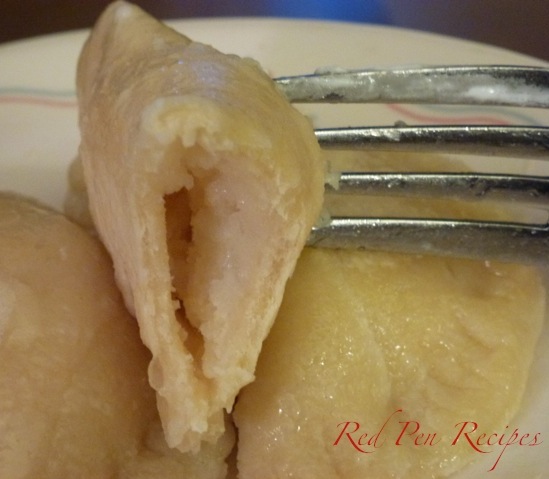
After letting the dough rest for the allotted time and making the filling, it was time to assemble the pierogies. I set out a few rounds at a time, put a bit of filling on each one, brushed the edges with the egg wash and crimped the edges with my fingers. They were a good size, and I was happy they all stayed together during the cooking process.

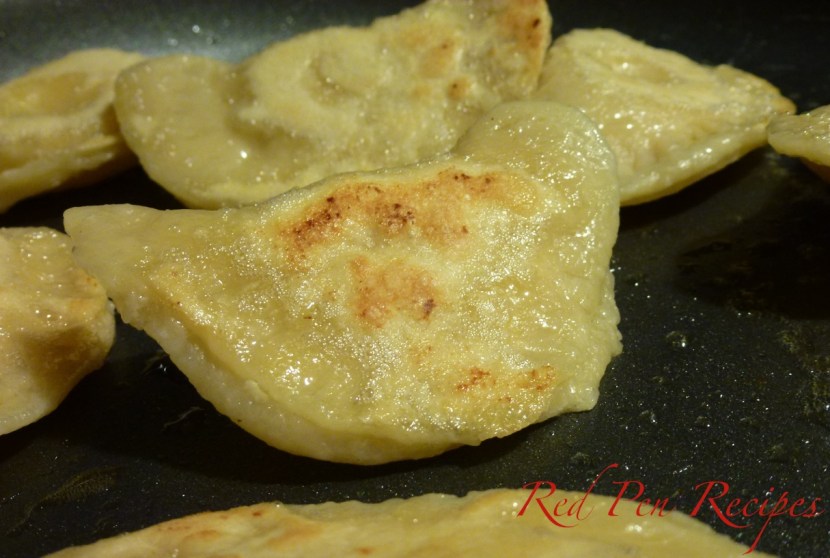
I boiled and then fried them, about eight at at time, while keeping an 8-inch square glass baking dish in the oven on warm to keep the finished pierogies warm while the rest of them cooked. Boiling them makes them soft throughout, while frying them afterward browns them slightly, just so there’s a bit of crispness to the outside. They’re perfect like that. The recipe below, which I reduced to half of the original, makes about three dozen pierogies. If you’re cooking for one, I’d recommend freezing half of them after boiling them, and then frying the rest. They are good with a bit of sour cream, or whatever your heart desires. They reheat well, so keep a few in the fridge for a weeknight dinner.

Ingredients pierogies3
4 cups all-purpose flour, plus extra for flouring your work surface
1/2 teaspoon salt
3 tablespoons salted butter, melted
1 cup sour cream
1/8 cup corn oil
2 whole eggs
1 egg yolk
Two russet potatoes, peeled and mashed
1 cup cheese, grated
1 egg
All-purpose flour for sprinkling and flouring work surfaces and dough
4 tablespoons butter

Combine the flour and salt in the bowl of a stand mixer fitted with the dough pierogies4 hook. In a separate large bowl, combine the melted butter, sour cream, and corn oil. Beat the eggs and egg yolk together, and add them to the sour cream mixture. Whisk everything together well, so it forms a smooth, thick liquid.

Add the wet mixture to the flour in the mixer bowl, and mix on low speed for about a minute and a half, until you’ve got a thick dough.

Sprinkle some flour on your work surface, and knead the dough by hand, forming it into a ball. Then use a rolling pin to roll the dough out into a thick disk about the size of a Frisbee, or push it into this shape with your hands. (This will make the dough easier to work with when it’s cold.) Wrap the dough well in plastic wrap and chill it in the fridge for at least 6 hours.

Combine the mashed potatoes and cheese in a bowl and set aside.

Preheat the oven to 175 degrees F.pierogies5

Take the dough out of the fridge and let it come up to room temperature on the countertop until it’s soft enough to work with (about 20 minutes).

Whisk the eggs together in a small bowl.

Flour a work surface well. Using a rolling pin, roll out the dough in batches, turning it and rolling in every direction, including diagonally, until it’s basically the same thickness as one of the cookies in an Oreo. Use a round pastry cutter (or the mouth of a glass) to cut out as many rounds as possible from each piece of dough.

Using a pastry brush, lightly brush the top of each round of dough with the egg (so it will stick together when you close it up). Take the filling out of the fridge just before you’re ready to use it.

Put 1 tablespoon of the filling on the middle of each round. Then fold the round in half around the filling, so you’ve got a half-moon with the filling inside. Use your fingers to pinch the open sides closed all the way around, making little pinches all the way along the edges.

Put a large pot of well-salted water on to boil. While the water is heating, put the pierogies on a tray in the fridge so they cool down a little and the dough sets.

When the water comes to a boil, put the first batch of pierogies in the pot —about 8-10 at a time. The pierogies will take about 7 minutes to cook, depending on your stove and the thickness of your dough. They’re definitely not done until they float up to the top, and then they probably need another minute or two. The best way to know if they’re ready is to take one out, cut it open, and taste it.

Giving cauliflower a second chance

cauliflower2

Cauliflower has never been at the top of my list of preferred vegetables. I’ve always seen it as a bland version of broccoli, probably because I never knew what to do with it.

This recipe in Bon Appetít made me want to give it another chance. Cheese makes a lot of things taste better, and this recipe is no exception. While the original recipe didn’t specify what kind of Parmesan to use, choose a harder Parmesan, such as Parmigiano Reggiano, for the best result. Soft Parmesans will just turn gummy, but harder versions will become slightly crispy during the baking process.

There’s a lot to like about this side dish. Roasting the cauliflower brings out the vegetable’s flavor, while the Parmesan adds a little salty, crispy kick to each bite. The roasted garlic is mellow enough to eat with the cauliflower without overpowering the other flavors.

Next time I head to the grocery store, I’ll think twice about passing up the cauliflower.

Ingredientscauliflower2
1 head cauliflower
1 sliced medium onion
4 thyme sprigs
4 unpeeled garlic cloves
3 tablespoons olive oil
Salt
White or black pepper
1/2 cup grated Parmesan

Preheat oven to 425 degrees F. Cut cauliflower into florets; toss on a large rimmed baking sheet with onion, thyme, garlic and olive oil. Season with salt and pepper. Roast, tossing occasionally, until almost tender, 35-40 minutes. Sprinkle with 1/2 cup grated Parmesan. Toss to combine. Roast until cauliflower is tender, 10-12 minutes longer.

Not your average baked potato

Twicebakedpotatoes1

Baked potatoes are good, but sometimes twice-baked potatoes are better. This was the first recipe I tried from the Williams-Sonoma Cookbook that my brother bought me for my birthday a few years ago. It’s probably one of the more decadent baked potato recipes you’ll ever make. One of these could be a meal in itself, but they also go well with salmon or steak.

I like this recipe because it’s straightforward, and the ingredients are something most people have on hand. If you don’t have one of the ingredients, it’s easy to substitute or just do without. This recipe can easily be halved or doubled, depending on the number of people you’re serving.

The one warning I have is that the cheese can make it oily after it bakes. I recommend either using less cheese or using a harder, aged cheddar instead. If you don’t like cheddar, you can use whatever you’d like.

IngredientsTwicebakedpotatoes2
4 large russet potatoes, scrubbed and patted dry
6 tablespoons (3/4 stick) unsalted butter
2 large garlic cloves, minced
1 large shallot, minced
2 bunches fresh spinach leaves, tough stems removed and leaves rinsed well
2 tablespoons sour cream
1/2 teaspoon salt
1/4 teaspoon freshly ground pepper
1 cup firmly packed shredded extra-sharp cheddar cheese

Position a rack in the upper third of an oven and preheat to 400 degrees F.

Prick the potatoes with a fork and place them directly on the oven rack. Bake until tender when pierced with a small knife, about 1 hour. Remove the potatoes from the oven and let cool for 5 minutes. Reduce the oven temperature to 350 degrees F.

In a large, heavy pot over medium heat, melt 2 tablespoons of the butter. Add the garlic and shallot and sauté until the shallot is translucent, about three minutes. Increase the heat to medium-high, add the spinach, and toss until wilted but still bright green, about four minutes. Transfer the spinach mixture to a sieve set over a bowl and press all the liquid out of the spinach.Twicebakedpotatoes3

Using a serrated knife, cut a slice 1/2 inch thick off one long side of each potato and discard. Scoop out the potato flesh into a bowl, leaving a shell 1/4 inch thick. Add the sour cream, salt, pepper and the remaining 4 tablespoons butter to the potato flesh and mash with a potato masher to blend. Stir in 2/3 cup of the cheese and then the spinach. Spoon the potato mixture into the potato shells, mounding it high. Press the remaining cheese on top of the filling.

Transfer the potatoes to a baking sheet and bake until heated through, about 20 minutes. To test for doneness, stick a small knife into a potato and leave it there for about 15 seconds. Remove the knife and feel the blade; if it is hot, the potatoes are ready. Serve immediately. Serves 4.