Seasonal cake worth celebrating

1pumpkincake102713

It’s time to jump on the pumpkin bandwagon. Pinterest is exploding with fall recipes and Starbucks has its Pumpkin Spice Latte back in stores. Two occasions at the end of October provided a good reason to bust out my cans of pumpkin puree. The first was my sports editor’s last day. The second is my dad’s birthday, which falls on Halloween.

My sports editor loves pumpkin-flavored things, so the week before she left I started brainstorming about what to make for her. I came across this recipe for pumpkin-spice cake and knew it would fit the bill. The problem was that I hadn’t yet successfully made cupcakes at high altitude. Every time I previously tried, the tops sank in or didn’t rise, or I had to cook them longer to see if they would get there, and then the outside would be overcooked. But, it was about time to give it another go, so I put on my apron and got to it.

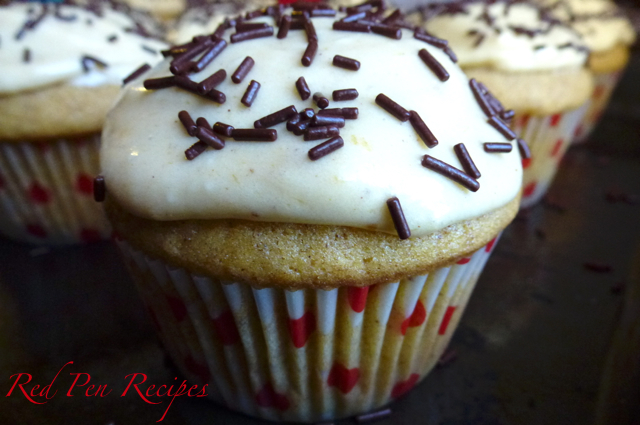
I only wanted to make a dozen cupcakes, so I cut the original recipe in half. I made all the alterations based on the adjustments that I’ve learned work at high altitude. I used a bit more flour, less of the leaveners and more salt. It worked. The cupcakes had a beautiful crumb and rose exactly as they should. They are, by far, the best cupcakes I’ve made at high altitude, and definitely make the top five of all time.

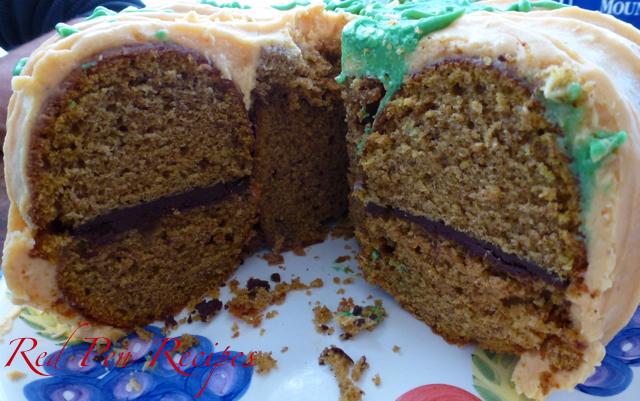
Since the cupcakes were such a hit with my staff on my sports editor’s last day on the job, I decided to also use the recipe to make my dad’s birthday cake. A while ago, I saw an idea on Pinterest for a pumpkin cake. Upon closer examination, I realized they used a pumpkin pan, but I decided to play off that creation by making two smaller bundt cakes and turning one on top of the other. It is one of the best cakes I’ve ever made — though, to give credit where it’s due, my best friend came up with the idea on how to create the pumpkin-like ridges in the frosting, and he drew the leaves. Decorating is not my thing, but it can be fun to learn a trick or two.

This dessert has a double dose of pumpkin, as both the cake and frosting contain it. But it isn’t overwhelming, and neither are the spices in the cake. The flavor is balanced, which is why I enjoyed them so much.

I’ve provided the cupcake recipe at high altitude and the cake recipe at regular altitude. However, if you want to make a cake at high altitude, double the cupcake recipe below. If you want to make one dozen cupcakes at regular altitude, cut the cake recipe in half. Or, if you want to make two dozen, leave it as is.

Happy Halloween, everyone. Happy birthday, dad!

2pumpkincake102713One dozen cupcakes (at high altitude)
1 2/3 cups all-purpose flour
1 teaspoon baking powder
1 teaspoons ground cinnamon
3/4 teaspoon ground cloves
1/2 teaspoon ground allspice
1/2 teaspoon ground nutmeg
1 teaspoon salt
1 1/3 cups granulated sugar
1/2 cup vegetable oil, plus more as needed
2 large eggs
1/2 of a (15-ounce) can pumpkin purée

Heat the oven to 350 degrees F and arrange a rack in the middle. Line a 12-muffin pan with paper liners and coat the liners with vegetable oil or cooking spray; set aside.

Place the sugar and measured oil in the bowl of a stand mixer fitted with the paddle attachment. Beat on medium speed until the sugar is incorporated, about 1 minute. Stop the mixer and scrape down the sides of the bowl and the paddle with a rubber spatula.

Return the mixer to medium speed and add the eggs 1 at a time, beating well after each addition, about 1 1/2 minutes total mixing time. Reduce the speed to medium low, add the pumpkin, and beat until just combined, about 30 seconds. Stop the mixer and scrape down the sides of the bowl and the paddle with a rubber spatula.

Add the flour, baking powder, cinnamon, cloves, allspice, nutmeg and salt and beat slowly until almost completely incorporated, about 1 minute. Remove the bowl from the mixer and fold in any unincorporated flour at the edges with a rubber spatula, making sure to scrape to the bottom of the bowl.

Fill the muffin wells three-quarters of the way (about a heaping 1/4 cup per well). Bake for 15 minutes or until a toothpick inserted in a cupcake comes out clean.

Meanwhile, make a half batch of frosting (recipe below).

Place the pan on a wire rack and let cool for 5 minutes. Remove the cupcakes from the pans and cool completely on the racks. Frost.

3pumpkincake102713Cake (at regular altitude)
3 1/4 cups all-purpose flour
2 teaspoons baking powder
2 teaspoons ground cinnamon
1 1/2 teaspoons ground cloves
1 teaspoon ground allspice
1 teaspoon ground nutmeg
1/2 teaspoon baking soda
1/2 teaspoon fine salt
2 3/4 cups granulated sugar
1 cup vegetable oil, plus more as needed
4 large eggs
1 (15-ounce) can pumpkin purée (not pie filling; about 1 3/4 cups)

Heat the oven to 350 degrees F and arrange a rack in the middle. Grease and flour one regular-size bundt pan — or two, if you have them.

Place the flour, baking powder, cinnamon, cloves, allspice, nutmeg, baking soda, and salt in a large bowl and whisk to aerate and break up any lumps; set aside.

Place the sugar and measured oil in the bowl of a stand mixer fitted with the paddle attachment. Beat on medium speed until the sugar is incorporated, about 1 minute. Stop the mixer and scrape down the sides of the bowl and the paddle with a rubber spatula.

Return the mixer to medium speed and add the eggs 1 at a time, beating well after each addition, about 1 1/2 minutes total mixing time. Reduce the speed to medium low, add the pumpkin, and beat until just combined, about 30 seconds. Stop the mixer and scrape down the sides of the bowl and the paddle with a rubber spatula.

Turn the mixer to low speed, slowly add the flour mixture, and beat until almost completely incorporated, about 1 minute. Remove the bowl from the mixer and fold in any unincorporated flour at the edges with a rubber spatula, making sure to scrape to the bottom of the bowl.

Put half of the batter into the bundt pan. Bake the cake for 40-55 minutes, or until a toothpick inserted into the center of the cake comes out clean.

Let the cake cool for 5-10 minutes, or until you are able to remove the cake from the pan cleanly. Let cake cool on a plate or wire rack. Leave the oven on and let pan sit for another 5 minutes, then grease and flour pan again and put remaining half of batter in it. Bake the cake for 40-55 minutes, or until a toothpick inserted into the center of the cake comes out clean.

Meanwhile, make frosting (recipe below).

Once cakes have cooled, turn so the part of the cake that was facing up when it was baked is once again facing up. Using a bread knife, cut convex part off, so top becomes flat. Set cake scraps aside. Repeat on other bundt.

Put frosting on the flat side of one bundt. Top by turning over the other bundt and placing it on top. Fill the hole in the middle with the scraps. Spread frosting all over cake. To achieve effect shown in photo, drag the back of a spoon from the bottom to the top of the cake. Repeat around entire cake. To create leaves, add about 10 drops of green food coloring to remaining frosting. Use a knife to make leaves. Use a piping bag or plastic bag filled with frosting to draw tendrils.

Pumpkin-and-Cream-Cheese Frosting
4 cups powdered sugar, sifted
1 teaspoon ground cinnamon
1/4 teaspoon freshly ground nutmeg
12 ounces cream cheese, at room temperature
8 tablespoons unsalted butter (1 stick), at room temperature
1/3 cup pumpkin purée (not pie filling)

Place the sugar, cinnamon, and nutmeg in a medium bowl and whisk to combine; set aside.

Place the cream cheese and butter in the bowl of a stand mixer fitted with a paddle attachment and beat on medium speed until fully combined and smooth, about 1 minute.

Reduce the speed to low, slowly add the powdered sugar mixture, and beat until fully incorporated and smooth, about 3 minutes. Stop the mixer and scrape down the paddle and sides of the bowl with a rubber spatula.

Turn the mixer to medium speed, add the pumpkin, and mix until fully incorporated and smooth, about 1 minute. Use immediately.

Broccoli bites take snacks back to basics

1broccolibites

I recently saw this broccoli bites recipe on Pinterest. It seemed simple enough, so I thought I’d give it a shot.

This is a nice, basic recipe that only calls for four ingredients, which leaves plenty of room to experiment with other flavors and additions. It doesn’t require any special equipment, either. Mix it with your hands, form it into patties and bake. That’s it.

Next time I make these, I will likely use 1/2 cup of cheddar and 1/2 cup Parmesan, because I wanted more bite to them. Or, I might try a sharper cheddar — medium didn’t offer the flavorful punch I wanted.

The most difficult thing to figure out was what to serve them with. I tried sour cream, but it wasn’t quite right. So I tried a bit of mayonnaise with worcestershire, which was better; but I think ranch dressing might be the best option — I just didn’t have any on hand.

2broccolibitesFor something to snack on, these are pretty hearty and filling.

Ingredients
1 head of fresh broccoli, cut and steamed
1 cup cheddar cheese, grated
2 eggs
1/2 cup of Italian breadcrumbs
Salt and pepper to taste

Preheat the oven to 375 degrees. Line a baking sheet with parchment paper.

Mix the ingredients together in a large bowl. Form small patties and place on the baking sheet.

Bake for 15 minutes, then turn over patties and bake for another 10 minutes.

Let cool for up to 5 minutes. Serve warm.

Sweet squash soup for cold nights

1Butternutsquashsoup

Lake Tahoe got a light dusting of snow at lake level last week. Night temperatures are dipping into the high 20s and I’m thinking about turning my heater on for the first time since May.

My thoughts have turned to warm meals that are easy to put together. I made this Roasted Butternut Squash Soup to keep me warm last week. I cut the recipe in half — but used the same amount of apple, onion and cream — because I only had one squash. It still made enough soup for four meals.

I’ve used Granny Smith apples in soups before, and they lend a certain tartness to them. This time I used a Fuji apple because it’s all I had. I liked the mellower flavor and feel that a Granny Smith apple would have made the soup more tart than I wanted it to be. The soup is sweeter and thicker than many other kinds of soup, but I liked that.

If you roast the squash ahead of time, this soup can be made quickly on a weeknight, when most people tend to look for meals that are easy to make after a day of work. I enjoyed it with a slice of sourdough bread and a spoonful of sour cream.

Ingredients
1 medium butternut squash, halved lengthwise and seeds removed
2 tablespoons unsalted butter
1 medium Granny Smith or Fuji apple
1/2 medium yellow onion
1 1/2 teaspoons rubbed sage or 4 fresh sage leaves
1 1/4 cups chicken or vegetable broth
1 1/4 cups water
1 teaspoon kosher salt
1/4 teaspoon white pepper
Dash of black pepper
1/3 cup heavy cream
Sour cream

Heat the oven to 425 degrees F and arrange a rack in the middle.

Line a baking sheet with aluminum foil. Place the squash pieces cut-side up on the baking sheet. Melt 1 tablespoon of the butter and brush all of it over the tops and insides of the squash halves (alternatively, you can rub it on evenly with your fingers). Season generously with salt and pepper. Roast until knife tender, about 45 minutes to 1 hour.

Meanwhile, peel, core, and dice the apple. Dice the onion. Melt the remaining tablespoon of butter in a large saucepan or Dutch oven over medium heat. Add the apple, onion and sage, season with salt and pepper, and cook, stirring occasionally, until softened, about 7 minutes. Remove the pan from the heat and set aside.

When the squash is ready, set the baking sheet on a wire rack until the squash is cool enough to handle. Using a large spoon, scoop the flesh into the saucepan with the sautéed apples and onions; discard the skins.

Add the broth, water, and measured salt and pepper, stir to combine, and bring to a boil over medium-high heat. Reduce the heat to medium low and simmer, stirring occasionally and breaking up any large pieces of squash, until the flavors meld, about 15 minutes. Remove the pan from the heat and stir in the cream.

Using an immersion blender or regular blender, purée the soup in batches until smooth. If using a regular blender, remove the small cap from the lid (the pour lid) and covering the space with a kitchen towel (this allows steam to escape and prevents the lid from popping off). Taste and season with salt and pepper as needed. Serve garnished with the sour cream, if using.

Banana bread that’s a breeze to make

bananabread100613

Everyone has a favorite banana bread recipe. It’s one of those classic things that most people have on hand, even if baking isn’t something they do on a regular basis.

I love my mom’s banana bread, but it didn’t translate well at high altitude. I also tried the Banana Bread Cockaigne from the Joy of Cooking, which is my second favorite recipe, but that had issues, too. So, I toyed with it until it came out perfectly.

While three bananas work well at much lower altitude, they make the bread overly mushy at altitude. So, I reduced the number of bananas to two and used less baking powder as well. I checked the bread 45 minutes into the baking process and, while it looked done, it wasn’t fully cooked inside. I left it in for another 10 minutes and it turned out just right. It stayed moist and the crust was not overcooked.

If you’re in the mood to put a spin on the bread, you can add seeds from one vanilla bean. I’ve done that before and it can be a nice change if you’re looking for a more dynamic loaf. The original recipe also suggests adding 1/2 cup chopped nuts or 1/4 cup finely chopped dried apricots.

Ingredients
1 1/2 cups all-purpose flour
1 1/2 teaspoons baking powder (use 1 teaspoon at high altitude)
1/2 teaspoon salt (use 1 teaspoon at high altitude)
2/3 cup sugar
6 tablespoons butter, softened
2 large eggs, beaten
2 ripe bananas, mashed

Grease a loaf pan and preheat the oven to 350 degrees F.

Beat sugar and butter in a large bowl at medium speed until creamy. Add eggs and bananas. Add dry ingredients. Mix until just combined.

Scrape the batter into the loaf pan. Bake the bread for 50-55 minutes, or until a toothpick inserted in the center of the loaf comes out clean. Cool slightly, then take out of pan and cool completely on a rack.

Having fun with a less common fall flavor

almondpeartart092913

Fall is here, and that means it’s time for baking comfort foods with apples and pumpkin. Last weekend, I went wine tasting in the Apple Hill area and stopped at a farm stand on my way home. The best deal at the farm stand was a box of about eight pears for $2. I bought two boxes because I knew I’d want to bake with them.

But, before I proceed, I want to let you know that Red Pen Recipes now has a Facebook page. Like it here.

Screen shot 2013-09-25 at 8.14.25 PMI also recently purchased a ticket to see Curtis Stone in Reno. Those of you who read regularly know that I love his style of cooking. According to his response to the question I posed to him on Facebook, we’ll be having cocktails, stir-frys and chocolate. The countdown to Oct. 12 has begun.

So, back to the pears. When I got home, I started looking for recipes and found this Pear and Almond Tart recipe from Bon Appétit. I had all of the ingredients, and it sounded like the perfect way to use a few of those pears.

This recipe has three major components, all of which can be done separately and saved until you’re ready to assemble the whole thing. If you don’t want to spend hours at a time in the kitchen, do one piece at a time.

I know my crust looks burned in the photo, but it didn’t taste like it at all. I was pleasantly surprised.

The recipe didn’t say to save the liquid from poaching the pears, but I knew from experience that I could boil it into a syrup. A beautiful simple syrup is a terrible thing to waste so I decided to use it to make ice cream.

For the ice cream, I used this recipe. If you plan on using the syrup for ice cream, you have to do things just a bit differently. I’d recommend adding a fourth pear to the poaching process. Set it aside and, when you’re ready to make the ice cream, core it, then dice it and add it to the ice cream when it’s in the ice cream mixer. After the pears have cooled in the liquid, remove them. Then bring the liquid back to a boil and keep it on the heat until there’s about 3/4 cup of thick syrup. Take it off the heat and set it aside. Use it in place of the 1/2 cup sugar in the recipe by using 1/2 in the milk mixture and adding the remaining 1/4 cup to the egg yolks. I know it seems like a lot, but trust me. It works. The bits of pear in the ice cream provided a nice contrast to the texture, too.

If you’re not into that, bottle the syrup and use it on pancakes or find another way to use it. But I encourage you not to waste it, because it’s too delicious to throw away.

Pears
4 cups water
1 1/4 cups sugar
1 1/2 tablespoons fresh lemon juice
3 medium-size firm but ripe pears (Bosc or Bartlett), peeled (each about 7 ounces)

Bring 4 cups water, sugar, and lemon juice to boil in large saucepan over medium-high heat, stirring until sugar dissolves. Add pears. Reduce heat to medium and simmer until pears are very tender, turning occasionally, about 20 minutes. Cool pears in syrup. Can be made two days ahead. Cover and refrigerate.

Crust
1/2 cup powdered sugar
1/4 cup almonds
1/4 teaspoon salt
9 tablespoons (1 stick plus 1 tablespoon) unsalted butter, room temperature
1 large egg yolk
1 1/4 cups all purpose flour

Blend powdered sugar, almonds, and salt in processor until nuts are finely ground. Add butter and blend until smooth, scraping down sides of bowl occasionally. Mix in egg yolk. Add flour. Using on/off turns, blend until dough comes together in clumps. Gather dough into ball; flatten into disk. Wrap in plastic and chill at least 3 hours. Can be made two days ahead. Keep refrigerated.

Almond filling
2/3 cup blanched slivered almonds
1 tablespoon all-purpose flour
7 tablespoons sugar
6 tablespoons (3/4 stick) unsalted butter, room temperature
1 large egg
Powdered sugar (optional)

Finely grind almonds and flour in processor. Mix in 7 tablespoons sugar, then butter, blending until smooth. Mix in egg. Transfer filling to medium bowl. Cover and chill at least 3 hours. Can be made two days ahead. Keep chilled.

Once you’re ready to assemble all three components, position rack in center of oven and preheat to 375 degrees F. Roll out chilled dough on floured sheet of parchment paper to 12-inch round, lifting and turning dough occasionally to free from paper. Using paper as aid, turn dough into 9-inch-diameter tart pan with removable bottom; peel off paper. Seal any cracks in dough. Trim overhang to 1/2 inch. Fold overhang in, making double-thick sides. Pierce crust all over with fork. Freeze crust 10 minutes.

Line crust with buttered foil, buttered side down, then fill with dried beans or pie weights. Bake crust until sides are set, about 20 minutes. Remove foil and beans. Bake crust until sides are golden and bottom is set, pressing with back of fork if crust bubbles, about 10 minutes longer. Cool crust in pan on rack. Reduce oven temperature to 350 degrees F.

Spread almond filling evenly in crust. Stem pears and cut each in half lengthwise; scoop out cores. Cut each half crosswise into thin slices. Gently press each pear half to fan slices but keep slices tightly overlapped. Slide spatula under pears and arrange atop filling like spokes of wheel with narrow ends in center.

Bake tart until golden and tester inserted into center of filling comes out clean, about 55 minutes. Cool tart in pan on rack. Push pan bottom up, releasing tart from pan. Let stand at room temperature. Cut tart into wedges; sprinkle with powdered sugar, if desired, and serve.