Behold the sides of March

beets1

This month my blog is going to be all about side dishes. To kick off the theme, I’ll introduce the most beautiful side dish I’ve ever made. I came across this recipe for beet and goat cheese napoleons on Pinterest a couple months ago. I’ve been eating beets lately and wanted to try something other than roasting them.

While I always like to make things that taste good, sometimes I’ll take the time to make something pretty, too.

A mandolin makes slicing the beets evenly a lot easier, but it’s not a necessity. You can cut the beets with a knife as long as you keep the thickness as uniform as possible. I don’t have a biscuit cutter, so I used the mouth of a glass to make the beet slices the same shape. I saved the beet scraps and made a beet salad for lunch the next day.

I don’t have presentation rings because they’re not something I see myself using on a regular basis, so my presentation of this dish is wanting. Luckily that doesn’t affect the flavor. I expected the overall taste to have a bit of a fresh, tangy flavor to it because of the goat cheese, but the honey in the mixture made it sweeter than I had imagined, and that was a pleasant surprise.

beets2Because I was making this for myself, I made two beet towers instead of the four or so the original recipe serves. I’ve pared down the ingredients so the recipe below produces two servings. I saved the second beet tower in a bowl, covered by plastic wrap, in the fridge for two days, and it kept, though the top beet layer was slightly dry and the beet juice had stained the goat cheese a pinkish purple color. I wouldn’t keep these refrigerated for longer than that. I served mine with pork, but it could stand alone for a vegetarian meal.

Ingredientsbeets3
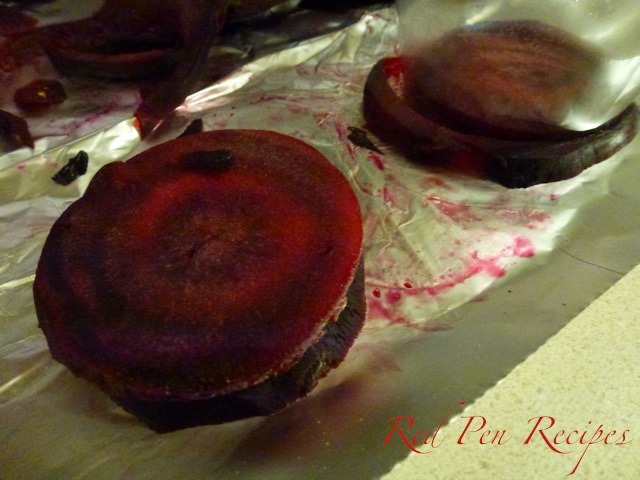
Two beets, golden and/or red
5-6 ounces goat cheese, softened (at room temperature)
2 sage leaves, minced
1 tbsp chopped parsley
salt and cracked pepper
1/3 teaspoon honey
chopped pistachios, for garnish

Preheat the oven to 350 degrees F.

Wrap the beets individually in aluminum foil. Bake for 1 hour, until a knife is easily inserted into the beet. Let them cool, and peel the skin off. Use a mandolin to slice the beets about 1/4-inch thick. Use a biscuit cutter to cut out beet slice circles.

Mix the sage and parsley with the goat cheese. Add the honey and season with freshly cracked pepper and salt to taste. Put dollops of goat cheese in between layers of sliced beet, until you get five slices of beet per napoleon. Serve with the chopped pistachios on top and watercress on the plate.

Sweets for your sweethearts

alfojares1

Alfajores were not a cookie I went in search of, rather, they crossed my path online. And what a beautiful cookie it is. It’s a light, South American cookie held together by dulce de leche, which is like spreadable caramel. The dough is made from a combination of flour and cornstarch, which gives it a silky feel when being rolled out.

I didn’t know how easy it was to make dulce de leche until I tried this recipe, which requires pouring a can of sweetened condensed milk into a pie dish, sprinkling it with salt, covering it with foil, putting the whole thing in a water bath and baking it for a couple hours. That’s it. While it took more time than traditional caramel does to make, it was easier than watching the color of the sugar syrup change in a pan on the stove. Dulce de leche is the slightest bit grainy, but it’s spreadable, which is perfect for these cookies. I made the cookies before the dulce de leche, which was a good order to do it in if you’re doing it all in one day. If you plan to tackle the recipe in two parts on different days, do the dulce de leche first.

I opted to use a heart-shaped cookie cutter for these because I thought the cookies would be cuter, and festive for Valentine’s Day — plus, I don’t think sandwich cookies should ever be big. I like mine small and sweet, and these were perfect. They are labor-intensive and time-consuming to make, but are completely worth it.

Cookiesalfojares2
1 cup cornstarch
3/4 cup all-purpose flour, plus more as needed
1 teaspoon baking powder (use 1/2 teaspoon if you’re at high altitude)
1/2 teaspoon baking soda
1/4 teaspoon fine salt
8 tablespoons unsalted butter (1 stick), at room temperature
1/3 cup granulated sugar
2 large egg yolks
1 tablespoon pisco, brandy or cognac
1/2 teaspoon vanilla extract
1 cup dulce de leche, at room temperature (recipe below)
Powdered sugar, for dusting

Place the cornstarch, measured flour, baking powder, baking soda, and salt in a medium bowl and whisk briefly to combine; set aside.

Place the butter and sugar in the bowl of a stand mixer fitted with a paddle attachment. Mix on medium speed, stopping the mixer to scrape down the sides of the bowl once with a rubber spatula, until the mixture is light in color and fluffy, about 3 minutes. Add the egg yolks, pisco or brandy, and vanilla and mix until incorporated, about 30 seconds. Stop the mixer and scrape down the sides of the bowl. On low speed, gradually add the reserved flour mixture and mix until just incorporated with no visible white pockets, about 30 seconds.

Turn the dough out onto a piece of plastic wrap, shape it into a smooth disk, and wrap it tightly. Place in the refrigerator until firm, at least 1 hour.

Meanwhile, heat the oven to 350 degrees F and arrange a rack in the middle. Line 2 baking sheets with parchment paper and set aside.

Remove the dough from the refrigerator, unwrap it, and place it on a lightly floured work surface. Lightly flour the top of the dough. Roll to 1/4-inch thickness (the dough will crack but can be easily patched back together). Stamp out 24 rounds using a plain or fluted 2-inch round cutter, rerolling the dough as necessary until all of it is gone.

Place the cookies on the prepared baking sheets, 12 per sheet and at least 1/2 inch apart. Bake 1 sheet at a time until the cookies are firm and pale golden on the bottom, about 12 to 14 minutes. Or, if you make smaller cookies like I did, bake for about 8 minutes. (The cookies will remain pale on top.) Transfer to a wire rack to cool completely.

Flip half of the cookies upside down and gently spread about 2 teaspoons of the dulce de leche on each. Place a second cookie on top and gently press to create a sandwich. Dust generously with powdered sugar before serving.

Dulce de lechealfojares4
1 (14-ounce) can sweetened condensed milk
1/4 teaspoon fine salt

Heat the oven to 425 degrees F and arrange a rack in the middle.

Pour milk into a pie plate and sprinkle with salt. Cover tightly with aluminum foil and place in a roasting pan. Place the roasting pan in the oven and add enough hot tap water to reach halfway up the sides of the pie plate. Bake for 1 hour.

Remove the roasting pan from the oven and remove the pie plate. Carefully uncover the plate and whisk the mixture until smooth, about 1 minute. Replace the foil and return the pie plate to the water in the roasting pan. Place back in the oven, adding more hot water so that it remains halfway up the sides of the pie plate. Continue to bake until the dulce de leche is dark golden brown (about the color of peanut butter), about 1 1/2 hours more.

Remove from the oven and transfer the pie plate to a wire rack. Remove the foil and whisk the dulce de leche until smooth, about 3 minutes. Let cool to room temperature, then refrigerate in an airtight container with a tight-fitting lid for up to 1 week.

Who knew applesauce could be so good?

applesauce1

Until recently, I had never made applesauce. My only experience with it was the kind spooned from the Mott’s jar with a yellow lid. I never found it impressive. It was something I might eat with pork chops, but not much else. That is, until I made my own.

While figuring out what to make next, I remembered I had bookmarked Ina Garten’s recipe for applesauce. Then I saw that it was baked in a Dutch oven, which is perfect since I’ve been using mine nonstop since I received it.

The recipe is straightforward, which is what I’ve come to expect from the Barefoot Contessa. That she keeps things simple is what I most like about her attitude toward cooking. Her recipe for applesauce is no exception. I had no idea applesauce could be so good until I made her flavor-packed version. applesauce2After baking the ingredients, her recipe calls for whisking them together. I left small chunks of apple in mine instead of making it the same consistency as the store-bought stuff.

Over the course of a week, I devoured the pot. It’s great for breakfast, a snack or as a dessert — and healthier than many alternatives. This applesauce may become a regular item in my refrigerator. I doubt I’ll ever purchase a jar of applesauce from the store again.

Ingredients
Zest and juice of 2 large navel oranges
Zest and juice of 1 lemon
3 pounds Granny Smith apples (6-8 apples)
3 pounds sweet red apples, such as Macoun, McIntosh or Winesap (6-8 apples)applesauce3
1/2 cup light brown sugar, packed
1/4 pound unsalted butter
2 teaspoons ground cinnamon
1/2 teaspoon ground allspice

Preheat the oven to 350 degrees.

Place the zest and juice of the oranges and lemon in a large bowl. Peel, quarter and core the apples and toss them in the juice. Pour the apples and juice into a nonreactive Dutch oven or enameled iron pot. Add the brown sugar, butter, cinnamon and allspice and cover the pot. Bake for 1 1/2 hours, or until all the apples are soft. Mix with a whisk until smooth. Serve warm or at room temperature.

Macaroni and cheese that’s worth your time

mac&cheese

When I went to check my mailbox a couple weeks ago, I had a surprise waiting for me: a copy of bon appétit magazine. It turns out one of my friends got me a subscription for Christmas, but I didn’t know it until the first issue arrived.

The most recent edition is all about learning. They call it “The Cooking School Issue,” and I can see why. It’s full of handy tips that can help you get the most flavor out of your food, as well as some time-saving tips for weeknight meals. For example, have you ever tried to make homemade macaroni and cheese without boiling the pasta beforehand? I hadn’t, and it’s quite a time-saver, not to mention that it tastes much better than any kind from a box.

The magazine’s recipe for No-Boil Mac and Cheese called for making a thinner béchamel sauce as the base for the cheese sauce. Though the pasta cooked perfectly, I felt the cheese flavor was muted. I used Tillamook’s Mac & Cheese blend, which is a combination of shredded sharp cheddar, vintage white medium cheddar and medium cheddar. Next time, I’ll likely choose just sharp cheeses or add goat cheese or gruyere for more prominent flavor.

The recipe said to use a 13-inch-by-9-inch pan, but I opted to use my Dutch oven, which turned out to be a suitable choice. The depth of the pan didn’t seem to matter as much as the amount of liquid. For my own changes, I used regular breadcrumbs because the store didn’t have panko. If you can get your hands on panko, the crunch would provide nice texture. I also added cubed black forest ham I had left from the previous night’s dinner.

This was one of the least labor-intensive versions of macaroni and cheese I’ve ever made. I’ll be hanging on to this recipe.

Ingredients
1/2 cup (1 stick) unsalted butter, divided
1/4 cup all-purpose flour
3 cups whole milk
1 tablespoon kosher salt plus more
1/2 teaspoon freshly ground black pepper plus more
1 pound elbow macaroni
2 cups shredded cheddar, divided
2 garlic cloves, chopped
1 cup panko (Japanese breadcrumbs)
2 tablespoons chopped flat-leaf parsley
2 cups ham, cubed (optional)

Preheat oven to 400 degrees F. Melt 1/4 cup butter in a large saucepan over medium-high heat. Add flour; cook, whisking constantly, for 1 minute. Whisk in milk and 3 cups water. Bring to a boil, reduce heat to a simmer, and cook, whisking often, until a very thin, glossy sauce forms, about 10 minutes. Stir in 1 tablespoon salt and 1/2 teaspoon pepper. Remove sauce from heat.

Toss pasta and 1 1/2 cups cheese in a 13-inch-by-9-inch-by-2-inch or other shallow 3-quart baking dish. Pour sauce over (pasta should be submerged; do not stir) and cover with foil. Bake until pasta is almost tender, about 20 minutes.

Meanwhile, melt remaining 1/4 cup butter in a large skillet over medium heat. Add garlic, panko, and parsley and toss to combine. Season with salt and pepper.

Remove foil from dish. Sprinkle with remaining 1/2 cup cheese, then panko mixture. Bake until pasta is tender, edges are bubbling, and top is golden brown, about 10 minutes longer. Let sit 10 minutes before serving.

Sweet treats brought on by winter weather

Marshmallows1

Tahoe got its first snow of the season on Monday, the day I returned from my week off. I spent my vacation in rainy Portland, on the foggy Central Coast of California and finished it in warm Paso Robles. Coming back to snow was not something I was looking forward to.

The weather is out of my power, so I turned on my heater for the first time since April and made myself a cup of tea. But I get tired of tea. When winter rolls around, I like a good cup of cocoa. What goes hand in hand with cocoa? Marshmallows. Homemade marshmallows, to be exact.

I first tried making marshmallows last year. I’d never had anything but the store-bought Jet-Puffed marshmallows, so I wasn’t sure whether making them from scratch would be better. But they were, and it was easier than I expected. The only trick is that you need a stand mixer to make them.

I used to be against stand mixers until a few years ago, when my friend’s grandmother gave me hers. For months, the mixer stayed in the cupboard, unused. I felt like using it would somehow be a form of cheating.

Around Christmastime, when I was in full holiday baking mode, I remembered I had it and pulled it out to mix some dough while I was working on something else. I haven’t looked back since. While I still hand-mix certain things, having the mixer has been incredibly useful when it comes to bread doughs and other doughs that can be tough to mix well by hand, and it’s nice to have for recipes that require it.

All people taste is the final product, and I haven’t found anyone who really cares whether I took the time to mix something by hand or not. No more guilt.

Once again, this recipe comes from Joy. Most of the work is done by the stand mixer. I’ve found I can kill two birds with one stone by heating the gelatin over the boiling sugar mixture instead of over a pot of water. Make sure to watch the sugar mixture when it’s close to 244 degrees because it heats up fast, and you don’t want your marshmallows to be too dense. I’ve made that mistake before, but they still melt well in cocoa. Also be careful not to overmix. If mixed too much, a lot of marshmallow will get stuck in the whisk and it will be too thick to pour into the pan to cool. Let them cool completely and use scissors to cut them — don’t use a knife, it fails every time.

This time around, I gave mine an orange tint. Why? Because it’s Orange October. Because Halloween is around the corner. Because the San Francisco Giants are in the World Series and need to win today’s game to clinch the title.

Ingredients
1/4 cup cornstarch
1/4 cup confectioners’ sugar
1/2 cup water
4 envelopes (3 tablespoons) unflavored gelatin
2 cups sugar
3/4 cup light corn syrup
1/2 cup water
1/4 teaspoon salt
2 tablespoons vanilla
cornstarch

Mix cornstarch and confectioners’ sugar and dust a lightly oiled 9-inch-by-13-inch baking pan with some of the mixture.

Pour 1/2 cup water into the bowl of a stand mixer and sprinkle the gelatin over the water. Let stand for 5 minutes. Place the bowl over a pot of simmering water for two to three minutes, or until the gelatin dissolves. Set aside on the stand mixer.

Bring sugar, light corn syrup, water and salt to a boil in a large, heavy saucepan over low heat, stirring with a long-handled wooden spoon until the sugar is dissolved, if necessary. Place a candy thermometer in the pan and raise the heat to medium-high and cook, without stirring, to 244 to 246 degrees, the firm-ball stage. Remove from heat.

With the whisk attachment on the mixer and the bowl of liquid gelatin secured, turn the mixer to medium speed and slowly pour the sugar mixture in a thin, steady stream. Be careful to avoid the whisk, because the sugar mixture will stick to it and harden quickly. Beat for about 10-15 minutes, or until the mixture is thick and fluffy, but still warm and thin enough to pour. Add vanilla.

Transfer the mixture to the prepared pan. Cool completely, then cover very loosely with aluminum foil and let dry for four to six hours, or until firm enough to cut. Remove the marshmallows from the pan and, using scissors dusted with cornstarch, cut into 1-inch squares. Put the rest of the cornstarch/confectioner’s sugar mixture into a large Ziploc bag and add half of the marshmallows. Shake, then take out the marshmallows and repeat with the remaining marshmallows.

Store between layers of wax paper in an airtight container at room temperature.