Broccoli bites take snacks back to basics

1broccolibites

I recently saw this broccoli bites recipe on Pinterest. It seemed simple enough, so I thought I’d give it a shot.

This is a nice, basic recipe that only calls for four ingredients, which leaves plenty of room to experiment with other flavors and additions. It doesn’t require any special equipment, either. Mix it with your hands, form it into patties and bake. That’s it.

Next time I make these, I will likely use 1/2 cup of cheddar and 1/2 cup Parmesan, because I wanted more bite to them. Or, I might try a sharper cheddar — medium didn’t offer the flavorful punch I wanted.

The most difficult thing to figure out was what to serve them with. I tried sour cream, but it wasn’t quite right. So I tried a bit of mayonnaise with worcestershire, which was better; but I think ranch dressing might be the best option — I just didn’t have any on hand.

2broccolibitesFor something to snack on, these are pretty hearty and filling.

Ingredients
1 head of fresh broccoli, cut and steamed
1 cup cheddar cheese, grated
2 eggs
1/2 cup of Italian breadcrumbs
Salt and pepper to taste

Preheat the oven to 375 degrees. Line a baking sheet with parchment paper.

Mix the ingredients together in a large bowl. Form small patties and place on the baking sheet.

Bake for 15 minutes, then turn over patties and bake for another 10 minutes.

Let cool for up to 5 minutes. Serve warm.

Sweet squash soup for cold nights

1Butternutsquashsoup

Lake Tahoe got a light dusting of snow at lake level last week. Night temperatures are dipping into the high 20s and I’m thinking about turning my heater on for the first time since May.

My thoughts have turned to warm meals that are easy to put together. I made this Roasted Butternut Squash Soup to keep me warm last week. I cut the recipe in half — but used the same amount of apple, onion and cream — because I only had one squash. It still made enough soup for four meals.

I’ve used Granny Smith apples in soups before, and they lend a certain tartness to them. This time I used a Fuji apple because it’s all I had. I liked the mellower flavor and feel that a Granny Smith apple would have made the soup more tart than I wanted it to be. The soup is sweeter and thicker than many other kinds of soup, but I liked that.

If you roast the squash ahead of time, this soup can be made quickly on a weeknight, when most people tend to look for meals that are easy to make after a day of work. I enjoyed it with a slice of sourdough bread and a spoonful of sour cream.

Ingredients
1 medium butternut squash, halved lengthwise and seeds removed
2 tablespoons unsalted butter
1 medium Granny Smith or Fuji apple
1/2 medium yellow onion
1 1/2 teaspoons rubbed sage or 4 fresh sage leaves
1 1/4 cups chicken or vegetable broth
1 1/4 cups water
1 teaspoon kosher salt
1/4 teaspoon white pepper
Dash of black pepper
1/3 cup heavy cream
Sour cream

Heat the oven to 425 degrees F and arrange a rack in the middle.

Line a baking sheet with aluminum foil. Place the squash pieces cut-side up on the baking sheet. Melt 1 tablespoon of the butter and brush all of it over the tops and insides of the squash halves (alternatively, you can rub it on evenly with your fingers). Season generously with salt and pepper. Roast until knife tender, about 45 minutes to 1 hour.

Meanwhile, peel, core, and dice the apple. Dice the onion. Melt the remaining tablespoon of butter in a large saucepan or Dutch oven over medium heat. Add the apple, onion and sage, season with salt and pepper, and cook, stirring occasionally, until softened, about 7 minutes. Remove the pan from the heat and set aside.

When the squash is ready, set the baking sheet on a wire rack until the squash is cool enough to handle. Using a large spoon, scoop the flesh into the saucepan with the sautéed apples and onions; discard the skins.

Add the broth, water, and measured salt and pepper, stir to combine, and bring to a boil over medium-high heat. Reduce the heat to medium low and simmer, stirring occasionally and breaking up any large pieces of squash, until the flavors meld, about 15 minutes. Remove the pan from the heat and stir in the cream.

Using an immersion blender or regular blender, purée the soup in batches until smooth. If using a regular blender, remove the small cap from the lid (the pour lid) and covering the space with a kitchen towel (this allows steam to escape and prevents the lid from popping off). Taste and season with salt and pepper as needed. Serve garnished with the sour cream, if using.

Experimenting with eggplant

eggplant1

I never ate eggplant as a kid. Mom never made it, so for most of my life it has been somewhat of a foreign vegetable. After seeing it at the farmers market on a regular basis, I decided to purchase one and figure out what to do with it.

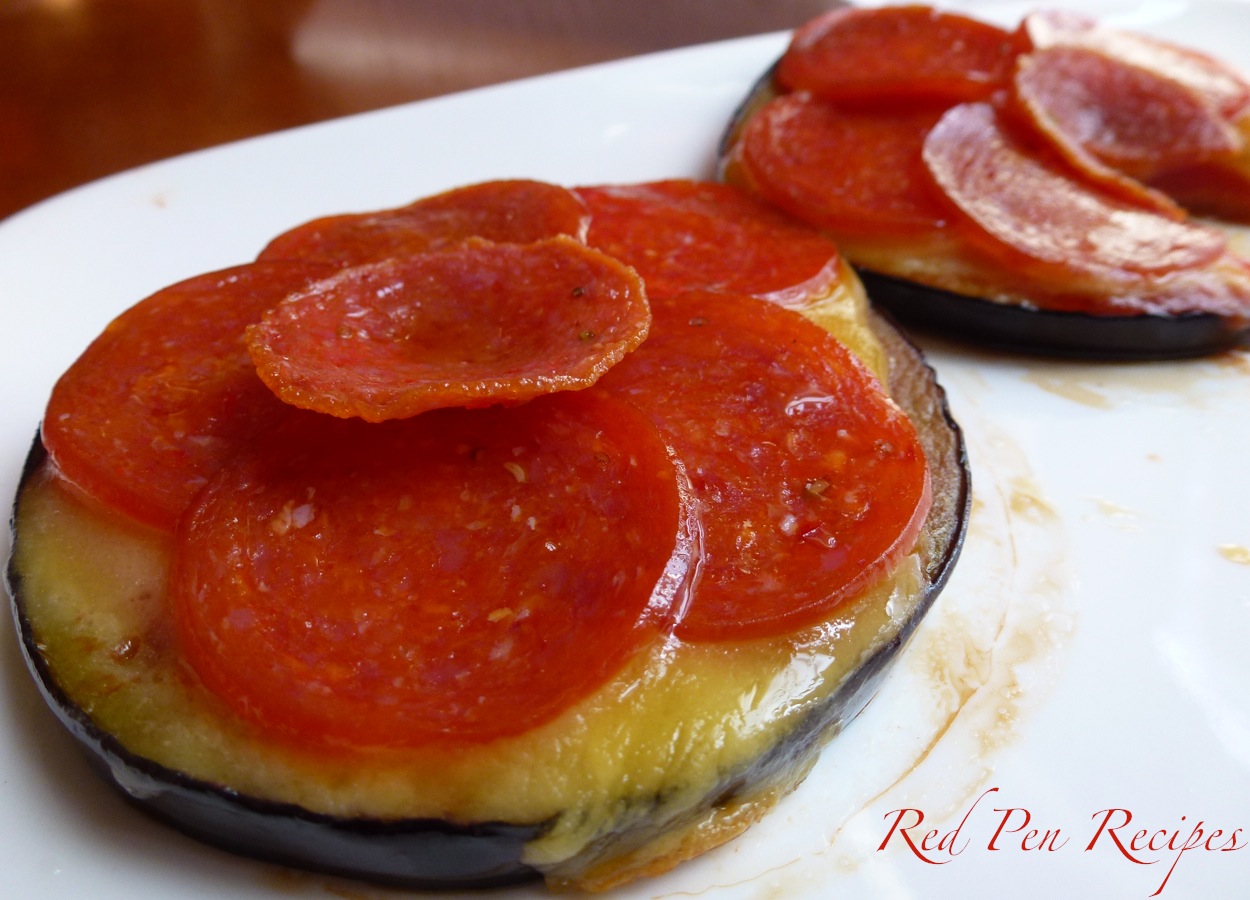
While browsing Pinterest a couple weeks ago, I saw a recipe for mini pizzas that used slices of zucchini for crust. I decided to see if I could do the same thing with eggplant. It seemed like a good starting point and it was. It gave me a bit of experience seeing how eggplant bakes, and I learned that it has a lot of moisture that can be cumbersome if not drained a ahead of time. I made the pizzas two ways — first in the oven and second in a frying pan. I preferred the way it came out of the oven, because it had less moisture in the end. The pizzas are simple enough to throw together on a whim, and they taste good, too. I stuck with basic toppings, but you can easily put whatever you want on them.

After getting that bit of experience under my belt, I felt ready to tackle something a little more ambitious. I had never made Eggplant Parmesan, so I decided to consult my cookbooks to see how it was done. It turns out everybody has their own version. One book called for large slices of eggplant, another called for long sticks of eggplant; one book recommended frying the eggplant in oil, and another said baking it was better because frying it made it too soggy. It sounded like each recipe had its issues, so after checking out the basic methods and ingredients, I decided to come up with my own method.

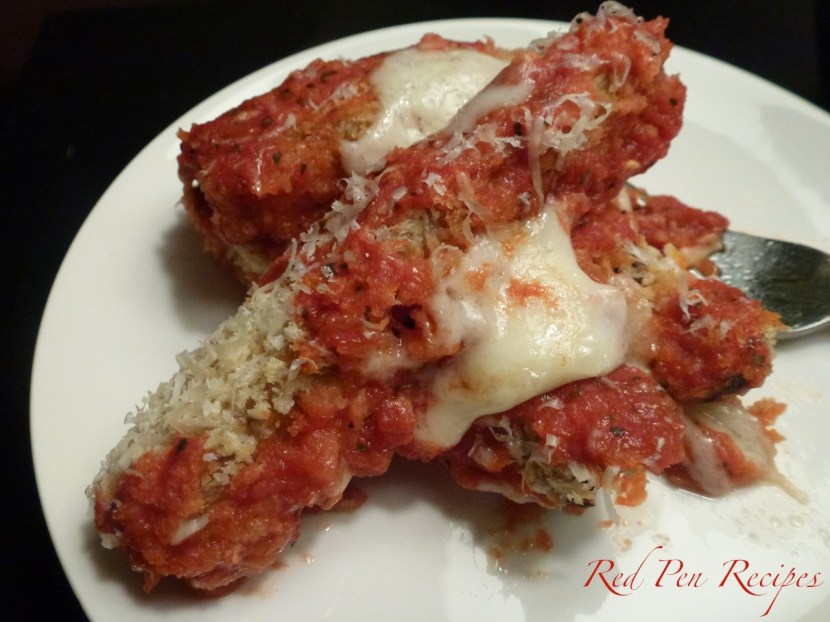
I chose to approach the eggplant like I would homemade fish sticks. I breaded it in panko, which I like because it gives foods a nice crunch, and chose to bake it in a thin layer of olive oil. It worked surprisingly well. I like a bit of heat to sauce, so the garlic and red pepper flakes took care of that. I didn’t have mozzarella, so I went with fresh Asiago I picked up at the store, and I liked how it complemented the sauce. I’m proud of how this experiment turned out, and will definitely be making this version of Eggplant Parmesan again.

eggplant2Eggplant mini pizzas
Olive oil
Sea salt
Three 1/4- to 1/3-inch slices of eggplant, drained on a paper towel for 30 to 45 minutes
1/3 cup tomato sauce
1 cup grated cheese
About 12 slices of pepperoni

Put enough olive oil in the bottom of a pie pan to lightly coat the bottom of the pan. Sprinkle with sea salt. Put the pan in the oven and preheat it to 350 degrees F.

Once the pan is preheated, add the eggplant slices. Cook for 5 minutes. Take the pan out of the oven and turn over the eggplant slices. Spoon tomato sauce onto each slice. Top with cheese and pepperoni. Put back in oven and cook for another 5 minutes, or until the cheese is melted.

Remove from the oven and serve.

Eggplant Parmesan
2/3 of an eggplant, cut into 1-inch-wide sticks and drained in a colander or pan lined with paper towels for 1 hour or overnight
1/2 cup flour
1/4 teaspoon white pepper
1/2 teaspoon salt
1 egg
1 cup panko (or breadcrumbs)
Olive oil
1 15-ounce can tomato sauce
2 tablespoons dried basil
1 teaspoon dried minced garlic or 1 clove fresh minced garlic
1/2 teaspoon crushed red pepper flakes
Dash salt
3/4 cup Asiago, grated or cut into small cubes
1/2 cup grated Parmesan

Preheat oven to 425 degrees F. Combine flour, white pepper and salt in a resealable freezer bag. Beat the egg in a pie pan and set aside.

Put five sticks of eggplant into the resealable bag with the flour mixture, seal the bag and shake to coat. Remove and repeat with the remaining eggplant, doing about five sticks at a time. Once all the eggplant has been coated with flour, dispose of any remaining flour mixture.

Put the panko in the same resealable bag. Coat each piece of eggplant in the beaten egg and set aside. Put five sticks of eggplant into the bag of panko. Seal the bag and shake to coat the eggplant. Repeat with the remaining eggplant.

Drizzle a generous amount of olive oil over the bottom of a 9-by-13-inch glass pan or cookie sheet. Place the panko-covered eggplant sticks in a single layer in the pan. Bake for 15 minutes, or until bottom of eggplant is slightly browned.

Meanwhile, combine the tomato sauce, basil, garlic, red pepper flakes and salt in a small saucepan or microwavable dish and heat until hot. Set aside.

Once the eggplant has baked for 15 minutes, turn it over and bake for another 10 minutes, or until the other side of the eggplant is slightly browned. Remove eggplant from the pan. Coat the bottom of the pan evenly with half of the sauce. Put the eggplant back in the pan in a single layer. Pour remaining sauce over eggplant. Sprinkle cheeses over eggplant and return to oven for 5 minutes, or until cheese has melted. Remove from oven and let sit for 5-10 minutes before serving.

Pulled pork provides a variety of options

pulledpork1

Once in a while, it’s nice to have some type of meat in the fridge to play with. I bought a round of pork shoulder the last time I went grocery shopping and, instead of roasting it and serving it with vegetables and I had initially intended, I slow-cooked it and turned it into pulled pork.

pulledpork2I turned to “The Joy of Cooking” for the guidelines for cooking pulled pork. If you’re going to be home for a few hours, put in the oven and just let it do its thing.

The great thing about pulled pork is that you can do a variety of things with it. You can cover it in barbecue sauce and toss it on a roll or make a sandwich out of it. You can use it to make tacos. Or, you can just eat it by itself. I like that flexibility.

Ingredients
2- to 3-pound round of pork shoulder or butt
2 tablespoons olive oil
Salt
1 cup barbecue sauce

pulledpork3Preheat oven, with a dutch oven inside, to 325 degrees F. Once it’s heated, take the dutch oven out and put olive oil inside. Add pork and let it sizzle on one side before turning over. Sprinkle with salt. Put the dutch oven, with the lid on, back in the oven. Cook for two hours or until a thermometer inserted in the thickest part of the meat reads at least 155 degrees F. I let mine get up to 185 degrees F before taking it out of the oven.

Once the meat is done, take the dutch oven out of the oven and remove the lid. Let sit for about 10 minutes, or until cool enough to handle.

Tear meat apart using a fork or your hands. Meat should be shredded as much as possible. Add barbecue sauce and mix until meat is evenly covered. Serve. Any leftovers can be stored in the fridge and reheated when ready to use.

Beautiful broccoli shines in simple pasta dish

broccoliorecchiette080413

The farmers market continues to have a variety of impossible-to-resist produce — and I keep buying it. A few weeks ago, I picked up some beautiful broccoli from one of the booths. I wanted to make those most of it, so I started looking through my cookbooks for a suitable recipe.

Since it was a weeknight after work, I wanted something I could make in 30 minutes or less. I decided to try another recipe from the “Five-ingredient Fridays” chapter of Curtis Stone’s “What’s for Dinner?” The recipe, Orecchiette with Brown Butter, Broccoli, Pine Nuts, and Basil, called for ingredients I had on hand and didn’t require a lot of cleanup. After about 20 minutes, I ended up with a hearty, delicious vegetarian dish that was great comfort food after a long day at work. The broccoli flavor really came through when paired with a simple brown butter sauce, and the pine nuts added a nice crunch that provided great contrast to the the pasta.

Though I’m not a vegetarian, sometimes it’s just nice to make something that allows vegetables to be the star of the meal. I’m looking forward to making more dinners with more finds from the farmers market.

Ingredients
13 ounces broccoli florets with 1-inch stems (about 6 cups)
1 pound orecchiette
8 tablespoons (1 stick) unsalted butter
1/2 cup lightly packed fresh basil leaves, coarsely chopped
1/2 cup pine nuts, toasted
2 tablespoons fresh lemon juice
Kosher salt and freshly ground black pepper
Extra virgin olive oil, for serving

Bring a large pot of salted water to a boil over high heat. Add the broccoli and cook for about 2 minutes, or just until bright green. Using a mesh spoon or sieve, scoop the broccoli out of the water, draining it well, and transfer to a rimmed baking sheet. Set aside.

Return the water to a boil. Add the orecchiette and cook, stirring often to ensure it doesn’t stick together, for about 8 minutes, or until tender but still firm to the bite. Scoop out and reserve 1/2 cup of the pasta cooking water. Drain the orecchiette.

Meanwhile, heat a large heavy skillet over medium-high heat. Add the butter and stir for about 2 minutes, or until it has turned hazelnut brown. Add the broccoli and cook, stirring often, for about 1 minute, or until hot.

Add the pasta to the broccoli mixture and stir gently to combine. Stir in the basil, pine nuts, and lemon juice. Season to taste with salt and pepper. Stir in enough of the reserved cooking water to moisten the pasta as necessary.

Divide the pasta among four pasta bowls, drizzle with olive oil, and serve.