Macaroni and cheese that’s worth your time

mac&cheese

When I went to check my mailbox a couple weeks ago, I had a surprise waiting for me: a copy of bon appétit magazine. It turns out one of my friends got me a subscription for Christmas, but I didn’t know it until the first issue arrived.

The most recent edition is all about learning. They call it “The Cooking School Issue,” and I can see why. It’s full of handy tips that can help you get the most flavor out of your food, as well as some time-saving tips for weeknight meals. For example, have you ever tried to make homemade macaroni and cheese without boiling the pasta beforehand? I hadn’t, and it’s quite a time-saver, not to mention that it tastes much better than any kind from a box.

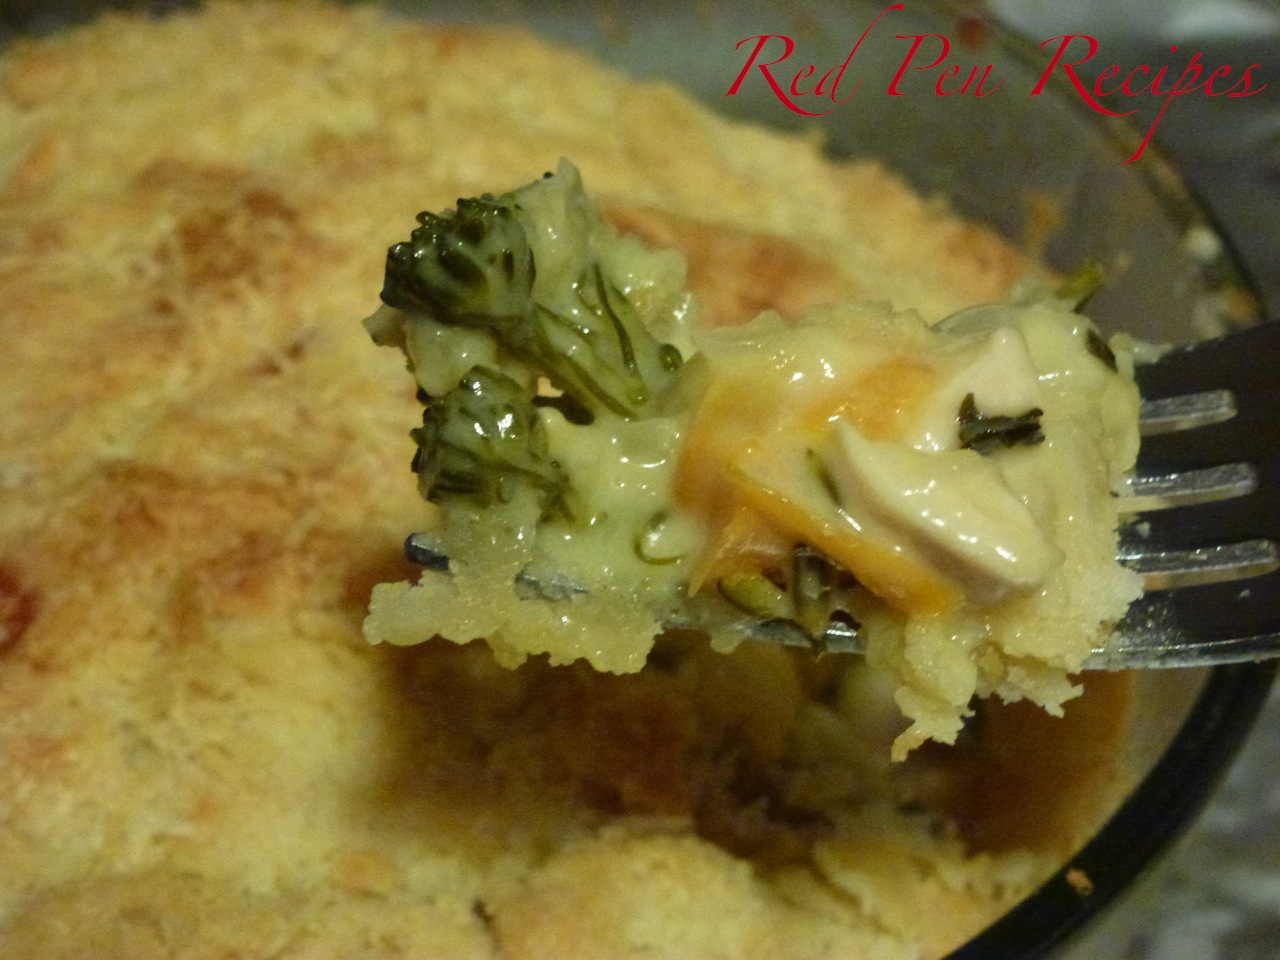
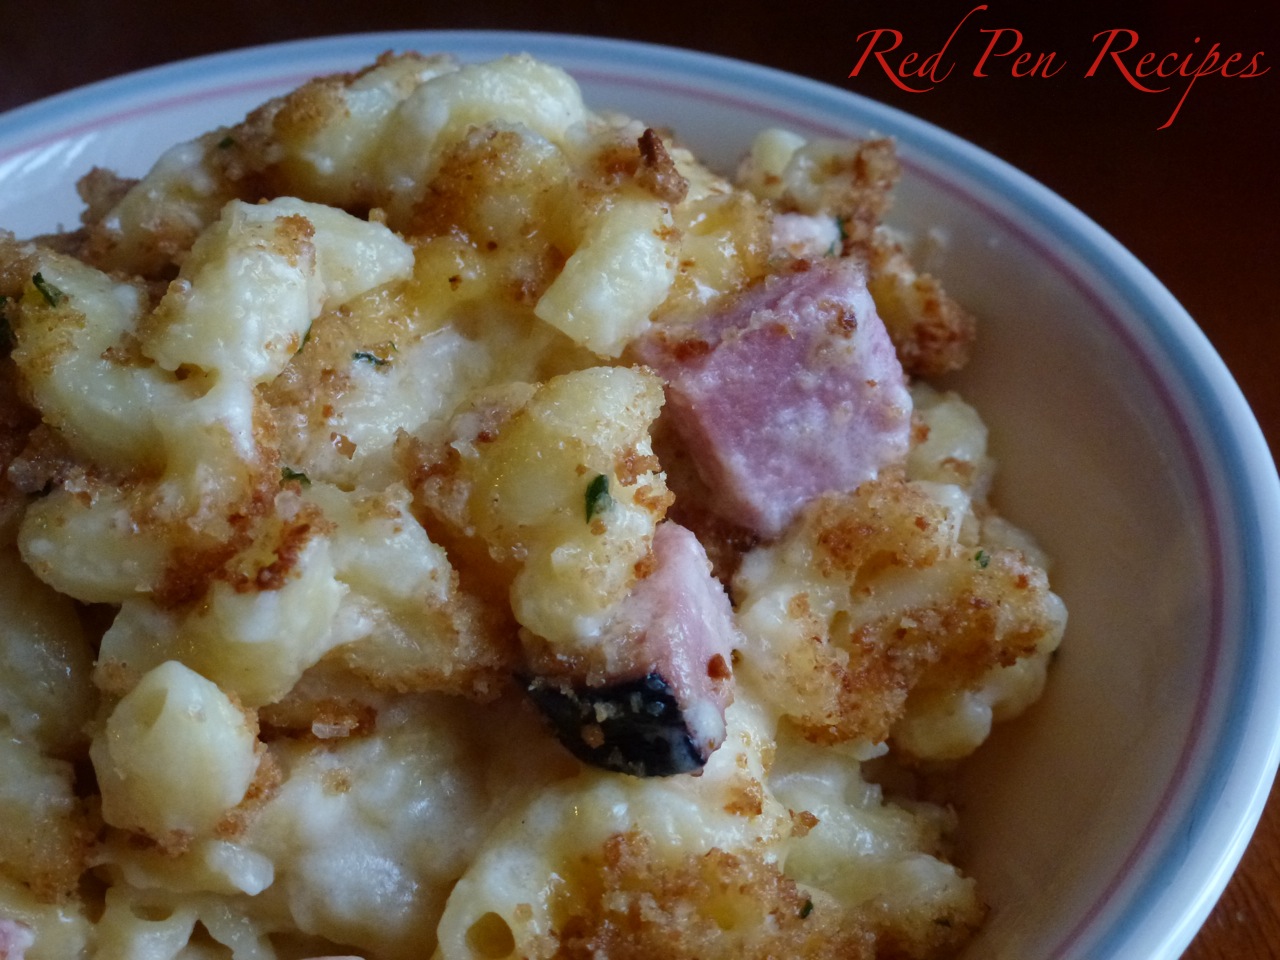
The magazine’s recipe for No-Boil Mac and Cheese called for making a thinner béchamel sauce as the base for the cheese sauce. Though the pasta cooked perfectly, I felt the cheese flavor was muted. I used Tillamook’s Mac & Cheese blend, which is a combination of shredded sharp cheddar, vintage white medium cheddar and medium cheddar. Next time, I’ll likely choose just sharp cheeses or add goat cheese or gruyere for more prominent flavor.

The recipe said to use a 13-inch-by-9-inch pan, but I opted to use my Dutch oven, which turned out to be a suitable choice. The depth of the pan didn’t seem to matter as much as the amount of liquid. For my own changes, I used regular breadcrumbs because the store didn’t have panko. If you can get your hands on panko, the crunch would provide nice texture. I also added cubed black forest ham I had left from the previous night’s dinner.

This was one of the least labor-intensive versions of macaroni and cheese I’ve ever made. I’ll be hanging on to this recipe.

Ingredients
1/2 cup (1 stick) unsalted butter, divided
1/4 cup all-purpose flour
3 cups whole milk
1 tablespoon kosher salt plus more
1/2 teaspoon freshly ground black pepper plus more
1 pound elbow macaroni
2 cups shredded cheddar, divided
2 garlic cloves, chopped
1 cup panko (Japanese breadcrumbs)
2 tablespoons chopped flat-leaf parsley
2 cups ham, cubed (optional)

Preheat oven to 400 degrees F. Melt 1/4 cup butter in a large saucepan over medium-high heat. Add flour; cook, whisking constantly, for 1 minute. Whisk in milk and 3 cups water. Bring to a boil, reduce heat to a simmer, and cook, whisking often, until a very thin, glossy sauce forms, about 10 minutes. Stir in 1 tablespoon salt and 1/2 teaspoon pepper. Remove sauce from heat.

Toss pasta and 1 1/2 cups cheese in a 13-inch-by-9-inch-by-2-inch or other shallow 3-quart baking dish. Pour sauce over (pasta should be submerged; do not stir) and cover with foil. Bake until pasta is almost tender, about 20 minutes.

Meanwhile, melt remaining 1/4 cup butter in a large skillet over medium heat. Add garlic, panko, and parsley and toss to combine. Season with salt and pepper.

Remove foil from dish. Sprinkle with remaining 1/2 cup cheese, then panko mixture. Bake until pasta is tender, edges are bubbling, and top is golden brown, about 10 minutes longer. Let sit 10 minutes before serving.

Dutch oven delights turn into cold weather classics

soup2

My best friend gave me a Dutch oven for Christmas. I’ve seen dozens of recipes I’d like to try and have pinned on Pinterest, but now I can actually try them. Since I’ve already used it for a few different recipes, I’ve decided that January will be Dutch oven month on my blog.

The temperature in Tahoe has been dropping to a single digit on a regular basis during the past month or two, which has put me in the mood for hot, healthy food. While this first recipe doesn’t require the use of a Dutch oven, I wanted to test its stovetop capability. The instructions for mine say it shouldn’t be put on high heat, so I wanted to see whether I could get anything to boil on a lower setting.

About six years ago, I clipped this recipe for White Bean and Rosemary Soup from O magazine. It has since become one of my favorite go-to recipes when I want to make soup. One tip I’d like to offer is to chop the rosemary as small as possible. Getting a larger piece in the middle of the soup is annoying. The croutons are good, too, but when I’m only cooking for myself, I opt for a piece of toast instead.

I recently attended an outdoor concert in the area and was an icicle when I returned home. It was so nice to have a pot of soup ready to heat up to help me defrost. It was just what I wanted.

Croutons
2 whole heads garlic
1/4 cup plus 2 teaspoons olive oil
1 teaspoon kosher salt , plus more to taste
1/2 teaspoon freshly ground black pepper, plus more to taste
1/2 loaf unsliced whole wheat bread, cut into 1-inch cubes

Preheat oven to 400 degrees F. Slice off tops of garlic heads so the cloves are just exposed. Rub each head with 1 teaspoon olive oil; wrap loosely in foil. Roast 25 to 35 minutes. Remove from oven (but leave oven on); let garlic cool until comfortable to touch. Squeeze cloves from the heads into a small bowl; mash with a fork; set aside.

In a large bowl, combine half the roasted garlic with 1/4 cup olive oil, salt and pepper. Add bread and toss until well coated. Place bread on a baking sheet and bake 20 minutes, turning once or twice, until golden brown. Remove from oven and set aside. soup3

Soup
1 tablespoon unsalted butter
2 tablespoons olive oil, plus more for drizzling
1 large onion, chopped (about 2 cups)
2 carrots, peeled and cut crosswise into 1/4-inch coins
2 stalks celery, cut into 1/4-inch slices
4 cups chicken or vegetable broth
2 cans (14.5 ounces each) white beans, drained, rinsed and drained again
2 tablespoons chopped fresh rosemary

To make soup: In a large saucepan, heat butter and 2 tablespoons olive oil over medium heat. Add onion, carrots and celery and cook until tender, about 10 minutes. Add broth and remaining half of garlic and bring to a boil; reduce heat and cook 20 minutes, until carrots are very tender. Add drained beans and rosemary; cook 10 more minutes. With an immersion blender or in a food processor fitted with knife blade, puree half the soup until smooth. Stir to combine. Serve in bowls topped with croutons and drizzled with remaining olive oil.

Taking a tomato tart up a notch

I’ve been working a lot lately, which means I’ve been eating a lot of pasta and quick meals. After a few days of reaching for whatever was in the fridge, I was craving something healthy, something homemade, something that would leave leftovers.

After a long day at work on Wednesday, I turned on the Food Network and saw the Barefoot Contessa was making a tomato and goat cheese tart, but hers used puff pastry and I was too tired to go to the store. So I Googled it to see what other recipes were out there. That’s how I found this recipe on The New York Times.

Compared to the tomato and goat cheese tarts I’ve made before, all of which were either unremarkable or overwhelmed by goat cheese, this one made an impression. I loved the crust for it — it’s somewhere in between bread and a pie crust; crispy on the outside and soft on the inside. Next time, I might even bake herbs into it. The dijon mustard spread on the crust added an unexpected level of flavor. If you don’t like dijon mustard, try substituting regular mustard, some kind of salad dressing or just eliminating it. Or, if you only want a bit of the flavor, use half the amount called for by the recipe. This version of a tomato and goat cheese tart is more tomato than goat cheese, and I prefer it that way, Choose ripe heirloom tomatoes for really fresh flavor. They make it beautiful, too.

Crust
1 teaspoon active dry yeast
1/4 cup lukewarm water
1/8 teaspoon sugar
1 large egg, at room temperature, beaten
1/8 cup olive oil
1/2 cup bread flour
1/2 cup unbleached flour
3/4 teaspoon salt

Dissolve the yeast in the water, add the sugar, and allow to sit until the mixture is creamy, about five minutes. Beat in the egg and the olive oil. Combine the flours and salt, and stir into the yeast mixture. You can use a bowl and wooden spoon for this, or a mixer — combine the ingredients using the paddle. Work the dough until it comes together in a coherent mass, adding flour as necessary. Turn out onto a lightly floured surface, and knead gently for a few minutes, adding flour as necessary, just until the dough is smooth — do not overwork it. Shape into a ball. Place in a lightly oiled bowl, cover the dough tightly with plastic wrap, and allow to rise in a draft-free spot until doubled in size, about one hour. If it’s too cold to rise, put the oven on warm until it heats up, then turn it off and put the dough inside. It’s a gem of a trick one of my former coworkers taught me. It has saved many a bread dough from being thrown out due to frustration.

Turn the dough out onto a lightly floured surface, gently knead a couple of times, and cut into two equal pieces (or as directed in each of this week’s recipes). Shape each piece into a ball without kneading it. Cover the dough loosely with plastic wrap, and let rest for five minutes. Then roll out into thin rounds, as directed in each recipe, and line pans. If not using right away, freeze the dough to prevent it from rising and becoming too fluffy. The dough can be transferred directly from the freezer to the oven.

Filling
3 tablespoons Dijon mustard
2 ripe heirloom tomatoes
Sea salt and freshly ground pepper
2 to 3 teaspoons fresh thyme, chopped rosemary or dried herbs
2 eggs
4 ounces goat cheese, crumbled
1 tablespoon extra virgin olive oil

Preheat the oven to 350 degrees. Oil a 10-inch tart pan and line it with the pastry. Keep in the refrigerator while you prepare the filling.

Brush the mustard over the bottom of the dough. Slice the tomatoes and arrange over the mustard in concentric circles, overlapping them slightly. Sprinkle with salt, pepper and the herbs.

Beat together the eggs and goat cheese. Season with salt and pepper and pour over the tomatoes. Drizzle on the olive oil. Place in the oven and bake 30 to 40 minutes, until the top is nicely browned. Remove from the heat and allow to cool for 10 minutes before serving. Serve hot, warm or at room temperature.

Transforming leftovers into comfort food

potpie1

Early last week I roasted a large portion of turkey I purchased from Costco. After eating some every day, I was left with one small portion. But I didn’t just want to reheat it. I needed to do something with it.

The first thing that usually comes to mind for me when I have leftover chicken or turkey is a pot pie. Pot pies are pretty simple, as long as you have a few vegetables and basic ingredients on hand. I’ve made pot pies before, but have never found a good recipe for the sauce. Most sauces are made of mostly flour and either water, broth or milk — some of which turn out thinner than I prefer, while others are too thick. This time, I consulted my Cook’s Illustrated cookbook, and it called for a combination of the three. While I didn’t follow the recipe to a T, I did use it as a guideline and it produced the best pot pie sauce I’ve made to date.

Traditional pot pies use carrots, celery and onion, but I all I had in the fridge were onions, bell peppers and broccolini. Together, the three worked well. That’s the great thing about pot pies — you can use just about anything you like to fill them. This makes one large pot pie, suitable for one hungry person.

Crust
8 tablespoons butter, cut into 1/4-inch cubes
1/2 teaspoon salt
1 cup flour
1 tablespoon water

Filling
2 tablespoons butter
1/2 small bell pepper, chopped
1/2 small yellow onion, chopped
6 stalks broccolini, save florets, either chop or discard stalks
1/2 cup chopped turkey or chicken
1/2 bullion cube
1/2 cup water
1 tablespoon flour
1 tablespoon goat cheese
2 tablespoons heavy whipping cream or milk
1 tablespoon water (if needed)
Dash of dried chives, basil or other herbs
1/2 teaspoon salt
Grated Parmesan

Combine butter, flour and salt in a small bowl. Using your hands, mix the ingredients until the dough forms into pea-size pieces. Add water and mix in. Take three-fourths of the dough and pat into a 6-inch round oven-safe glass dish. Flatten remaining one-fourth of the dough into a disc. Wrap in plastic wrap and put into freezer alongside dish with crust.

Preheat oven to 400 degrees. Melt butter in a saucepan over medium heat. Add chopped bell pepper, onion and broccolini florets. Sautee until onion is translucent. Add turkey, flour, 1/2 cup water and 1/2 bullion cube. Bring to a simmer. Once bullion cube has dissolved, add goat cheese and heavy whipping cream stir until combined. If sauce seems too thick, add one tablespoon water. Turn off heat to burner. Add basil, chives and salt.

Take prepared pan and dough out of freezer. Pour filling into pan. Shape remaining dough into crust and place over filling. Pinch edges to seal crust. Using a fork, prick holes in top of crust. If desired, grate Parmesan over crust.

Put pot pie on a cookie sheet in oven for 25 minutes, or until top is golden brown. Let cool for 10 minutes before digging in.

A versatile dish for any time of day

The best thing about quiche is that you can eat it at any time of day, at any temperature and with anything in it, as long as you have a good base recipe.

For those of you who aren’t familiar with quiche, it’s a simple egg dish baked in a crust. It usually contains cheese, vegetables and meat, but is also simple enough to improvise and include only what you want. The base recipe I use is from Joy. I know I’ve posted a few recipes from the book so far, but there’s a reason it’s an American classic. I use Joy’s Pat-in-the-Pan Butter Dough for the crust and the Cheese Quiche recipe for the filling.

Gouda is my favorite cheese to use and I like to add red bell peppers, crispy prosciutto and chives to the filling. I’ve found that sauteing the vegetables and herbs ahead of time helps them cook better. If you choose to use spinach, make sure you cook it before throwing it in the filling. The general rule of thumb is not to leave the pieces of chopped vegetables too thick and not to overload the quiche — don’t use more than about 1 1/2 cups total of additions. If you use more, there may not be enough egg mixture to hold it together.

Once the quiche is done, you’ve got a meal that you can eat hot or cold at any time. It’s a good standby to have in the fridge, whether you’re expecting company or just know you won’t have time to cook during the next couple days.

Crust
1 1/2 cups all-purpose flour
1/2 teaspoon salt
1/2 cup (1 stick) butter, cut into eight pieces
2 to 3 tablespoons heavy cream
1 beaten egg yolk

Preheat oven to 425 degrees. Stir flour and salt together. With your hands or the back of a fork, mash butter in until mixture resembles coarse crumbs. Drizzle heavy cream over the top of the crust and mix in until the crumbs look damp and hold together. Pat dough into a pie dish or tart pan. Prick crust with a fork so it won’t bubble up while cooking. Bake crust for 18-22 minutes or until golden brown. While the crust is baking, prepare the filling.

After the crust comes out of the oven, turn the heat down to 375 degrees and brush the warm crust with the egg yolk.

Filling
1 1/2 cups shredded cheese (Gouda, cheddar, Monterey Jack and Swiss work well — you can use more than one kind if you’d like)
1 cup heavy cream
3 eggs
1/2 small onion, grated
1/8 teaspoon grated or ground nutmeg
1/2 teaspoon salt
1/4 teaspoon white or black pepper
(1 1/2 cups total of any chopped vegetables, meat or other additions)

Sprinkle the cheese onto the crust. Whisk the rest of the ingredients together in a medium bowl until no streaks of egg white remain. Pour the mixture evenly over the cheese in the pastry shell. Bake until the filling is puffed around the sides and a knife inserted in the center comes out clean, 30 to 40 minutes. Let stand 10 minutes before slicing.