A fall twist on French toast

pft

Pinterest is exploding with recipes for fall. Most of them involve pumpkin or apples or are for pie crust or soup. About a month ago, I pinned a recipe for Single-serving Pumpkin Pie French Toast, but I didn’t want to open a whole can of pumpkin for a couple tablespoons. Weeks later, I had leftover pumpkin that needed to be used, but I didn’t have enough to make another loaf of pumpkin bread. That’s when I remembered this recipe.

I’ve never made anything but traditional French toast, and this seemed simple enough. I used slices of challah, which wasn’t the best choice — it was too dry for this recipe. Choose a softer bread to absorb as much liquid as possible. The original recipe didn’t call for salt, but after digging in, I realized I should have added some. It needed it. If you don’t have pumpkin pie spice, you can add a dash each of allspice, cinnamon, ginger and nutmeg.

The nice thing about this recipe is that it makes a single serving. There are no leftovers to contend with, and it’s easy to make if you still have more of the ingredients on hand. If you want to make enough for more than one person, do the math.

Ingredients
1 egg
1/4 cup milk
1/4 teaspoon pumpkin pie spice
3 tablespoons canned pumpkin (not pumpkin pie filling)
1 teaspoon brown sugar
2 slices bread
A dash of salt
Butter
Syrup

In a medium-size bowl, whisk together egg, milk, pumpkin pie spice, pumpkin, brown sugar and salt until well mixed. Mixture will be thick.

Carefully dip bread, one slice at a time, into the mixture, turning to coat. Let each slice soak for 1-2 minutes. Be careful turning the bread, as it absorbs the liquid it will start to fall apart if handled roughly.

Heat a medium-size pan over medium-low heat. Melt 1 tablespoon of butter in the pan. Place bread in pan. Any leftover mixture can be poured over the bread.

Cook over medium-low heat until bottom side is a dark, golden brown. If cooked on high heat, it will cook improperly — the outside will burn and the inside will be squishy. Using a spatula, carefully flip bread over. Continue cooking until both sides are dark, golden brown and outside of toast is a bit crisp.

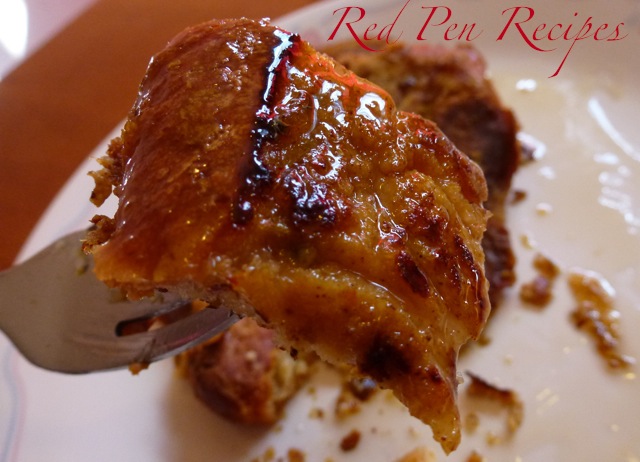
Serve hot with butter and syrup.

Pita made from scratch

Pita

Breads have always been difficult for me. I’ve had them turn out too dry, not fully cooked in the center or fail to rise in the dough stage on many occasions. I tend to avoid making them, usually because of the long process, but sometimes because I’ve felt discouraged.

A few weeks ago, while grocery shopping, I was in the bread aisle and about to buy some pita bread when I thought, “Maybe I should try to make it instead.” Today, I finally got around to that challenge.

I found this recipe through a Google search, and it seemed simple enough for a first-time pita baker.

My apartment tends to be cold, so, when I got to the three-hour rising stage, I covered the bowl in plastic wrap and set it in the sun. That did the trick.

The recipe says to divide the dough into 10-12 pieces. I did 12 and baked them in three batches of four to give them enough space on the baking pan. If I were to make these again, I would only do 10 pieces because the final rounds were smaller than I wanted them to be. If you’re planning to stuff these for a meal, you’ll want them to be bigger.

I live in the mountains, so there are altitude challenges as well. I follow each recipe the first time I make it in order to figure out what adjustments I’ll need to make in the future. In the case of this recipe, I noticed the first batch of pita was cooked a little harder than I wanted it to be, so I reduced the first cooking time (four minutes) to three minutes for the second batch. The second batch came out with more of a golden color. I was initially worried about how stiff the pita appeared when I took it out of the oven but, after I immediately put them in the bags, they steamed themselves to a softer consistency. I let them sit in the bags for about an hour before I dug in. The end result was still a little stiff around the edges, but I was able to open them and stuff them.

Not bad for my first attempt.

Ingredients
1 package of yeast, or quick-rising yeast
1/2 cup warm water
3 cups all-purpose flour
1 1/4 teaspoon salt
1 teaspoon granulated sugar
1 cup lukewarm water

Dissolve yeast in 1/2 cup of warm water. Add sugar and stir until dissolved. Let sit for 10-15 minutes until water is frothy.

Combine flour and salt in large bowl. Make a small depression in the middle of flour and pour yeast water in depression. Slowly add 1 cup of warm water and stir with wooden spoon or rubber spatula until elastic.

Place dough on floured surface and knead for 10-15 minutes. When the dough is no longer sticky and is smooth and elastic, it has been successfully kneaded. Coat large bowl with vegetable oil and place dough in bowl. Turn dough upside down so all of the dough is coated. Allow to sit in a warm place for about 3 hours, or until it has doubled in size.

Once doubled, roll out in a rope, and pinch off 10-12 small pieces. Place balls on floured surface. Let sit covered for 10 minutes. Preheat oven to 500 deg F. and make sure rack is at the very bottom of oven. Be sure to also preheat your baking sheet.

Roll out each ball of dough with a rolling pin into circles. Each should be about 5-6 inches across and 1/4-inch thick.

Bake each circle for 4 minutes until the bread puffs up. Turn over and bake for 2 minutes.

Remove each pita with a spatula from the baking sheet and add additional pitas for baking.

Take spatula and gently push down puff. Immediately place in storage bags.