Shortbread wreaths pleasing to the eye and the taste buds

shortbreadwreaths1

Bon Appetit had a gorgeous cover for their holiday edition. What at first appeared to be a wreath was actually a shortbread cookie beautifully decorated with freeze-dried flowers. The concept seemed pretty simple and, since I usually have shortbread on my platter, I thought it could be a more sophisticated offering for the adults in the group.

Staying with the mantra of always using what I have on hand, I used all regular flour instead of rice flour, as the original recipe called for. I also had no idea where to find freeze-dried flowers—I check the tea and produce aisles and came up short—so I made it easy and chopped up some dried cherries and apricots. Since I don’t like lavender, I used about a half teaspoon of rose water instead. It worked well.

I made one batch and used smaller cookie cutters, so it made nearly four dozen cookies, but they were the perfect size. I was pleasantly surprised at how gorgeous and tasty these ended up being, and my coworkers loved them, too. I can’t wait to see how they’re received on Christmas eve.

Glaze
3 large egg whites
4 cups powdered sugar
1/2 teaspoon cream of tartar

Using a wooden spoon or rubber spatula, stir egg whites, powdered sugar, and cream of tartar in a medium bowl until a thick paste forms with no dry spots. Ideally, glaze should sit at least 12 hours for sugar to fully hydrate, but it can be used as soon as cookies have cooled. Or, you can cover and chill up to 1 week. Bring to room temperature before using.

Shortbread
2 1/2 + 1/3 cups all-purpose flour, plus more
1 1/2 teaspoon kosher salt
1 cup (2 sticks) plus 6 tablespoons unsalted butter, cut into pieces, room temperature
3/4 cup granulated sugar
1/2 teaspoon rose water
Freeze-dried and/or dried fruits, dried edible flowers, fresh and/or dried herbs (for decorating)
*Raw egg is not recommended for the elderly, pregnant women, children under 4, and people with weakened immune systems.

Whisk flour and salt together in a medium bowl. Using an electric mixer on medium-high, beat butter, sugar, and rose water in a medium bowl until very pale and fluffy, about 5 minutes. Mix in dry ingredients on low until fully combined. Wrap in plastic and chill at least 2 hours and up to 2 days.

Preheat oven to 350 degrees F. Roll out dough between 2 sheets of lightly floured parchment to 1/8-inch thick. Using large cutter, cut out 16 rounds, rerolling scraps. Using small cutter, punch out centers. Bake on parchment-lined baking sheets until edges are golden, 12–14 minutes. Let cool on a wire rack.

Working quickly, dip tops of cookies into glaze, letting excess drip off. Transfer to wire rack and decorate.

Whiskey cake a divine treat for a dinner party

whiskeycake092114

My friend threw a Prohibition-themed dinner party on Friday. I figured it would be too obvious to bring a bottle of booze, so I started looking for recipes that included alcohol. Since baking is my thing and the main course was pretty much decided, I decided to look in the dessert section of Bon Appetit, which is where I found this whiskey cake. Whiskey is my preferred spirit and thus one of few I always have on hand, so I decided this cake was the winner.

When I looked at the list of ingredients, I saw that it contained some key ingredients — espresso and vanilla — which are known for enhancing the flavor of chocolate in baked goods. The low amount of flour it called for also meant it would be a very rich, dense cake. The finished product was only about an inch thick, but the intense flavor more than compensated for the lack of volume.

Though the original recipe called for an 8-inch springform pan, mine is 9 inches so I had to make do. It only took 30 minutes for mine to bake completely. I followed the cooling instructions and frosted it the next day. While sometimes you can put the frosting on while the cake is still slightly warm, this is not one of these cases. This frosting isn’t like your traditional buttercream. No powdered sugar is involved, so it has less to keep it sturdy.

In the end, this small-but-mighty cake was a nice treat, and a sweet ending to a fun dinner.

Ingredients
1/2 cup plus Irish whiskey
6 ounces bittersweet (70 percent cocoa) chocolate (such as Scharffen Berger or Lindt), chopped
2 teaspoons instant espresso powder dissolved in 6 tablespoons hot water
1/3 cup blanched almonds (about 2 ounces), lightly toasted
6 tablespoons all purpose flour, divided
1/2 cup unsalted butter, room temperature
7 tablespoons sugar, divided
1/2 vanilla bean, or 2 teaspoons vanilla extract
3 large eggs, separated
Pinch of fine sea salt

Position rack in center of oven and preheat to 350°F. Butter and flour 8-inch-diameter springform pan.

Dissolve espresso powder in water. Set aside.

Boil 1/2 cup whiskey in small saucepan until reduced to 1/4 cup, about 2 minutes. Combine bittersweet chocolate, espresso powder mixture, and 1/4 cup boiled whiskey in small metal bowl. Place bowl over saucepan of simmering water; stir until mixture is smooth. Remove bowl from over water. Finely grind almonds with 2 tablespoons flour in processor.

Using electric mixer, beat 1/2 cup butter and 6 tablespoons vanilla sugar in medium bowl until fluffy. Beat in egg yolks 1 at a time, then sea salt. Fold in chocolate mixture, then ground almond mixture. Using clean dry beaters, beat egg whites in another bowl until soft peaks form. Gradually add 1 tablespoon vanilla sugar, beating until stiff peaks form. Fold whites into batter alternately with remaining 4 tablespoons flour in 3 additions. Transfer batter to prepared pan.

Bake cake until tester inserted into center comes out clean, about 40 minutes. Cool in pan on rack 30 minutes. Remove pan sides and cool cake completely.

Frosting
2 ounces semisweet chocolate, chopped
2 tablespoons whiskey
1/4 cup butter, room temperature

Combine semisweet chocolate and remaining whiskey in small metal bowl. Place bowl over saucepan of simmering water and stir until smooth. Remove bowl from over water. Add butter to chocolate mixture, 1 small piece at a time, whisking until each piece is melted before adding next. Place bowl over larger bowl of ice water. Using electric mixer, beat icing until thickened to spreadable consistency, about 1 minute. Spread icing over top and sides of cake. This can be made 8 hours ahead. Cover with cake dome and let stand at room temperature.

Beautiful black rice salad is all about texture

1Blackricedish010514

I was originally going to post a soup recipe as my first entry of 2014, but something better came along. I tried a new recipe Wednesday and am still enjoying the leftovers.

I don’t often stray from more typical grains such as white or brown rice and cous cous, but when a friend moved away last year, she left behind a bag of black rice which I knew I needed to figure out how to use.

That bag of rice sat in my cupboard for about six months, up until this month’s edition of Bon Appétit arrived. In this month’s issue, some of the magazine’s staff provided recipes for dishes they cook at home. Among them was this recipe for Black and Wild Rice Salad with Roasted Squash. The accompanying photo was stunning and it included butternut squash, which I love, but most importantly it used black rice.

I wasn’t sure how much I would like this, but I really enjoyed it. The sweetness of the squash and the tartness of the red wine vinegar added delicious layers of flavor. It was even better the next day and, while it can be eaten cold, I prefer it hot.

I omitted the pomegranate seeds in the recipe because the seeds drive me crazy, though I imagine the flavor of the arils would have complemented the rest of the flavors in the dish. I also substituted sliced almonds for the pistachios, since I didn’t have pistachios; and I used curly parsley and carrot greens instead of the microgreens. The curly parsley was a bit harsh, but the carrot greens worked well.

One of my favorite things about it was the texture. The sticky rice and soft squash are balanced by crunchy nuts and rough greens. This must be the amuse-gueule, or “amusement for the mouth,” that celebrity chef Robert Irvine talked about when I interviewed him last year.

It’s not often that you find such an abundance of color, texture and flavor in one meal, but you definitely do in this rice salad. Try it. You won’t be disappointed.

Ingredients
1 1/2 cups black rice
1/2 cup wild rice
Kosher salt
1/2 medium butternut squash, peeled, seeds removed, cut into pieces
1/2 cup olive oil, divided
Freshly ground black pepper
1/4 cup red wine vinegar
2 teaspoons honey
2 scallions, thinly sliced
1 cup pomegranate seeds
1 cup microgreens or sprouts
1/2 cup roasted pistachios, chopped

Preheat oven to 450 degrees F. Cook black rice and wild rice in a large pot of boiling salted water until tender, 35-40 minutes; drain and rinse, shaking off as much water as possible. Spread out on a rimmed baking sheet and let cool.

Meanwhile, toss squash with 1/4 cup oil on another baking sheet; season with salt and pepper. Roast, tossing once, until golden brown and tender, 20-25 minutes; let cool.

Whisk vinegar, honey, and remaining 1/4 cup oil in a large bowl. Add black rice and wild rice, squash, scallions, pomegranate seeds, microgreens, and pistachios; season with salt and pepper and toss to combine.

Cocoa cookies are as cute as can be

cocoacookies copy

My 2013 cookie countdown to Christmas begins with this post. I know Thanksgiving hasn’t passed yet, but I’m already testing new recipes. I put my little Christmas tree up yesterday while listening to Christmas music, so the holidays are in full force at my place. I’m excited to share some new favorites with you.

My favorite new decorated cookie from last year was Food Network Magazine’s hot cocoa cookie recipe. I saw the recipe in the December 2012 edition as I was perusing for new recipes. The cookie is a chocolate cutout cookie topped with marshmallow cream. The recipe in the magazine called for making a sandwich cookie loaded with the cream, but it only makes 15 sandwich cookies — not enough for my large family. I decided to do a single cookie topped with the cream.

Though the recipe called for store-bought marshmallow cream, I pride myself on making things from scratch. This was no exception. While I know how to make marshmallows, I didn’t know how to make marshmallow creme. I turned to this recipe from Bon Appétit for help.

The chocolate cookie isn’t too rich, and the marshmallow cream was a really nice change from traditional icing or buttercream frosting, which is what I use on my sugar cookies. Plus, it gave me a chance to decorate in a different way. I love how they turned out. They just put a smile on my face.Christmaskitchen

Cookies
2 1/4 cups cake flour, plus more for dusting
1/4 cup unsweetened Dutch-process cocoa powder
1 teaspoon baking soda
1/4 teaspoon salt
2 sticks unsalted butter, at room temperature
3/4 cup sugar
1 large egg
1 teaspoon vanilla extract

Sift the flour, cocoa powder, baking soda and salt into a medium bowl.

Beat the butter and sugar in a large bowl with a mixer on medium-high speed until light and fluffy, 3 to 5 minutes. Add the egg and vanilla and beat until incorporated. Reduce the mixer speed to low; add the flour mixture in 2 batches and beat until just incorporated. Divide the dough in half, wrap in plastic wrap and refrigerate until firm, at least 1 hour and up to 1 day.

Line 2 baking sheets with parchment paper. Working with 1 piece of dough at a time, dust the dough generously with flour and roll out between 2 pieces of parchment paper until about 1/8-inch thick. Cut out shapes using 2- to 4-inch cookie cutters and transfer to the prepared baking sheets. Gather the scraps and refrigerate until firm; reroll once to cut out more cookies. Refrigerate the cutouts until firm, about 30 minutes.

Position racks in the upper and lower thirds of the oven and preheat to 350 degrees F. Bake the cookies, switching the position of the pans halfway through, until slightly puffed and darker around the edges, 12 to 15 minutes. Let cool 5 minutes on the baking sheets, then transfer to racks to cool completely. Sandwich the cookies with the marshmallow cream.

Marshmallow creme
1 cup sugar, divided
4 egg whites
Pinch of kosher salt
1 teaspoon vanilla extract

Combine 3/4 cup sugar and 1/4 cup water in a small saucepan over medium-high heat. Attach a candy thermometer to the side of the pan and simmer syrup without stirring until the thermometer reads 240 degrees F, occasionally swirling pan and brushing down sides of pan with a wet pastry brush.

Meanwhile, place egg whites, salt, and vanilla in the bowl of a stand mixer fitted with a whip attachment. Whip on high until frothy. Slowly add remaining 1/4 cup sugar. Whip until soft peaks form. Continue whipping until medium peaks form. Reduce speed to medium, then pour hot syrup into meringue in a slow, steady stream while whipping. Increase speed to high and continue whipping until stiff peaks form. Reduce speed to medium and whip until meringue is cool.

Having fun with a less common fall flavor

almondpeartart092913

Fall is here, and that means it’s time for baking comfort foods with apples and pumpkin. Last weekend, I went wine tasting in the Apple Hill area and stopped at a farm stand on my way home. The best deal at the farm stand was a box of about eight pears for $2. I bought two boxes because I knew I’d want to bake with them.

But, before I proceed, I want to let you know that Red Pen Recipes now has a Facebook page. Like it here.

Screen shot 2013-09-25 at 8.14.25 PMI also recently purchased a ticket to see Curtis Stone in Reno. Those of you who read regularly know that I love his style of cooking. According to his response to the question I posed to him on Facebook, we’ll be having cocktails, stir-frys and chocolate. The countdown to Oct. 12 has begun.

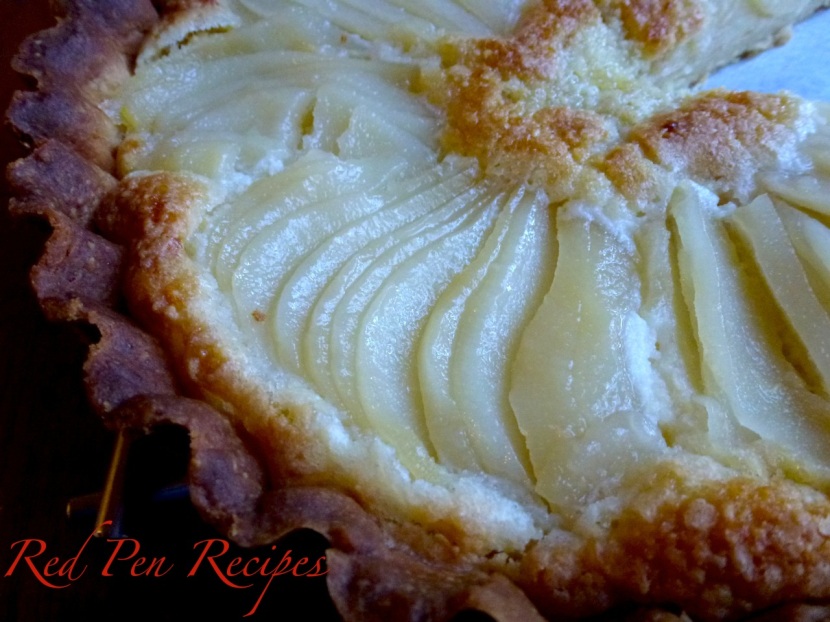
So, back to the pears. When I got home, I started looking for recipes and found this Pear and Almond Tart recipe from Bon Appétit. I had all of the ingredients, and it sounded like the perfect way to use a few of those pears.

This recipe has three major components, all of which can be done separately and saved until you’re ready to assemble the whole thing. If you don’t want to spend hours at a time in the kitchen, do one piece at a time.

I know my crust looks burned in the photo, but it didn’t taste like it at all. I was pleasantly surprised.

The recipe didn’t say to save the liquid from poaching the pears, but I knew from experience that I could boil it into a syrup. A beautiful simple syrup is a terrible thing to waste so I decided to use it to make ice cream.

For the ice cream, I used this recipe. If you plan on using the syrup for ice cream, you have to do things just a bit differently. I’d recommend adding a fourth pear to the poaching process. Set it aside and, when you’re ready to make the ice cream, core it, then dice it and add it to the ice cream when it’s in the ice cream mixer. After the pears have cooled in the liquid, remove them. Then bring the liquid back to a boil and keep it on the heat until there’s about 3/4 cup of thick syrup. Take it off the heat and set it aside. Use it in place of the 1/2 cup sugar in the recipe by using 1/2 in the milk mixture and adding the remaining 1/4 cup to the egg yolks. I know it seems like a lot, but trust me. It works. The bits of pear in the ice cream provided a nice contrast to the texture, too.

If you’re not into that, bottle the syrup and use it on pancakes or find another way to use it. But I encourage you not to waste it, because it’s too delicious to throw away.

Pears
4 cups water
1 1/4 cups sugar
1 1/2 tablespoons fresh lemon juice
3 medium-size firm but ripe pears (Bosc or Bartlett), peeled (each about 7 ounces)

Bring 4 cups water, sugar, and lemon juice to boil in large saucepan over medium-high heat, stirring until sugar dissolves. Add pears. Reduce heat to medium and simmer until pears are very tender, turning occasionally, about 20 minutes. Cool pears in syrup. Can be made two days ahead. Cover and refrigerate.

Crust
1/2 cup powdered sugar
1/4 cup almonds
1/4 teaspoon salt
9 tablespoons (1 stick plus 1 tablespoon) unsalted butter, room temperature
1 large egg yolk
1 1/4 cups all purpose flour

Blend powdered sugar, almonds, and salt in processor until nuts are finely ground. Add butter and blend until smooth, scraping down sides of bowl occasionally. Mix in egg yolk. Add flour. Using on/off turns, blend until dough comes together in clumps. Gather dough into ball; flatten into disk. Wrap in plastic and chill at least 3 hours. Can be made two days ahead. Keep refrigerated.

Almond filling
2/3 cup blanched slivered almonds
1 tablespoon all-purpose flour
7 tablespoons sugar
6 tablespoons (3/4 stick) unsalted butter, room temperature
1 large egg
Powdered sugar (optional)

Finely grind almonds and flour in processor. Mix in 7 tablespoons sugar, then butter, blending until smooth. Mix in egg. Transfer filling to medium bowl. Cover and chill at least 3 hours. Can be made two days ahead. Keep chilled.

Once you’re ready to assemble all three components, position rack in center of oven and preheat to 375 degrees F. Roll out chilled dough on floured sheet of parchment paper to 12-inch round, lifting and turning dough occasionally to free from paper. Using paper as aid, turn dough into 9-inch-diameter tart pan with removable bottom; peel off paper. Seal any cracks in dough. Trim overhang to 1/2 inch. Fold overhang in, making double-thick sides. Pierce crust all over with fork. Freeze crust 10 minutes.

Line crust with buttered foil, buttered side down, then fill with dried beans or pie weights. Bake crust until sides are set, about 20 minutes. Remove foil and beans. Bake crust until sides are golden and bottom is set, pressing with back of fork if crust bubbles, about 10 minutes longer. Cool crust in pan on rack. Reduce oven temperature to 350 degrees F.

Spread almond filling evenly in crust. Stem pears and cut each in half lengthwise; scoop out cores. Cut each half crosswise into thin slices. Gently press each pear half to fan slices but keep slices tightly overlapped. Slide spatula under pears and arrange atop filling like spokes of wheel with narrow ends in center.

Bake tart until golden and tester inserted into center of filling comes out clean, about 55 minutes. Cool tart in pan on rack. Push pan bottom up, releasing tart from pan. Let stand at room temperature. Cut tart into wedges; sprinkle with powdered sugar, if desired, and serve.